


3 In 1 Professional Handheld Anti-Aging Facial Lift Tightening Eye Face Chest RF Skin Firming Machine Body Rejuvenation Device
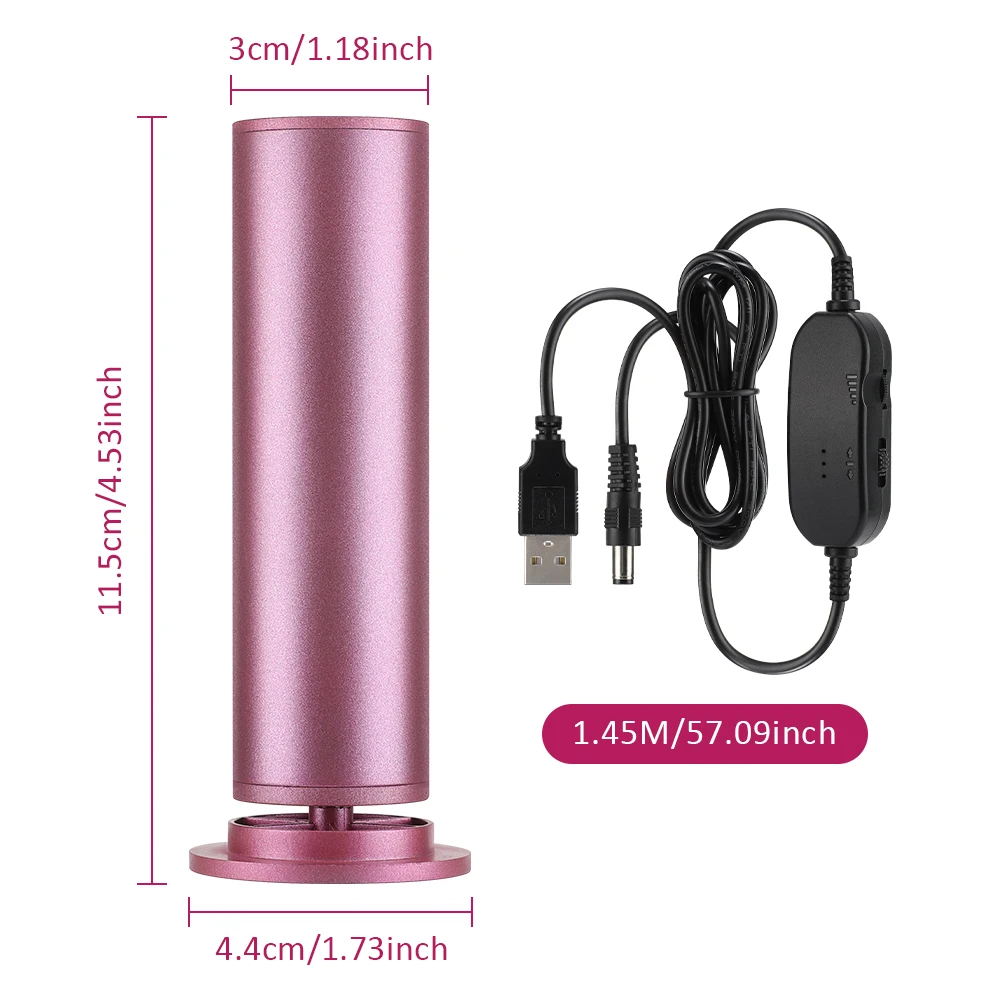
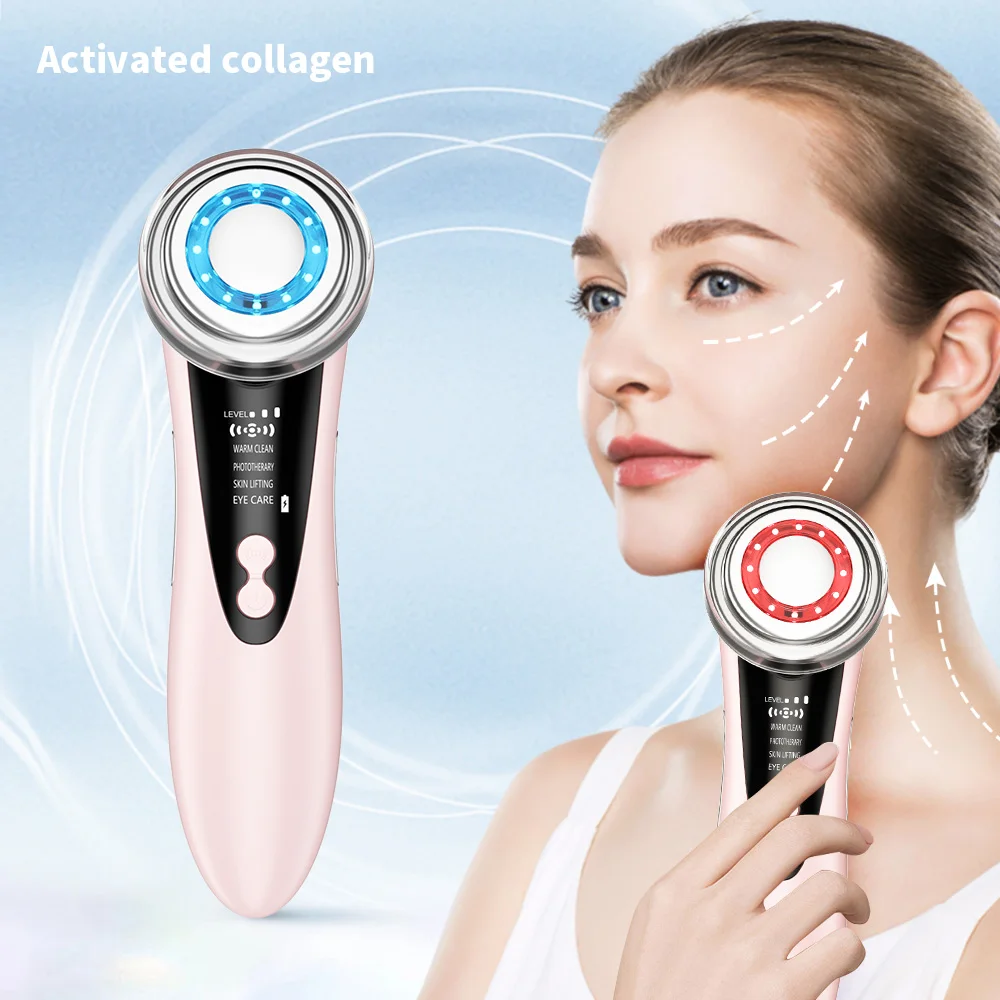
<div class="detailmodule_html"><div class="detail-desc-decorate-richtext"><div><br/></div><p style="text-align:left" align="left"></p><p style="text-align:center" align="center"><span style="font-size:20px;font-family:arial, helvetica, sans-serif"><strong>3 In 1 Eye Face Chest RF Skin Firming Machine Professional Handheld Anti-Aging Facial Lift Tightening Body Rejuvenation Device</strong></span></p><p style="text-align:left" align="left"><span style="font-size:20px;font-family:arial, helvetica, sans-serif"><strong>Specifications:</strong></span></p><p class="MsoNormal"><span style="background-color:rgb(241, 242, 244);color:rgb(43, 50, 59);font-size:20px;font-family:arial, helvetica, sans-serif"><span style="font-size:20px;font-family:arial, helvetica, sans-serif">Product Name:Handheld Lifting Beauty Device</span></span></p><p style="text-align:justify" class="MsoNormal" align="justify"><span style="font-size:20px;font-family:arial, helvetica, sans-serif">Power Input Voltage:100-240V</span></p><p style="text-align:justify" class="MsoNormal" align="justify"><span style="font-size:20px;font-family:arial, helvetica, sans-serif">Product model:H-020</span></p><p style="text-align:justify" class="MsoNormal" align="justify"><span style="font-size:20px;font-family:arial, helvetica, sans-serif">Instrument Size:5.5 * 4.5 * 23cm</span></p><p style="text-align:justify" class="MsoNormal" align="justify"><span style="font-size:20px;font-family:arial, helvetica, sans-serif">Current:3A</span></p><p style="text-align:justify" class="MsoNormal" align="justify"><span style="font-size:20px;font-family:arial, helvetica, sans-serif">Frequency:3MHZ</span></p><p style="text-align:justify" class="MsoNormal" align="justify"><span style="font-size:20px;font-family:arial, helvetica, sans-serif">Power:72W</span></p><p style="text-align:justify" class="MsoNormal" align="justify"><span style="font-size:20px;font-family:arial, helvetica, sans-serif">Instrument Operating Voltage:24V</span></p><p style="text-align:justify" class="MsoNormal" align="justify"><span style="font-size:20px;font-family:arial, helvetica, sans-serif">Number of Operation Heads:3</span></p><p style="text-align:justify" class="MsoNormal" align="justify"><span style="font-size:20px;font-family:arial, helvetica, sans-serif">Package size:31*27*8cm</span></p><p style="text-align:justify" class="MsoNormal" align="justify"><span style="font-size:20px;font-family:arial, helvetica, sans-serif"><strong>Operating area:</strong></span></p><p style="text-align:justify" class="MsoNormal" align="justify"><span style="font-size:20px;font-family:arial, helvetica, sans-serif">Neck:Neck operation ( use the facial head recommended ) : Start from above the clavicle and lift the probe upwards along the neck to the position of the mandible ( perform 3-4repetitions for each movement ) , then move from the chin position to the lymph node position behind the ear ( perform3-4 repetitions ) . Set it according to individual conditions Remember not to apply the probe to the thyroid cartilage.</span></p><p style="text-align:justify" class="MsoNormal" align="justify"><span style="font-size:20px;font-family:arial, helvetica, sans-serif">Face:Facial operation ( use the facial head recommended ) : After the probe sucks on the skin , slowly lift it from the mandible to the position of the cheekbone ( lift 3-6 times ) , then move from the nose along the lower edge of the cheekbone to the temple , and then from the temple to the lymph node behind the ear . Set it according to individual conditions.</span></p><p style="text-align:justify" class="MsoNormal" align="justify"><span style="font-size:20px;font-family:arial, helvetica, sans-serif">Eyes:Eye operation ( use the eye head recommended ) : Lift the probe slowly from the inner corner of the eye to the temple , then lift it from the outer corner of the eye to the hairline ( operate for about 5 minutes for each eye ) . The energy should be adjusted to a comfortable warm feeling and should not be applied to the upper eyelid.</span></p><p style="text-align:justify" class="MsoNormal" align="justify"><span style="font-size:20px;font-family:arial, helvetica, sans-serif">Forehead:Forehead operation ( use the facial head recommended )Lift the probe slowly from the center of the eyebrow to thehairline , from the middle of the eyebrow to the hairline , andfrom the end of the eyebrow to the hairline , and repeat eachmovement 3-5 times . Horizontal operation , move from thecenter of the forehead to the temple , and from the middle ofthe forehead to the temple.</span></p><p style="text-align:justify" class="MsoNormal" align="justify"><span style="font-size:20px;font-family:arial, helvetica, sans-serif">Chest:Operate from the outside of the chest to the middle , keep the probe closeto the skin , avoid the nipple and areola , pull and slide from around the chestto the middle , and avoid the position between the two breasts close to theheart . The probe around the chest is close to the skin and slides clockwiseor counterclockwise along the outer circle of the chest , and the lower edgeof the chest slides from bottom to top .</span></p><p style="text-align:justify" class="MsoNormal" align="justify"><span style="font-size:20px;font-family:arial, helvetica, sans-serif"><strong>Operation steps:</strong></span></p><p style="text-align:justify" class="MsoNormal" align="justify"><span style="font-size:20px;font-family:arial, helvetica, sans-serif">Step1:First , clean the operation area</span></p><p style="text-align:justify" class="MsoNormal" align="justify"><span style="font-size:20px;font-family:arial, helvetica, sans-serif">Step 2 : Connect the power cord to the power supply . After connecting , insert the powersupply into the power port at the end of the instrument. After connecting the power </span></p><p style="text-align:justify" class="MsoNormal" align="justify"><span style="font-size:20px;font-family:arial, helvetica, sans-serif">a: Power on: Press and hold the circular button on the instrument for five seconds , and the instrument will turn on with the screen lighting up </span></p><p style="text-align:justify" class="MsoNormal" align="justify"><span style="font-size:20px;font-family:arial, helvetica, sans-serif">b: Start/Pause: The circular button is also the start and pause button (. In the power-on state, press the button gently to start the instrument Press the button gently again during the instruments working state to pause the instrument </span></p><p style="text-align:justify" class="MsoNormal" align="justify"><span style="font-size:20px;font-family:arial, helvetica, sans-serif">c : Adjust the mode : The button with an arrow on the instrument is the mode adjustment button ( ' In the power-on state , press the button gently to change the mode from 1 to 9in a loop . Choose the appropriate mode according to your needs</span></p><p style="text-align:justify" class="MsoNormal" align="justify"><span style="font-size:20px;font-family:arial, helvetica, sans-serif">d : Power off : If you need to power off , press and hold the arrow button for five seconds and the instrument will turn off with the screen light going off</span></p><p style="text-align:justify" class="MsoNormal" align="justify"><span style="font-size:20px;font-family:arial, helvetica, sans-serif">Step3:Detailed Operation InstructionsApply a specialized medium ( such as gel , serum , solution , cream , etc . to the area to betreated Spread the medium evenly until no white residue is visible . During the procedure , ifthe medium is fully absorbed , immediately replenish it . Customers should adjust theintensity of the radio frequency energy slowly based on their feelings during the procedure generally starting from low to high and increasing to the most comfortable energy intensity( Do not start with the highest energy level , as excessive heat can damage the skin . ) The instrument head is made of metal . so it takes several seconds to a minute for the metal head to guide the skin to feel the heat when it is first started</span></p><p style="text-align:justify" class="MsoNormal" align="justify"><span style="font-size:20px;font-family:arial, helvetica, sans-serif">Step 4 : After the operation is completed , clean the medium on the operation area andapply a pure moisturizing mask or eye mask for 15 minutes</span></p><p style="text-align:justify" class="MsoNormal" align="justify"><span style="font-size:20px;font-family:arial, helvetica, sans-serif">Step 5 : Use an alcohol swab ( when there is no dripping water ) to wipe and disinfect theprobe to prevent residual medium from remaining on the probe , and prolong the service lifeof the machine</span></p><p style="text-align:justify" class="MsoNormal" align="justify"><span style="color:rgb(244, 78, 59);font-size:20px;font-family:arial, helvetica, sans-serif"><strong>Tips</strong></span><span style="color:rgb(244, 78, 59);font-size:20px;font-family:arial, helvetica, sans-serif">:For sensitive skin , it is recommended to operate once every 7-10 days ( duringthe operation , use mode 1 comprehensively and avoid using high energy intensity ) . For normalskin,it can be operated once every 3-5 days</span></p><p style="text-align:justify" class="MsoNormal" align="justify"><span style="font-size:20px;font-family:arial, helvetica, sans-serif"><strong>PACKING LIST:</strong></span></p><p style="text-align:justify" class="MsoNormal" align="justify"><span style="font-size:20px;font-family:arial, helvetica, sans-serif">ITEM QUANTITY</span></p><p style="text-align:justify" class="MsoNormal" align="justify"><span style="font-size:20px;font-family:arial, helvetica, sans-serif">Mainframe*1</span></p><p style="text-align:justify" class="MsoNormal" align="justify"><span style="font-size:20px;font-family:arial, helvetica, sans-serif">Power cord*1</span></p><p style="text-align:justify" class="MsoNormal" align="justify"><span style="font-size:20px;font-family:arial, helvetica, sans-serif">Power supply*1</span></p><p style="text-align:justify" class="MsoNormal" align="justify"><span style="font-size:20px;font-family:arial, helvetica, sans-serif">Certificate of conformity*1</span></p><p style="text-align:justify" class="MsoNormal" align="justify"><span style="font-size:20px;font-family:arial, helvetica, sans-serif">User manual*1</span></p><p style="text-align:justify" class="MsoNormal" align="justify"><span style="font-size:20px;font-family:arial, helvetica, sans-serif">Operation head*3</span></p><p style="text-align:justify" class="MsoNormal" align="justify"><span style="font-size:20px;font-family:arial, helvetica, sans-serif">Inspection report*1</span></p><p style="text-align:justify" class="MsoNormal" align="justify"><span style="font-size:20px;font-family:arial, helvetica, sans-serif"><strong>Note:</strong></span><span style="font-size:20px;font-family:arial, helvetica, sans-serif">After the operation , the face will experience varying degrees of detoxification symptoms such as acne , red bumps , sand-like particles , redness , itching , etc . These phenomena are normal Normal skin generally repairs itself within 1-3 days , while individual special cases may take longer . If these symptoms occur , it is recommended to apply moisturizing mask continuously for one week . If acne or small red bumps occur , vitamin B6 ointment can be applied three to five times a day . The machine can quickly promote skin blood circulation and accelerate the elimination of toxins from the skins bottom layer . If the skin has a lot of hidden toxins , it may cause acne or small red bumps.</span></p><p style="text-align:justify" class="MsoNormal" align="justify"><span style="font-size:20px;font-family:arial, helvetica, sans-serif">If the skin lacks massage care , is dehydrated , or sensitive , it may cause redness , sand-likeparticles , and itching.</span></p><p style="text-align:justify" class="MsoNormal" align="justify"><span style="font-size:20px;font-family:arial, helvetica, sans-serif">Everyone's skin tolerance is different . Therefore , during the operation , the energy intensityused by each customer must be adjusted flexibly according to their actual skin sensitivity.</span></p><p style="text-align:justify" class="MsoNormal" align="justify"><span style="font-size:20px;font-family:arial, helvetica, sans-serif"><strong>Instrument Maintenance:</strong></span></p><p style="text-align:justify" class="MsoNormal" align="justify"><span style="font-size:20px;font-family:arial, helvetica, sans-serif">1.after each use clean the equipment with water and store it properly.</span></p><p style="text-align:justify" class="MsoNormal" align="justify"><span style="font-size:20px;font-family:arial, helvetica, sans-serif">2.use a plug with a ground pin before using the equipment and ensure that theequipment’s power socket is properly grounded. </span></p><p style="text-align:justify" class="MsoNormal" align="justify"><span style="font-size:20px;font-family:arial, helvetica, sans-serif">3.ensure that the equipment voltage is compatible . if the local power supply voltageunstable , we recommend that users increase the power-matching stable powersupply. </span></p><p style="text-align:justify" class="MsoNormal" align="justify"><span style="font-size:20px;font-family:arial, helvetica, sans-serif">4.To ensure the effectiveness of the equipment's treatment and its normal service life , please use the designated parts provided or recommended by the manufacturer.</span></p><p style="text-align:justify" class="MsoNormal" align="justify"><span style="font-size:20px;font-family:arial, helvetica, sans-serif">5.Do not place the equipment in damp areas or near water sources , and do not expose the equipment directly to sunlight.</span></p><p style="text-align:justify" class="MsoNormal" align="justify"><span style="font-size:20px;font-family:arial, helvetica, sans-serif">6.Do not place the equipment near a strong heat source , as this may affect itslifespan and normal use.</span></p><p style="text-align:justify" class="MsoNormal" align="justify"><span style="font-size:20px;font-family:arial, helvetica, sans-serif">7.During the winter or in dry weather , use a current circuit arm sleeve . To avoid poorcontact , make sure that the area of skin contact is slightly moistened . You canachieve this effect by using a water-based product or wiping it with water .</span></p><p style="text-align:justify" class="MsoNormal" align="justify"><span style="font-size:20px;font-family:arial, helvetica, sans-serif">8.Do not allow water , oil , or other mediums to penetrate into the interior of theequipment , and do not knock , hit or drop the equipment to avoid damage.</span></p><p style="text-align:justify" class="MsoNormal" align="justify"><span style="font-size:20px;font-family:arial, helvetica, sans-serif">9.After use , please clean the probe promptly and disconnect the power.</span></p><p style="text-align:justify" class="MsoNormal" align="justify"><span style="font-size:20px;font-family:arial, helvetica, sans-serif">10.The warranty period is one year . Within the warranty period , the machine isresponsible for free maintenance and parts replacement under normal use.</span></p><p style="text-align:justify" class="MsoNormal" align="justify"><span style="font-size:20px;font-family:arial, helvetica, sans-serif">11.We provide lifelong maintenance and technical support.</span></p><p style="text-align:justify" class="MsoNormal" align="justify"><span style="font-size:20px;font-family:arial, helvetica, sans-serif">12.Wipe the instrument body with alcohol.</span></p><p style="text-align:justify" class="MsoNormal" align="justify"></p></div></div><p><br/></p>
$323.225
$162.605
- Category : Beauty & Health
- Brand : haoyue_technology_store HAOYUE TECHNOLOGY Store
Colors
Sizes
-
+
<div class="detailmodule_html"><div class="detail-desc-decorate-richtext"><div><br/></div><p style="text-align:left" align="left"></p><p style="text-align:center" align="center"><span style="font-size:20px;font-family:arial, helvetica, sans-serif"><strong>3 In 1 Eye Face Chest RF Skin Firming Machine Professional Handheld Anti-Aging Facial Lift Tightening Body Rejuvenation Device</strong></span></p><p style="text-align:left" align="left"><span style="font-size:20px;font-family:arial, helvetica, sans-serif"><strong>Specifications:</strong></span></p><p class="MsoNormal"><span style="background-color:rgb(241, 242, 244);color:rgb(43, 50, 59);font-size:20px;font-family:arial, helvetica, sans-serif"><span style="font-size:20px;font-family:arial, helvetica, sans-serif">Product Name:Handheld Lifting Beauty Device</span></span></p><p style="text-align:justify" class="MsoNormal" align="justify"><span style="font-size:20px;font-family:arial, helvetica, sans-serif">Power Input Voltage:100-240V</span></p><p style="text-align:justify" class="MsoNormal" align="justify"><span style="font-size:20px;font-family:arial, helvetica, sans-serif">Product model:H-020</span></p><p style="text-align:justify" class="MsoNormal" align="justify"><span style="font-size:20px;font-family:arial, helvetica, sans-serif">Instrument Size:5.5 * 4.5 * 23cm</span></p><p style="text-align:justify" class="MsoNormal" align="justify"><span style="font-size:20px;font-family:arial, helvetica, sans-serif">Current:3A</span></p><p style="text-align:justify" class="MsoNormal" align="justify"><span style="font-size:20px;font-family:arial, helvetica, sans-serif">Frequency:3MHZ</span></p><p style="text-align:justify" class="MsoNormal" align="justify"><span style="font-size:20px;font-family:arial, helvetica, sans-serif">Power:72W</span></p><p style="text-align:justify" class="MsoNormal" align="justify"><span style="font-size:20px;font-family:arial, helvetica, sans-serif">Instrument Operating Voltage:24V</span></p><p style="text-align:justify" class="MsoNormal" align="justify"><span style="font-size:20px;font-family:arial, helvetica, sans-serif">Number of Operation Heads:3</span></p><p style="text-align:justify" class="MsoNormal" align="justify"><span style="font-size:20px;font-family:arial, helvetica, sans-serif">Package size:31*27*8cm</span></p><p style="text-align:justify" class="MsoNormal" align="justify"><span style="font-size:20px;font-family:arial, helvetica, sans-serif"><strong>Operating area:</strong></span></p><p style="text-align:justify" class="MsoNormal" align="justify"><span style="font-size:20px;font-family:arial, helvetica, sans-serif">Neck:Neck operation ( use the facial head recommended ) : Start from above the clavicle and lift the probe upwards along the neck to the position of the mandible ( perform 3-4repetitions for each movement ) , then move from the chin position to the lymph node position behind the ear ( perform3-4 repetitions ) . Set it according to individual conditions Remember not to apply the probe to the thyroid cartilage.</span></p><p style="text-align:justify" class="MsoNormal" align="justify"><span style="font-size:20px;font-family:arial, helvetica, sans-serif">Face:Facial operation ( use the facial head recommended ) : After the probe sucks on the skin , slowly lift it from the mandible to the position of the cheekbone ( lift 3-6 times ) , then move from the nose along the lower edge of the cheekbone to the temple , and then from the temple to the lymph node behind the ear . Set it according to individual conditions.</span></p><p style="text-align:justify" class="MsoNormal" align="justify"><span style="font-size:20px;font-family:arial, helvetica, sans-serif">Eyes:Eye operation ( use the eye head recommended ) : Lift the probe slowly from the inner corner of the eye to the temple , then lift it from the outer corner of the eye to the hairline ( operate for about 5 minutes for each eye ) . The energy should be adjusted to a comfortable warm feeling and should not be applied to the upper eyelid.</span></p><p style="text-align:justify" class="MsoNormal" align="justify"><span style="font-size:20px;font-family:arial, helvetica, sans-serif">Forehead:Forehead operation ( use the facial head recommended )Lift the probe slowly from the center of the eyebrow to thehairline , from the middle of the eyebrow to the hairline , andfrom the end of the eyebrow to the hairline , and repeat eachmovement 3-5 times . Horizontal operation , move from thecenter of the forehead to the temple , and from the middle ofthe forehead to the temple.</span></p><p style="text-align:justify" class="MsoNormal" align="justify"><span style="font-size:20px;font-family:arial, helvetica, sans-serif">Chest:Operate from the outside of the chest to the middle , keep the probe closeto the skin , avoid the nipple and areola , pull and slide from around the chestto the middle , and avoid the position between the two breasts close to theheart . The probe around the chest is close to the skin and slides clockwiseor counterclockwise along the outer circle of the chest , and the lower edgeof the chest slides from bottom to top .</span></p><p style="text-align:justify" class="MsoNormal" align="justify"><span style="font-size:20px;font-family:arial, helvetica, sans-serif"><strong>Operation steps:</strong></span></p><p style="text-align:justify" class="MsoNormal" align="justify"><span style="font-size:20px;font-family:arial, helvetica, sans-serif">Step1:First , clean the operation area</span></p><p style="text-align:justify" class="MsoNormal" align="justify"><span style="font-size:20px;font-family:arial, helvetica, sans-serif">Step 2 : Connect the power cord to the power supply . After connecting , insert the powersupply into the power port at the end of the instrument. After connecting the power </span></p><p style="text-align:justify" class="MsoNormal" align="justify"><span style="font-size:20px;font-family:arial, helvetica, sans-serif">a: Power on: Press and hold the circular button on the instrument for five seconds , and the instrument will turn on with the screen lighting up </span></p><p style="text-align:justify" class="MsoNormal" align="justify"><span style="font-size:20px;font-family:arial, helvetica, sans-serif">b: Start/Pause: The circular button is also the start and pause button (. In the power-on state, press the button gently to start the instrument Press the button gently again during the instruments working state to pause the instrument </span></p><p style="text-align:justify" class="MsoNormal" align="justify"><span style="font-size:20px;font-family:arial, helvetica, sans-serif">c : Adjust the mode : The button with an arrow on the instrument is the mode adjustment button ( ' In the power-on state , press the button gently to change the mode from 1 to 9in a loop . Choose the appropriate mode according to your needs</span></p><p style="text-align:justify" class="MsoNormal" align="justify"><span style="font-size:20px;font-family:arial, helvetica, sans-serif">d : Power off : If you need to power off , press and hold the arrow button for five seconds and the instrument will turn off with the screen light going off</span></p><p style="text-align:justify" class="MsoNormal" align="justify"><span style="font-size:20px;font-family:arial, helvetica, sans-serif">Step3:Detailed Operation InstructionsApply a specialized medium ( such as gel , serum , solution , cream , etc . to the area to betreated Spread the medium evenly until no white residue is visible . During the procedure , ifthe medium is fully absorbed , immediately replenish it . Customers should adjust theintensity of the radio frequency energy slowly based on their feelings during the procedure generally starting from low to high and increasing to the most comfortable energy intensity( Do not start with the highest energy level , as excessive heat can damage the skin . ) The instrument head is made of metal . so it takes several seconds to a minute for the metal head to guide the skin to feel the heat when it is first started</span></p><p style="text-align:justify" class="MsoNormal" align="justify"><span style="font-size:20px;font-family:arial, helvetica, sans-serif">Step 4 : After the operation is completed , clean the medium on the operation area andapply a pure moisturizing mask or eye mask for 15 minutes</span></p><p style="text-align:justify" class="MsoNormal" align="justify"><span style="font-size:20px;font-family:arial, helvetica, sans-serif">Step 5 : Use an alcohol swab ( when there is no dripping water ) to wipe and disinfect theprobe to prevent residual medium from remaining on the probe , and prolong the service lifeof the machine</span></p><p style="text-align:justify" class="MsoNormal" align="justify"><span style="color:rgb(244, 78, 59);font-size:20px;font-family:arial, helvetica, sans-serif"><strong>Tips</strong></span><span style="color:rgb(244, 78, 59);font-size:20px;font-family:arial, helvetica, sans-serif">:For sensitive skin , it is recommended to operate once every 7-10 days ( duringthe operation , use mode 1 comprehensively and avoid using high energy intensity ) . For normalskin,it can be operated once every 3-5 days</span></p><p style="text-align:justify" class="MsoNormal" align="justify"><span style="font-size:20px;font-family:arial, helvetica, sans-serif"><strong>PACKING LIST:</strong></span></p><p style="text-align:justify" class="MsoNormal" align="justify"><span style="font-size:20px;font-family:arial, helvetica, sans-serif">ITEM QUANTITY</span></p><p style="text-align:justify" class="MsoNormal" align="justify"><span style="font-size:20px;font-family:arial, helvetica, sans-serif">Mainframe*1</span></p><p style="text-align:justify" class="MsoNormal" align="justify"><span style="font-size:20px;font-family:arial, helvetica, sans-serif">Power cord*1</span></p><p style="text-align:justify" class="MsoNormal" align="justify"><span style="font-size:20px;font-family:arial, helvetica, sans-serif">Power supply*1</span></p><p style="text-align:justify" class="MsoNormal" align="justify"><span style="font-size:20px;font-family:arial, helvetica, sans-serif">Certificate of conformity*1</span></p><p style="text-align:justify" class="MsoNormal" align="justify"><span style="font-size:20px;font-family:arial, helvetica, sans-serif">User manual*1</span></p><p style="text-align:justify" class="MsoNormal" align="justify"><span style="font-size:20px;font-family:arial, helvetica, sans-serif">Operation head*3</span></p><p style="text-align:justify" class="MsoNormal" align="justify"><span style="font-size:20px;font-family:arial, helvetica, sans-serif">Inspection report*1</span></p><p style="text-align:justify" class="MsoNormal" align="justify"><span style="font-size:20px;font-family:arial, helvetica, sans-serif"><strong>Note:</strong></span><span style="font-size:20px;font-family:arial, helvetica, sans-serif">After the operation , the face will experience varying degrees of detoxification symptoms such as acne , red bumps , sand-like particles , redness , itching , etc . These phenomena are normal Normal skin generally repairs itself within 1-3 days , while individual special cases may take longer . If these symptoms occur , it is recommended to apply moisturizing mask continuously for one week . If acne or small red bumps occur , vitamin B6 ointment can be applied three to five times a day . The machine can quickly promote skin blood circulation and accelerate the elimination of toxins from the skins bottom layer . If the skin has a lot of hidden toxins , it may cause acne or small red bumps.</span></p><p style="text-align:justify" class="MsoNormal" align="justify"><span style="font-size:20px;font-family:arial, helvetica, sans-serif">If the skin lacks massage care , is dehydrated , or sensitive , it may cause redness , sand-likeparticles , and itching.</span></p><p style="text-align:justify" class="MsoNormal" align="justify"><span style="font-size:20px;font-family:arial, helvetica, sans-serif">Everyone's skin tolerance is different . Therefore , during the operation , the energy intensityused by each customer must be adjusted flexibly according to their actual skin sensitivity.</span></p><p style="text-align:justify" class="MsoNormal" align="justify"><span style="font-size:20px;font-family:arial, helvetica, sans-serif"><strong>Instrument Maintenance:</strong></span></p><p style="text-align:justify" class="MsoNormal" align="justify"><span style="font-size:20px;font-family:arial, helvetica, sans-serif">1.after each use clean the equipment with water and store it properly.</span></p><p style="text-align:justify" class="MsoNormal" align="justify"><span style="font-size:20px;font-family:arial, helvetica, sans-serif">2.use a plug with a ground pin before using the equipment and ensure that theequipment’s power socket is properly grounded. </span></p><p style="text-align:justify" class="MsoNormal" align="justify"><span style="font-size:20px;font-family:arial, helvetica, sans-serif">3.ensure that the equipment voltage is compatible . if the local power supply voltageunstable , we recommend that users increase the power-matching stable powersupply. </span></p><p style="text-align:justify" class="MsoNormal" align="justify"><span style="font-size:20px;font-family:arial, helvetica, sans-serif">4.To ensure the effectiveness of the equipment's treatment and its normal service life , please use the designated parts provided or recommended by the manufacturer.</span></p><p style="text-align:justify" class="MsoNormal" align="justify"><span style="font-size:20px;font-family:arial, helvetica, sans-serif">5.Do not place the equipment in damp areas or near water sources , and do not expose the equipment directly to sunlight.</span></p><p style="text-align:justify" class="MsoNormal" align="justify"><span style="font-size:20px;font-family:arial, helvetica, sans-serif">6.Do not place the equipment near a strong heat source , as this may affect itslifespan and normal use.</span></p><p style="text-align:justify" class="MsoNormal" align="justify"><span style="font-size:20px;font-family:arial, helvetica, sans-serif">7.During the winter or in dry weather , use a current circuit arm sleeve . To avoid poorcontact , make sure that the area of skin contact is slightly moistened . You canachieve this effect by using a water-based product or wiping it with water .</span></p><p style="text-align:justify" class="MsoNormal" align="justify"><span style="font-size:20px;font-family:arial, helvetica, sans-serif">8.Do not allow water , oil , or other mediums to penetrate into the interior of theequipment , and do not knock , hit or drop the equipment to avoid damage.</span></p><p style="text-align:justify" class="MsoNormal" align="justify"><span style="font-size:20px;font-family:arial, helvetica, sans-serif">9.After use , please clean the probe promptly and disconnect the power.</span></p><p style="text-align:justify" class="MsoNormal" align="justify"><span style="font-size:20px;font-family:arial, helvetica, sans-serif">10.The warranty period is one year . Within the warranty period , the machine isresponsible for free maintenance and parts replacement under normal use.</span></p><p style="text-align:justify" class="MsoNormal" align="justify"><span style="font-size:20px;font-family:arial, helvetica, sans-serif">11.We provide lifelong maintenance and technical support.</span></p><p style="text-align:justify" class="MsoNormal" align="justify"><span style="font-size:20px;font-family:arial, helvetica, sans-serif">12.Wipe the instrument body with alcohol.</span></p><p style="text-align:justify" class="MsoNormal" align="justify"></p></div></div><p><br/></p>
Related Product
Browse The Collection of Top Products.