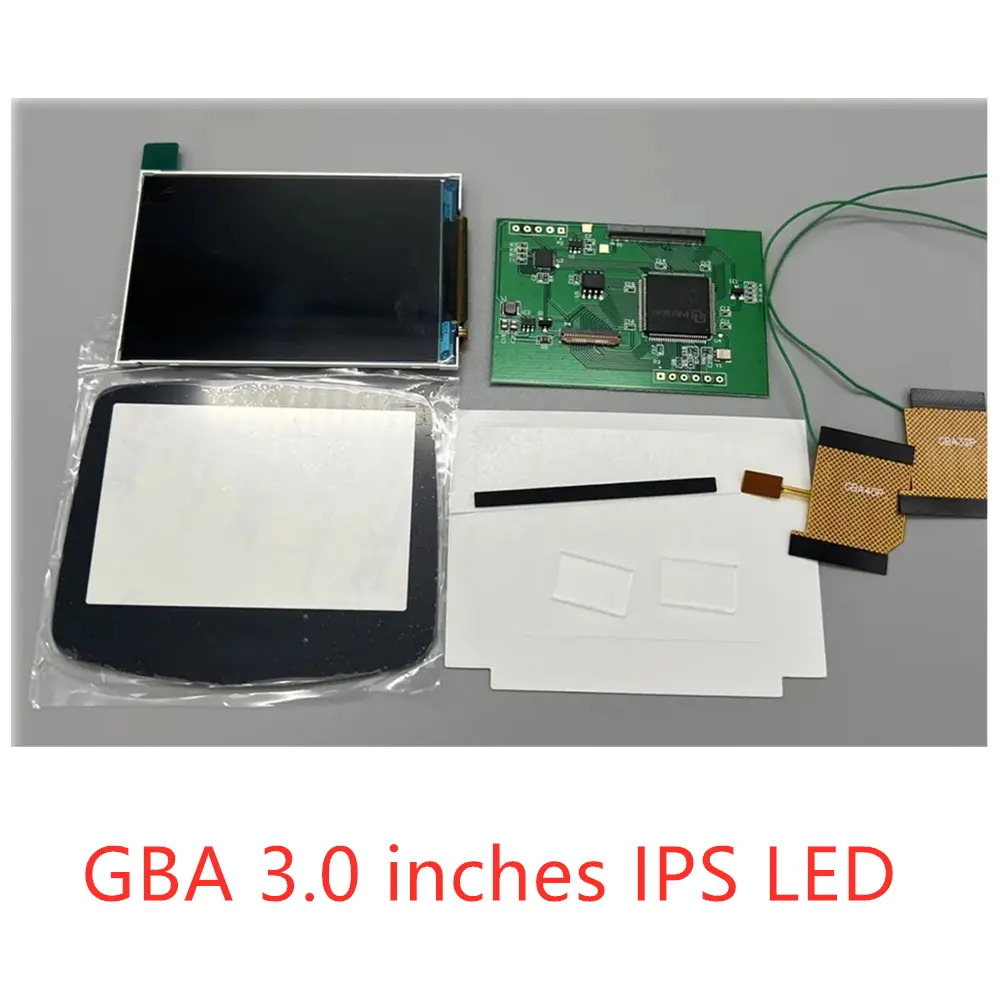

3.0 Inches GBA IPS LCD For GBA/Nintendo GAME BOY ADVANCE.Support Pixel Display.No Need To Cut The Shell
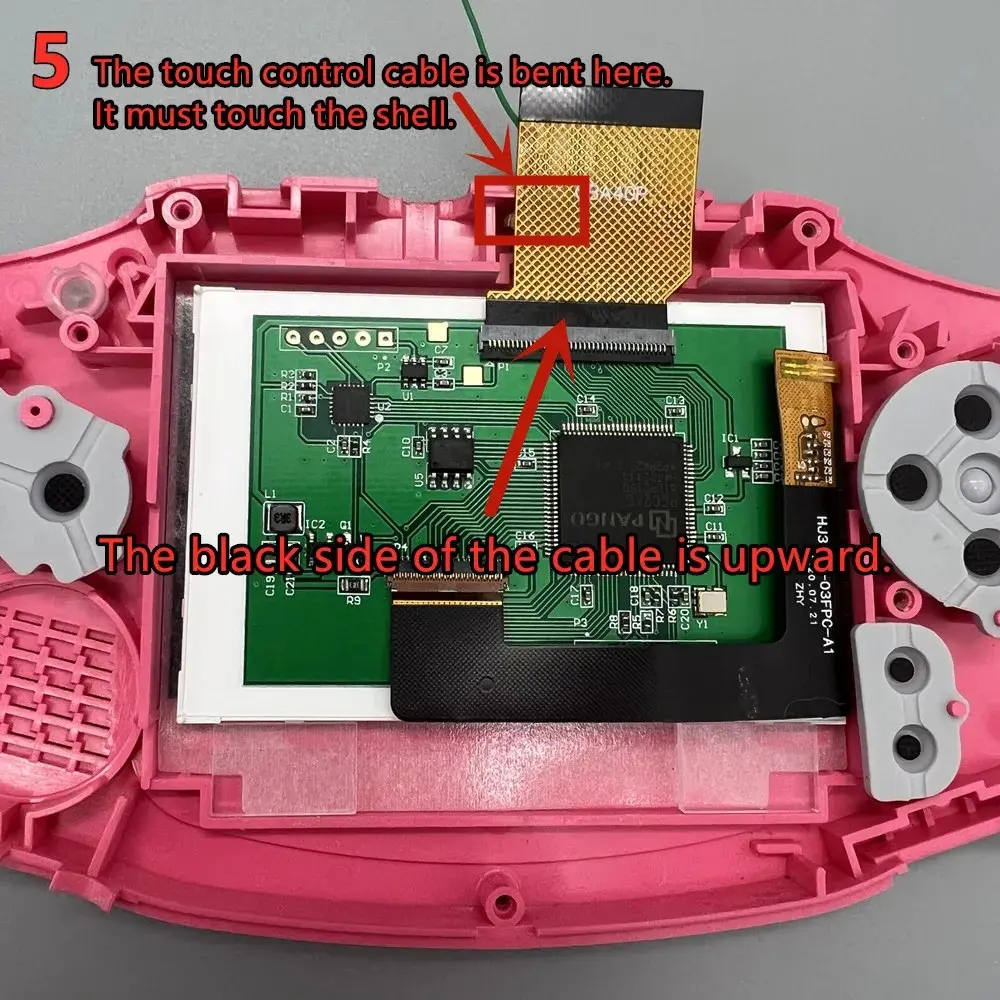
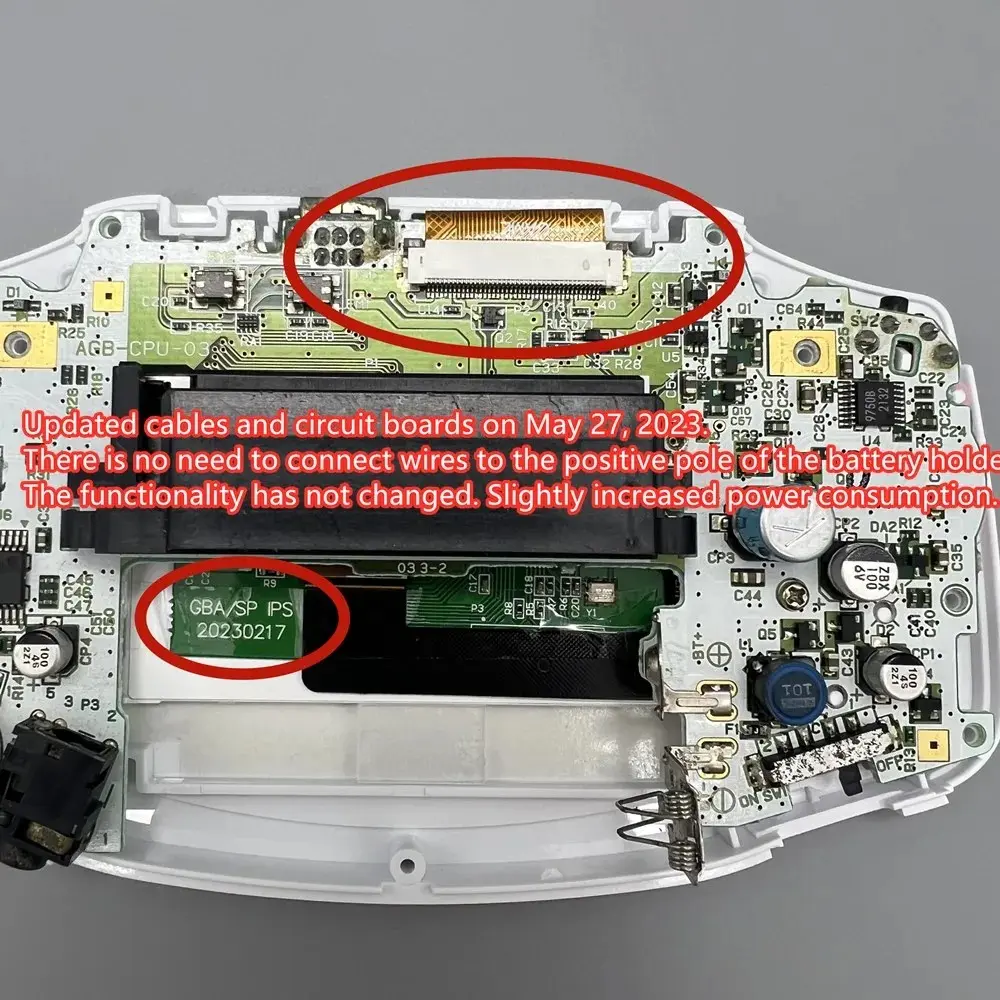
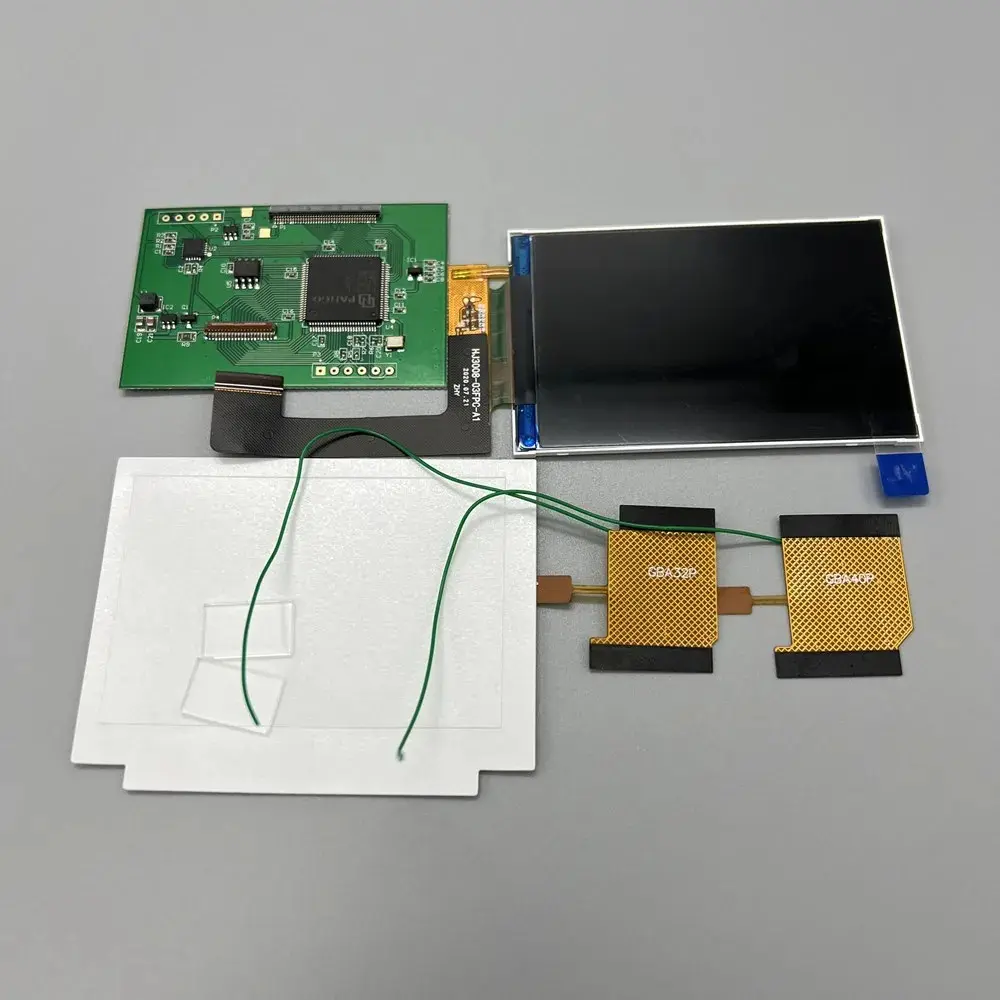
<p>There is a problem with this screen. If you change the game and start it up immediately, there may be residual images from the previous game or screen flickering, which will disappear after running the game for several tens of seconds. Does not affect playing games.</p><p>This is a LCD screen, not a console! If you don't have a motherboard, you can't assemble it into a console.</p><p>Glass lens with logoPlease do not pull the cable of the LCD screen. Slight pulling may damage the LCD screen. It will cause the LCD to display horizontal and vertical lines.Don't squeeze the LCD screen. Don't wipe the LCD screen with a wet towel. Squeezing the LCD frame and back cover will lead to uneven backlight display, light spot and dark spot.</p><p><br/></p><p>Product features:</p><p>1. IPS LCD. There is no need for shell cutting and welding. Easy to install.</p><p>2. Deliver 32 pin and 40 pin cables, no matter what version you are.</p><p>3. Use ordinary AA battery, the endurance is about 6 hours. Using different ink cartridges, the power consumption will be different</p><p>4. Support black and white style display. High brightness display. Long press the touch sensing cable for 3 seconds to switch the display style. Briefly press to adjust the brightness.Playing FC games and F-ZERO games, switching to F-ZERO mode reduces frame rate without leaving any shadows, while switching to this mode is not necessary for other games.</p><p>5. Support brightness adjustment memory and display style memory, and there is no need to reset when starting up.</p><p>The package on sale is only different from the mirror, and other configurations are the same. The original mirror can be used. The matching mirrors are made of glass.</p><p><br/></p><p>Each set of LCD has been tested before shipment. You can test it again like this before installing. Test before installation. It is helpful to find out the causes of problems in later installation.</p><p></p><div style="font-family:"Open Sans", Roboto, Arial, Helvetica, sans-serif, SimSun;font-size:14px;font-weight:400;letter-spacing:normal;text-align:start;white-space:normal;color:rgb(0, 0, 0);background-color:rgb(255, 255, 255);margin:0px;margin-bottom:0px;margin-top:0px;margin-left:0px;margin-right:0px;padding:0px;padding-bottom:0px;padding-top:0px;padding-left:0px;padding-right:0px;box-sizing:content-box" class="detailmodule_text" align="start"><p style="font-family:OpenSans;font-size:20px;font-weight:900;line-height:28px;white-space:pre-wrap;color:rgb(0, 0, 0);margin:0px 0px 12px;margin-bottom:12px;margin-top:0px;margin-left:0px;margin-right:0px;padding:0px;padding-bottom:0px;padding-top:0px;padding-left:0px;padding-right:0px;box-sizing:border-box" class="detail-desc-decorate-title"><span style="font-size:24px">Installation tutorial</span></p></div><div style="font-family:"Open Sans", Roboto, Arial, Helvetica, sans-serif, SimSun;font-size:14px;font-weight:400;letter-spacing:normal;text-align:start;white-space:normal;color:rgb(0, 0, 0);background-color:rgb(255, 255, 255);margin:0px;margin-bottom:0px;margin-top:0px;margin-left:0px;margin-right:0px;padding:0px;padding-bottom:0px;padding-top:0px;padding-left:0px;padding-right:0px;box-sizing:content-box" class="detailmodule_text-image" align="start"><p style="font-size:14px;font-weight:400;line-height:inherit;margin:0px;margin-bottom:0px;margin-top:0px;margin-left:0px;margin-right:0px;padding:0px;padding-bottom:0px;padding-top:0px;padding-left:0px;padding-right:0px;box-sizing:border-box"><span style="font-size:18px">GBA console motherboard LCD cable support is divided into 32 pin and 40 pin. There is a model mark under the cable support. Choose the right cable for yourself.</span></p><p style="font-size:14px;font-weight:400;line-height:inherit;margin:0px;margin-bottom:0px;margin-top:0px;margin-left:0px;margin-right:0px;padding:0px;padding-bottom:0px;padding-top:0px;padding-left:0px;padding-right:0px;box-sizing:border-box"><span style="font-size:18px">Put the double-sided adhesive tape and LCD stop block in place. The LCD limit block is placed on the bottom two sides of the shell.</span></p><p style="font-size:14px;font-weight:400;line-height:inherit;margin:0px;margin-bottom:0px;margin-top:0px;margin-left:0px;margin-right:0px;padding:0px;padding-bottom:0px;padding-top:0px;padding-left:0px;padding-right:0px;box-sizing:border-box"><span style="font-size:18px">Then install the LCD and LCD adapter board. The LCD screen should be as far as possible to the right, and the border should touch the two small bumps on the right side of the shell.</span></p><p></p></div><p><span style="background-color:rgb(255, 255, 255);color:rgb(34, 34, 34);font-size:14px;font-family:"Open Sans", Roboto, Arial, Helvetica, sans-serif, SimSun">Attention! The 2022 circuit board cannot use this new cable. Since both ends of the 40P cable are 40P, please be careful not to plug them in incorrectly, as it may burn the motherboard.</span>If you need to place touch sensing in another location.</p><p>You can cut the touch cable on the ribbon cable.</p><p>Solder wires to touch sensing points on the circuit board and extend to other locations.</p><p></p><p></p><p>Short circuit R9 resistance. It can double the brightness of the LCD screen.</p><p>GBASP does not recommend this. Because the voltage supplied by the GBASP motherboard to the LCD screen is too high. This will result in increased power consumption.</p><p style="font-family:"Open Sans", Roboto, Arial, Helvetica, sans-serif, SimSun;font-size:14px;font-weight:400;letter-spacing:normal;line-height:inherit;text-align:start;white-space:normal;color:rgb(0, 0, 0);background-color:rgb(255, 255, 255);margin:0px;margin-bottom:0px;margin-top:0px;margin-left:0px;margin-right:0px;padding:0px;padding-bottom:0px;padding-top:0px;padding-left:0px;padding-right:0px;box-sizing:border-box" align="start"></p>
$75.755
$69.11
- Category : Consumer Electronics
- Brand : game_fans_store Game Fans Store
Colors
Sizes
-
+
<p>There is a problem with this screen. If you change the game and start it up immediately, there may be residual images from the previous game or screen flickering, which will disappear after running the game for several tens of seconds. Does not affect playing games.</p><p>This is a LCD screen, not a console! If you don't have a motherboard, you can't assemble it into a console.</p><p>Glass lens with logoPlease do not pull the cable of the LCD screen. Slight pulling may damage the LCD screen. It will cause the LCD to display horizontal and vertical lines.Don't squeeze the LCD screen. Don't wipe the LCD screen with a wet towel. Squeezing the LCD frame and back cover will lead to uneven backlight display, light spot and dark spot.</p><p><br/></p><p>Product features:</p><p>1. IPS LCD. There is no need for shell cutting and welding. Easy to install.</p><p>2. Deliver 32 pin and 40 pin cables, no matter what version you are.</p><p>3. Use ordinary AA battery, the endurance is about 6 hours. Using different ink cartridges, the power consumption will be different</p><p>4. Support black and white style display. High brightness display. Long press the touch sensing cable for 3 seconds to switch the display style. Briefly press to adjust the brightness.Playing FC games and F-ZERO games, switching to F-ZERO mode reduces frame rate without leaving any shadows, while switching to this mode is not necessary for other games.</p><p>5. Support brightness adjustment memory and display style memory, and there is no need to reset when starting up.</p><p>The package on sale is only different from the mirror, and other configurations are the same. The original mirror can be used. The matching mirrors are made of glass.</p><p><br/></p><p>Each set of LCD has been tested before shipment. You can test it again like this before installing. Test before installation. It is helpful to find out the causes of problems in later installation.</p><p></p><div style="font-family:"Open Sans", Roboto, Arial, Helvetica, sans-serif, SimSun;font-size:14px;font-weight:400;letter-spacing:normal;text-align:start;white-space:normal;color:rgb(0, 0, 0);background-color:rgb(255, 255, 255);margin:0px;margin-bottom:0px;margin-top:0px;margin-left:0px;margin-right:0px;padding:0px;padding-bottom:0px;padding-top:0px;padding-left:0px;padding-right:0px;box-sizing:content-box" class="detailmodule_text" align="start"><p style="font-family:OpenSans;font-size:20px;font-weight:900;line-height:28px;white-space:pre-wrap;color:rgb(0, 0, 0);margin:0px 0px 12px;margin-bottom:12px;margin-top:0px;margin-left:0px;margin-right:0px;padding:0px;padding-bottom:0px;padding-top:0px;padding-left:0px;padding-right:0px;box-sizing:border-box" class="detail-desc-decorate-title"><span style="font-size:24px">Installation tutorial</span></p></div><div style="font-family:"Open Sans", Roboto, Arial, Helvetica, sans-serif, SimSun;font-size:14px;font-weight:400;letter-spacing:normal;text-align:start;white-space:normal;color:rgb(0, 0, 0);background-color:rgb(255, 255, 255);margin:0px;margin-bottom:0px;margin-top:0px;margin-left:0px;margin-right:0px;padding:0px;padding-bottom:0px;padding-top:0px;padding-left:0px;padding-right:0px;box-sizing:content-box" class="detailmodule_text-image" align="start"><p style="font-size:14px;font-weight:400;line-height:inherit;margin:0px;margin-bottom:0px;margin-top:0px;margin-left:0px;margin-right:0px;padding:0px;padding-bottom:0px;padding-top:0px;padding-left:0px;padding-right:0px;box-sizing:border-box"><span style="font-size:18px">GBA console motherboard LCD cable support is divided into 32 pin and 40 pin. There is a model mark under the cable support. Choose the right cable for yourself.</span></p><p style="font-size:14px;font-weight:400;line-height:inherit;margin:0px;margin-bottom:0px;margin-top:0px;margin-left:0px;margin-right:0px;padding:0px;padding-bottom:0px;padding-top:0px;padding-left:0px;padding-right:0px;box-sizing:border-box"><span style="font-size:18px">Put the double-sided adhesive tape and LCD stop block in place. The LCD limit block is placed on the bottom two sides of the shell.</span></p><p style="font-size:14px;font-weight:400;line-height:inherit;margin:0px;margin-bottom:0px;margin-top:0px;margin-left:0px;margin-right:0px;padding:0px;padding-bottom:0px;padding-top:0px;padding-left:0px;padding-right:0px;box-sizing:border-box"><span style="font-size:18px">Then install the LCD and LCD adapter board. The LCD screen should be as far as possible to the right, and the border should touch the two small bumps on the right side of the shell.</span></p><p></p></div><p><span style="background-color:rgb(255, 255, 255);color:rgb(34, 34, 34);font-size:14px;font-family:"Open Sans", Roboto, Arial, Helvetica, sans-serif, SimSun">Attention! The 2022 circuit board cannot use this new cable. Since both ends of the 40P cable are 40P, please be careful not to plug them in incorrectly, as it may burn the motherboard.</span>If you need to place touch sensing in another location.</p><p>You can cut the touch cable on the ribbon cable.</p><p>Solder wires to touch sensing points on the circuit board and extend to other locations.</p><p></p><p></p><p>Short circuit R9 resistance. It can double the brightness of the LCD screen.</p><p>GBASP does not recommend this. Because the voltage supplied by the GBASP motherboard to the LCD screen is too high. This will result in increased power consumption.</p><p style="font-family:"Open Sans", Roboto, Arial, Helvetica, sans-serif, SimSun;font-size:14px;font-weight:400;letter-spacing:normal;line-height:inherit;text-align:start;white-space:normal;color:rgb(0, 0, 0);background-color:rgb(255, 255, 255);margin:0px;margin-bottom:0px;margin-top:0px;margin-left:0px;margin-right:0px;padding:0px;padding-bottom:0px;padding-top:0px;padding-left:0px;padding-right:0px;box-sizing:border-box" align="start"></p>