
DC 3V High Voltage Electromagnetic Transmitter DIY Electronics Kit Shooting Game Mini Voltage Converter Module For STEM Learn
<div class="detailmodule_dynamic"><kse:widget data-widget-type="relatedProduct" id="1005000004422459" title="" type="relation"></kse:widget></div>
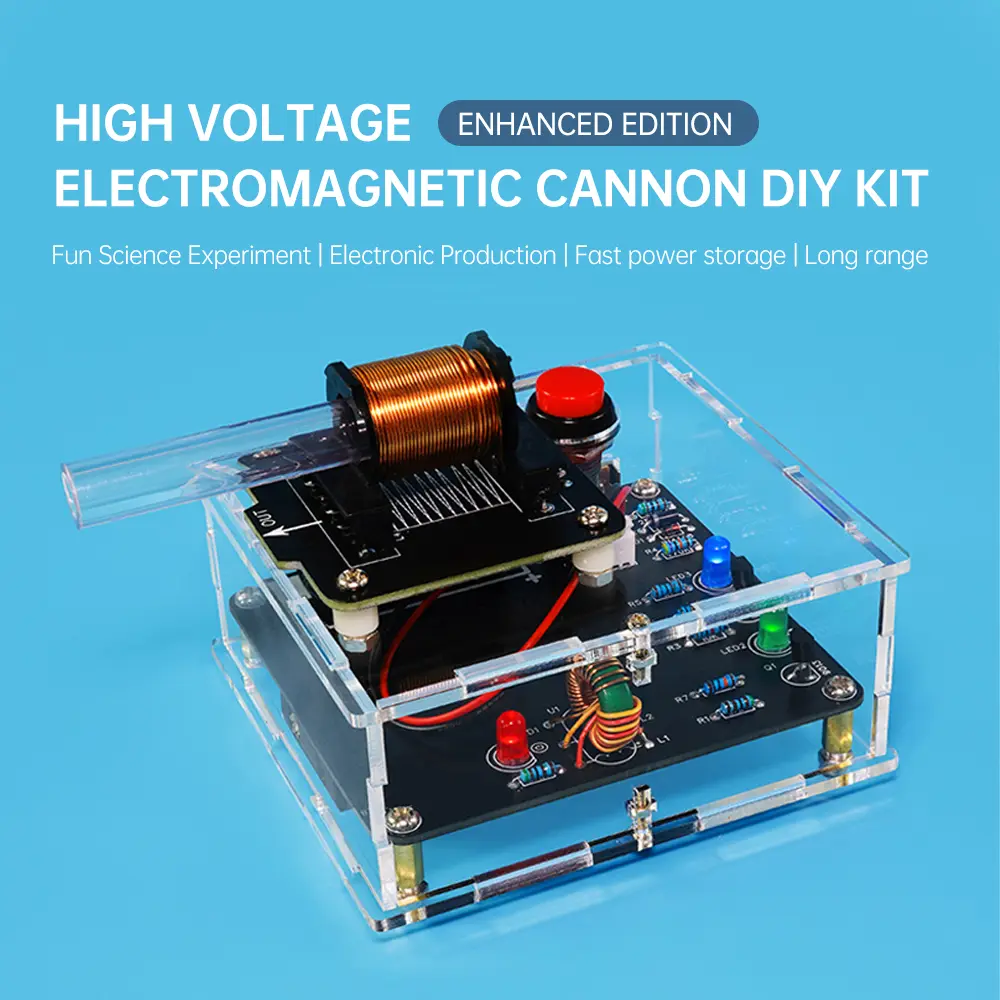
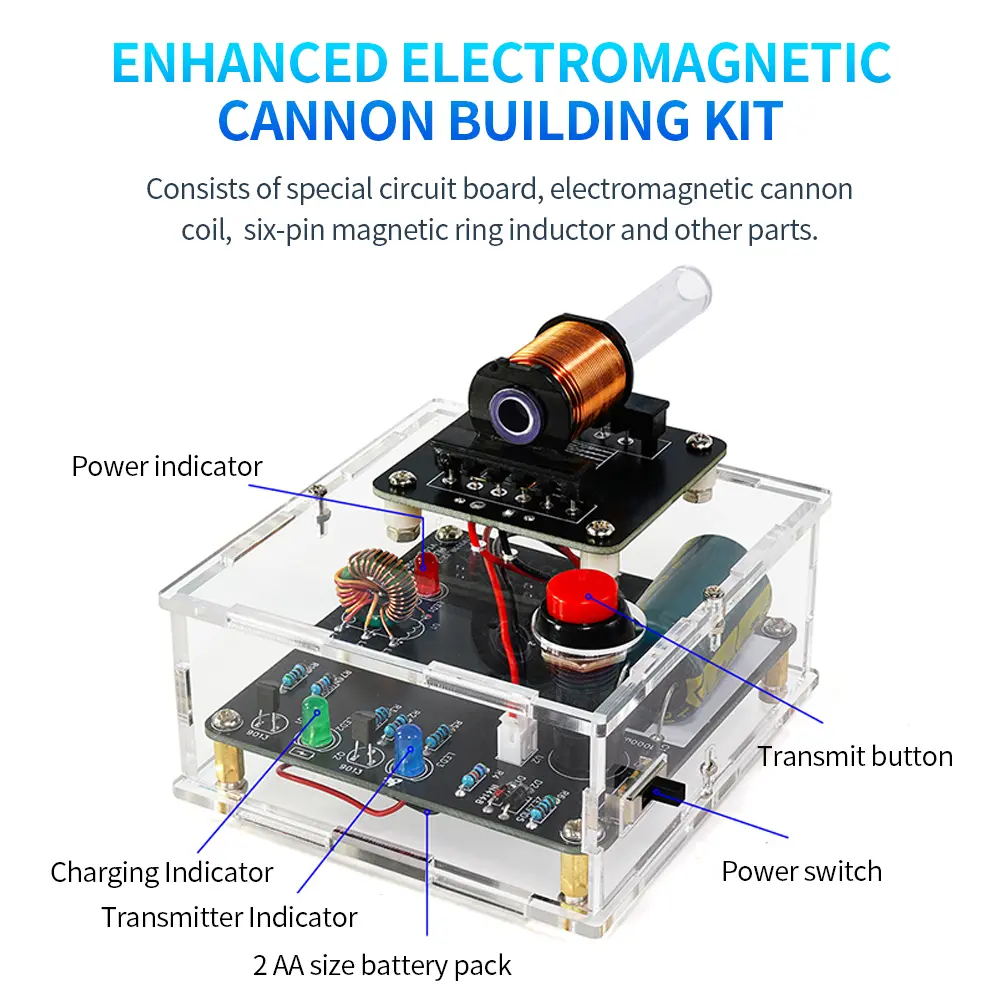
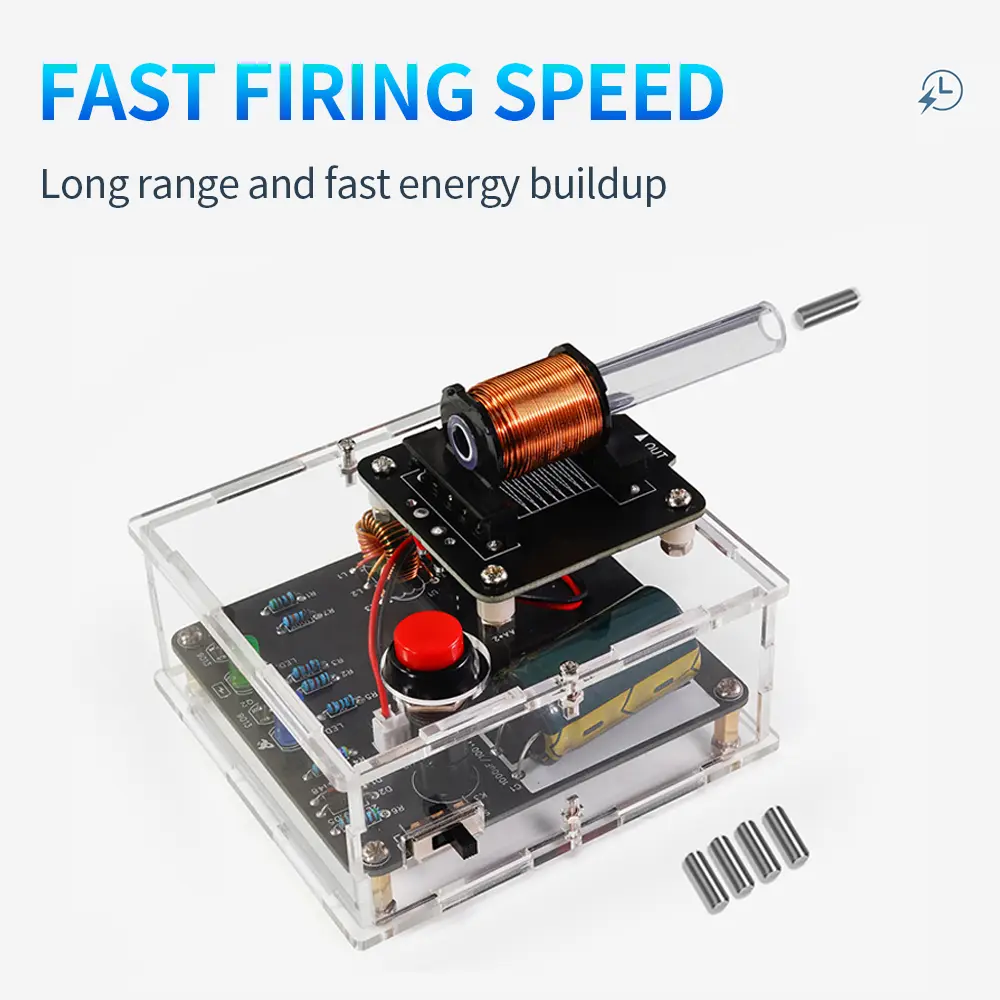
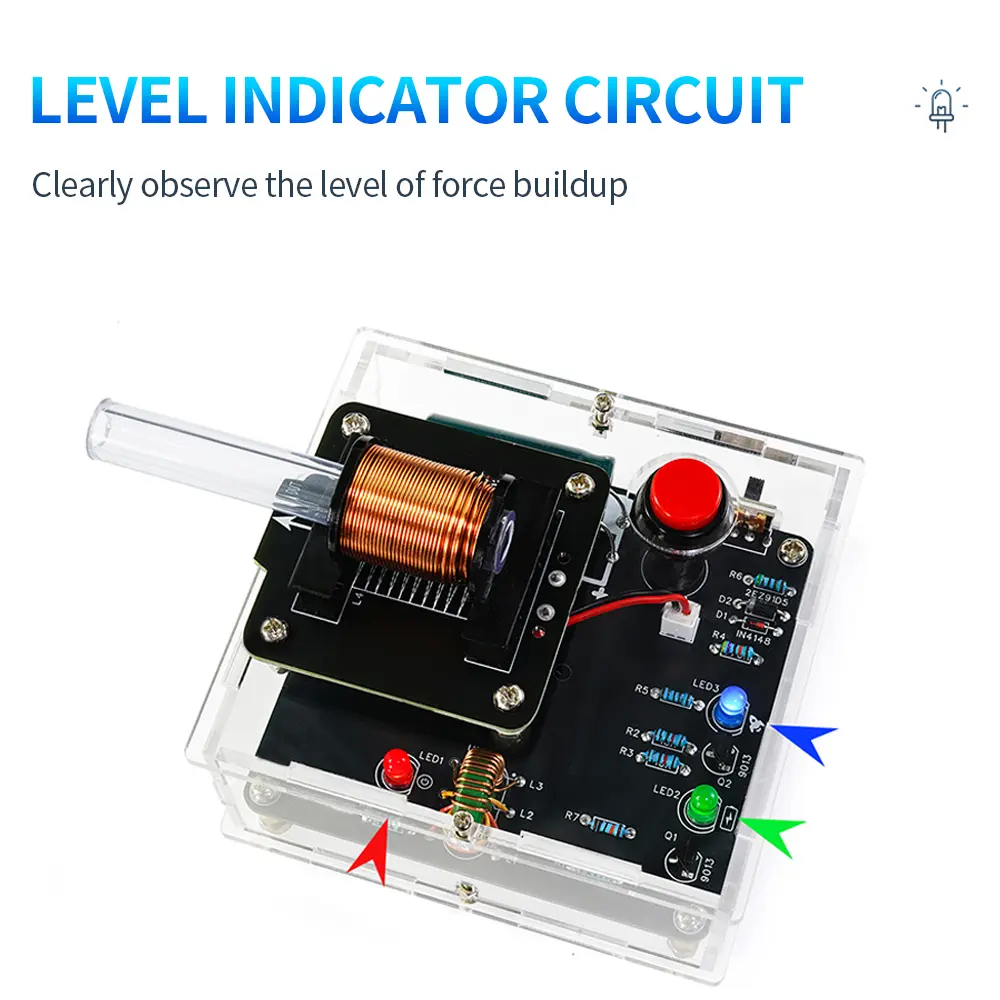
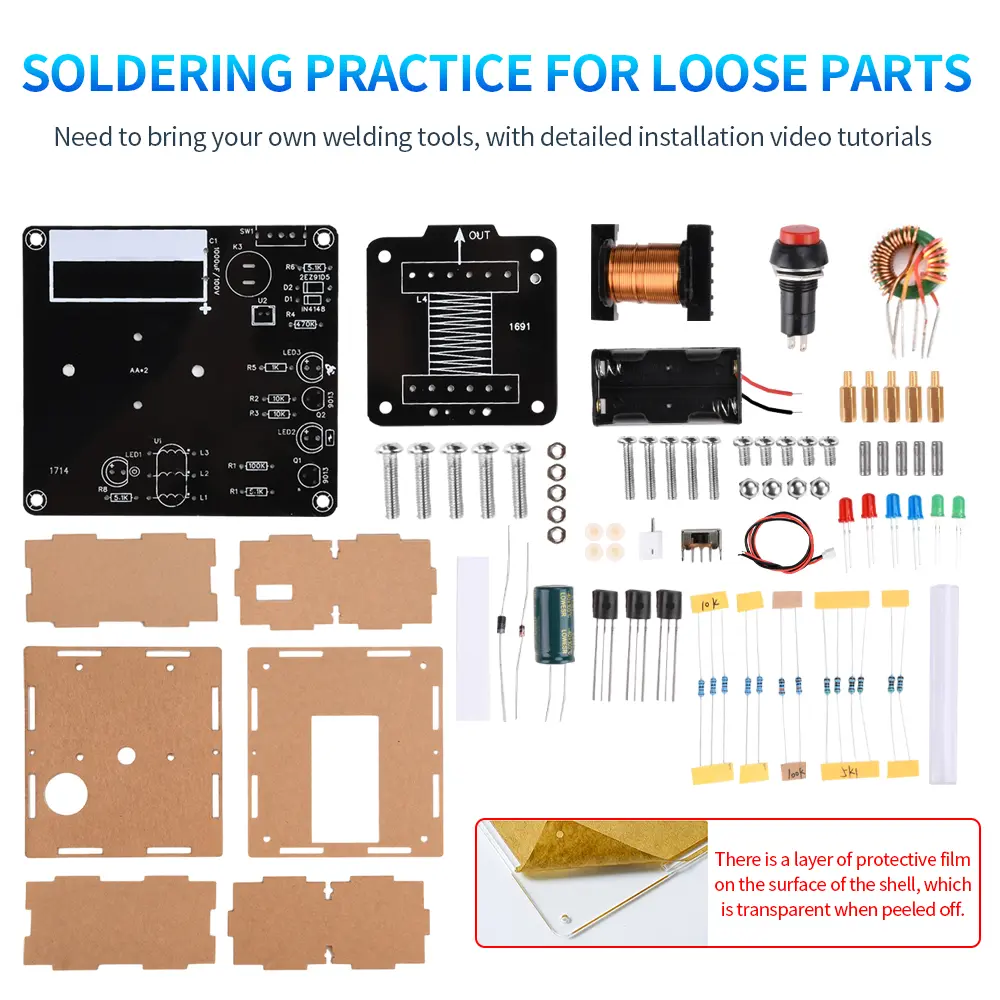
<div class="detailmodule_html"><div class="detail-desc-decorate-richtext"><br />Features: <br />1. Composed of specialized circuit boards, electromagnetic gun coils, six pin magnetic ring inductors, and other components. <br />2. The firing speed of shells is fast. <br />3. Fast energy storage. <br />4. The shell has a long range. <br />5. The level indicator circuit can more conveniently observe the charging condition. <br />6. Optional acrylic shell for insulation protection. <br />7. The bottom battery box is beautiful and convenient, and the battery can be easily replaced without opening the outer shell.</p>
<p>Product Introduction: <br />Electromagnetic cannon is a weapon technology that uses electromagnetic force to accelerate the launch of objects. It uses electromagnetic pulses to accelerate projectiles to high speeds and then fires them out at high speeds. We have reduced the complexity of wiring and greatly reduced the difficulty of welding in the enhanced electromagnetic cannon kit, making it more suitable for beginners to DIY. At the same time, we have added power, charging, and firing indicator lights, which can more clearly observe the operation status of the electromagnetic cannon. Please do not shoot at people or fragile objects during use to avoid the danger of firing!</p>
<p>Parameter: <br />Kit Name: Enhanced Electromagnetic Cannon Production Kit <br />Working voltage: DC3V <br />Power supply mode: 2 No. 5 batteries, DC 3V (requires self provided batteries) <br />Storage current: 50~65mA <br />Emission current: 70~80mA <br />PCB size: 85x78mm+50x53mm, measured manually with an error of 1-2mm. <br />Operating instructions: <br />1. Turn on the power switch (toggle switch SW1), and the red and green LEDs will light up. <br />2. Wait for about 10-30 seconds, the blue light will turn on, and the brighter the blue light, the farther the emission distance. <br />3. Insert the projectile into the rear of the barrel. <br />4. Press the launch button (circular button K3), and the shell will fly out of the barrel, completing the launch. <br />The main technologies of electromagnetic guns include: <br />Power supply system: provides high voltage power supply for generating strong electromagnetic force. Common power systems include capacitors or battery packs. <br />Electromagnetic accelerator: an electromagnetic device used to accelerate the emission of objects, consisting of coils and brackets. When powered through a coil, a strong magnetic field is generated that acts on the emitting object, accelerating it.</p>
<p>Package include: <br />1 * DIY kit (optional with or without casing)</p>
<p>***Safety Tips*** <br />Do not shoot at people or fragile objects during use to avoid shooting danger! <br />The project is being carried out under high voltage, do not touch metal parts when starting up! <br />matters needing attention: <br />1. The maximum working voltage inside this device can reach 90-100V, which exceeds the international safety voltage standard of 36V. Therefore, when it is powered on, do not touch the internal electronic components, otherwise electric shock accidents may occur. <br />2. The insulation of external electronic components such as coils is thin, so it is necessary to avoid damage and leakage caused by rubbing. The switch is also a weak link. If it is exposed, the risk will be higher if there is no shell version. Please handle it carefully. <br />3. Self assembled circuit boards are inevitably prone to errors or malfunctions. If the boost circuit is already functioning properly, it is possible that the voltage of the energy storage capacitor (1000uF/100V) has been charged to a higher value, causing a risk of electric shock. Therefore, before troubleshooting and handling the problem, the first step is to use a multimeter to measure the voltage between the two terminals of the energy storage capacitor, or directly use a plastic wire (with copper wires exposed at both ends) to pinch the plastic part and touch the two terminals of the capacitor with copper wires to discharge. After the charge is completely released, the voltage of the capacitor will drop to 0V, and then the operation can be carried out safely.<br /></p></div></div>
$15.215
$7.685
- Category : Consumer Electronics
- Brand : diy_electronics_module_999_store DIY Electronics Module 999 Store
Colors
Sizes
-
+
<div class="detailmodule_dynamic"><kse:widget data-widget-type="relatedProduct" id="1005000004422459" title="" type="relation"></kse:widget></div>
<div class="detailmodule_html"><div class="detail-desc-decorate-richtext"><br />Features: <br />1. Composed of specialized circuit boards, electromagnetic gun coils, six pin magnetic ring inductors, and other components. <br />2. The firing speed of shells is fast. <br />3. Fast energy storage. <br />4. The shell has a long range. <br />5. The level indicator circuit can more conveniently observe the charging condition. <br />6. Optional acrylic shell for insulation protection. <br />7. The bottom battery box is beautiful and convenient, and the battery can be easily replaced without opening the outer shell.</p>
<p>Product Introduction: <br />Electromagnetic cannon is a weapon technology that uses electromagnetic force to accelerate the launch of objects. It uses electromagnetic pulses to accelerate projectiles to high speeds and then fires them out at high speeds. We have reduced the complexity of wiring and greatly reduced the difficulty of welding in the enhanced electromagnetic cannon kit, making it more suitable for beginners to DIY. At the same time, we have added power, charging, and firing indicator lights, which can more clearly observe the operation status of the electromagnetic cannon. Please do not shoot at people or fragile objects during use to avoid the danger of firing!</p>
<p>Parameter: <br />Kit Name: Enhanced Electromagnetic Cannon Production Kit <br />Working voltage: DC3V <br />Power supply mode: 2 No. 5 batteries, DC 3V (requires self provided batteries) <br />Storage current: 50~65mA <br />Emission current: 70~80mA <br />PCB size: 85x78mm+50x53mm, measured manually with an error of 1-2mm. <br />Operating instructions: <br />1. Turn on the power switch (toggle switch SW1), and the red and green LEDs will light up. <br />2. Wait for about 10-30 seconds, the blue light will turn on, and the brighter the blue light, the farther the emission distance. <br />3. Insert the projectile into the rear of the barrel. <br />4. Press the launch button (circular button K3), and the shell will fly out of the barrel, completing the launch. <br />The main technologies of electromagnetic guns include: <br />Power supply system: provides high voltage power supply for generating strong electromagnetic force. Common power systems include capacitors or battery packs. <br />Electromagnetic accelerator: an electromagnetic device used to accelerate the emission of objects, consisting of coils and brackets. When powered through a coil, a strong magnetic field is generated that acts on the emitting object, accelerating it.</p>
<p>Package include: <br />1 * DIY kit (optional with or without casing)</p>
<p>***Safety Tips*** <br />Do not shoot at people or fragile objects during use to avoid shooting danger! <br />The project is being carried out under high voltage, do not touch metal parts when starting up! <br />matters needing attention: <br />1. The maximum working voltage inside this device can reach 90-100V, which exceeds the international safety voltage standard of 36V. Therefore, when it is powered on, do not touch the internal electronic components, otherwise electric shock accidents may occur. <br />2. The insulation of external electronic components such as coils is thin, so it is necessary to avoid damage and leakage caused by rubbing. The switch is also a weak link. If it is exposed, the risk will be higher if there is no shell version. Please handle it carefully. <br />3. Self assembled circuit boards are inevitably prone to errors or malfunctions. If the boost circuit is already functioning properly, it is possible that the voltage of the energy storage capacitor (1000uF/100V) has been charged to a higher value, causing a risk of electric shock. Therefore, before troubleshooting and handling the problem, the first step is to use a multimeter to measure the voltage between the two terminals of the energy storage capacitor, or directly use a plastic wire (with copper wires exposed at both ends) to pinch the plastic part and touch the two terminals of the capacitor with copper wires to discharge. After the charge is completely released, the voltage of the capacitor will drop to 0V, and then the operation can be carried out safely.<br /></p></div></div>