
DIY Wireless FM Radio Receiver Module 87.0MHz-108.0MHz Digital Radio Transmitter Board Equipment with LCD Clock
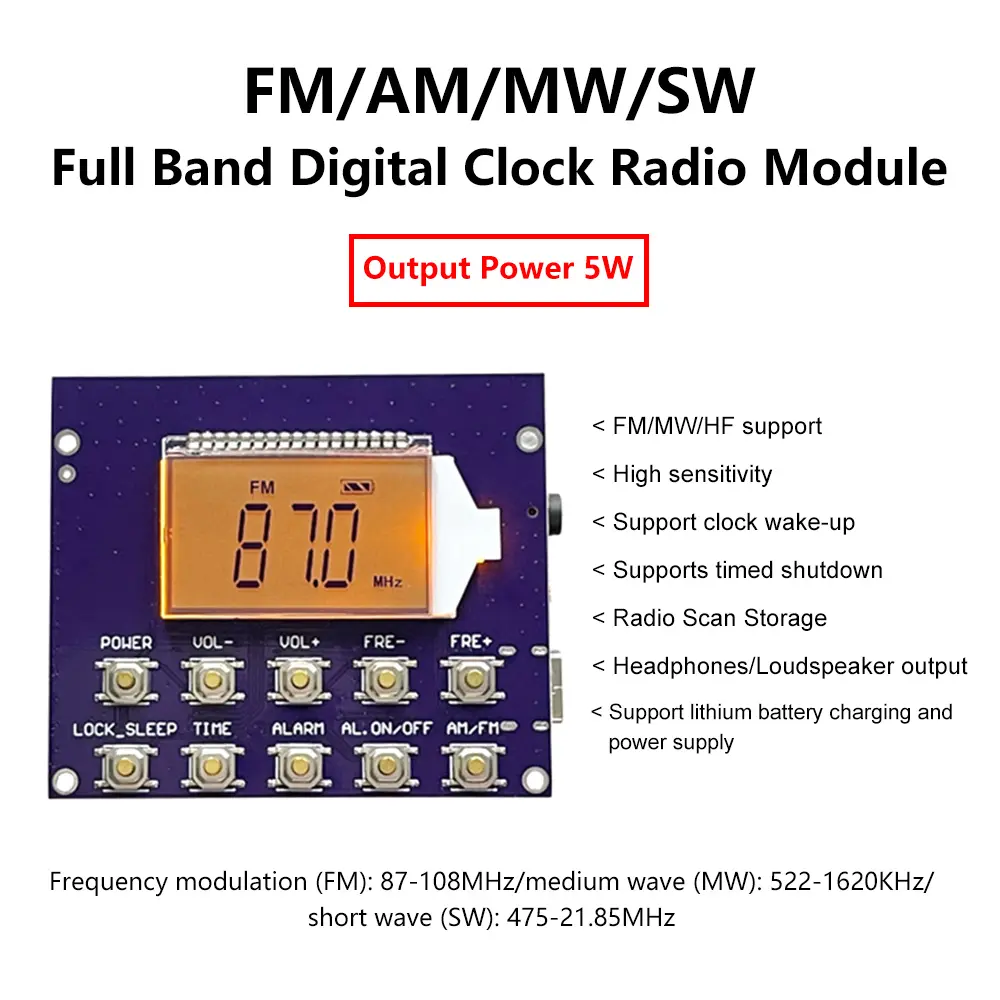
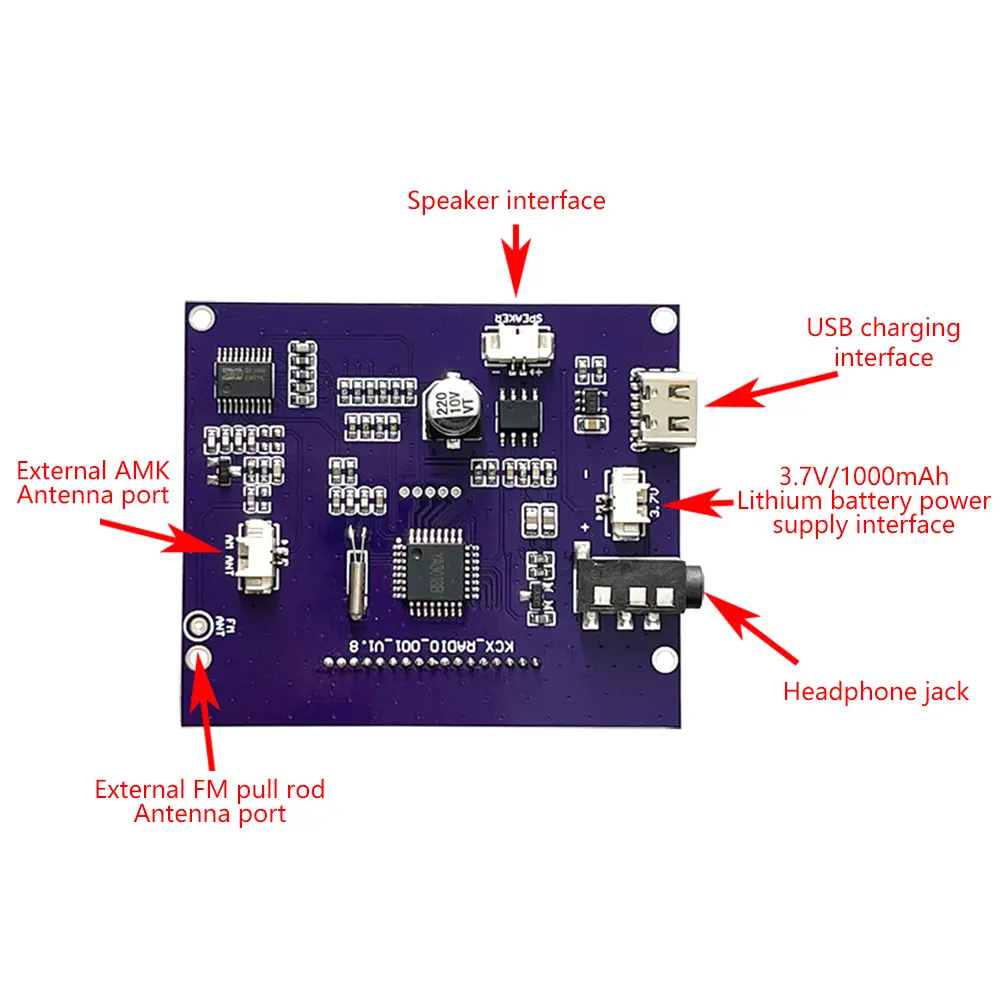
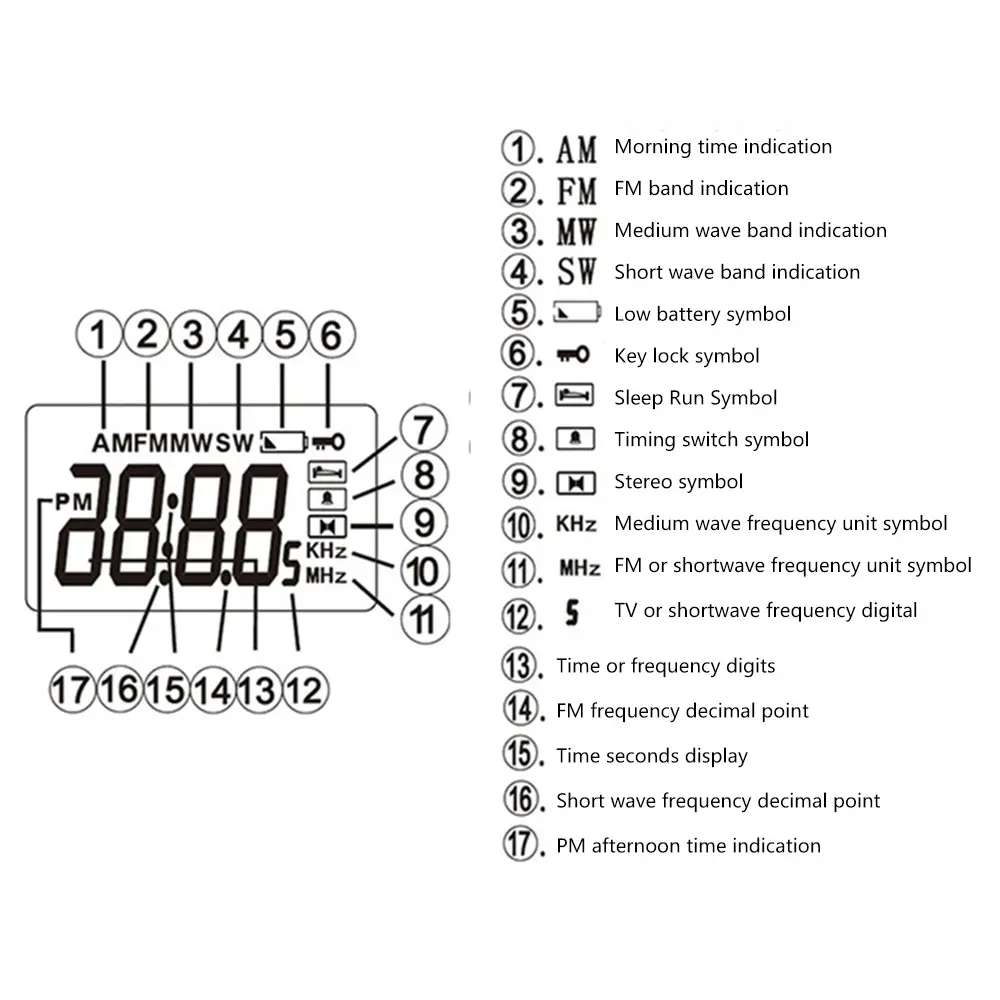
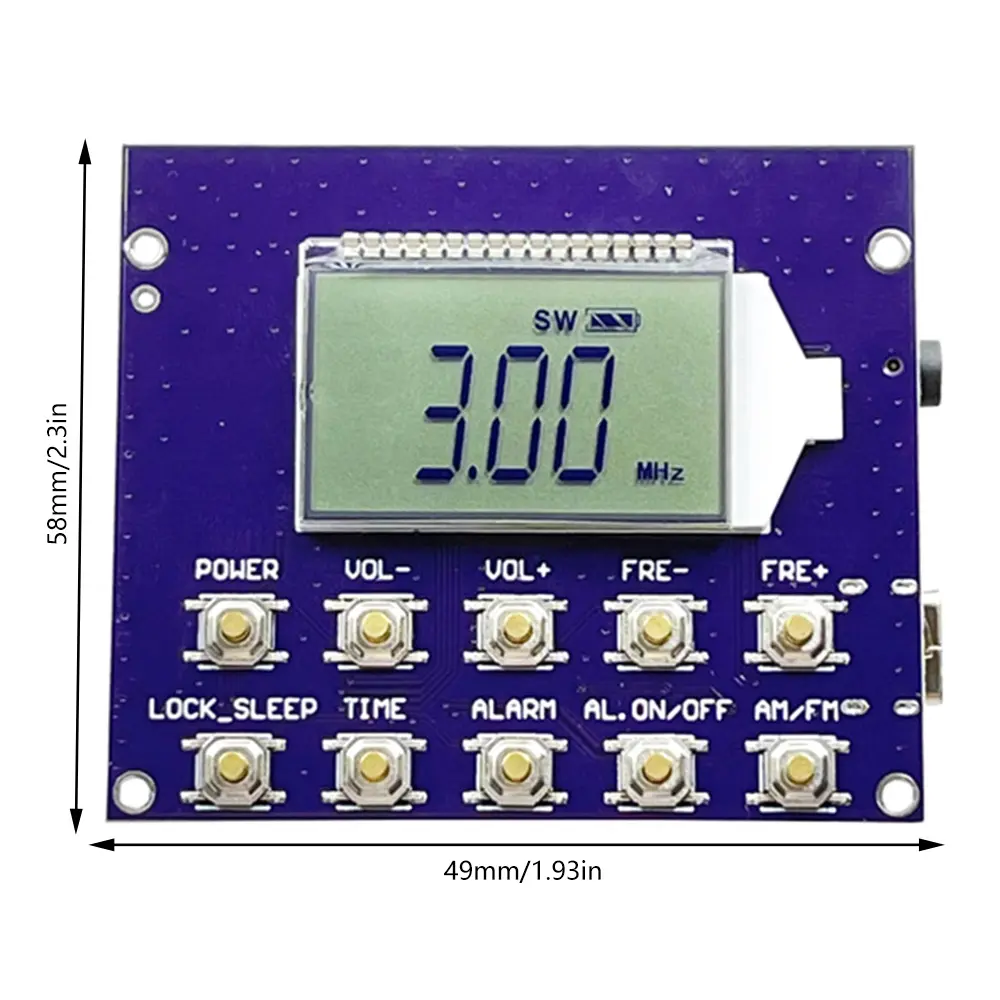
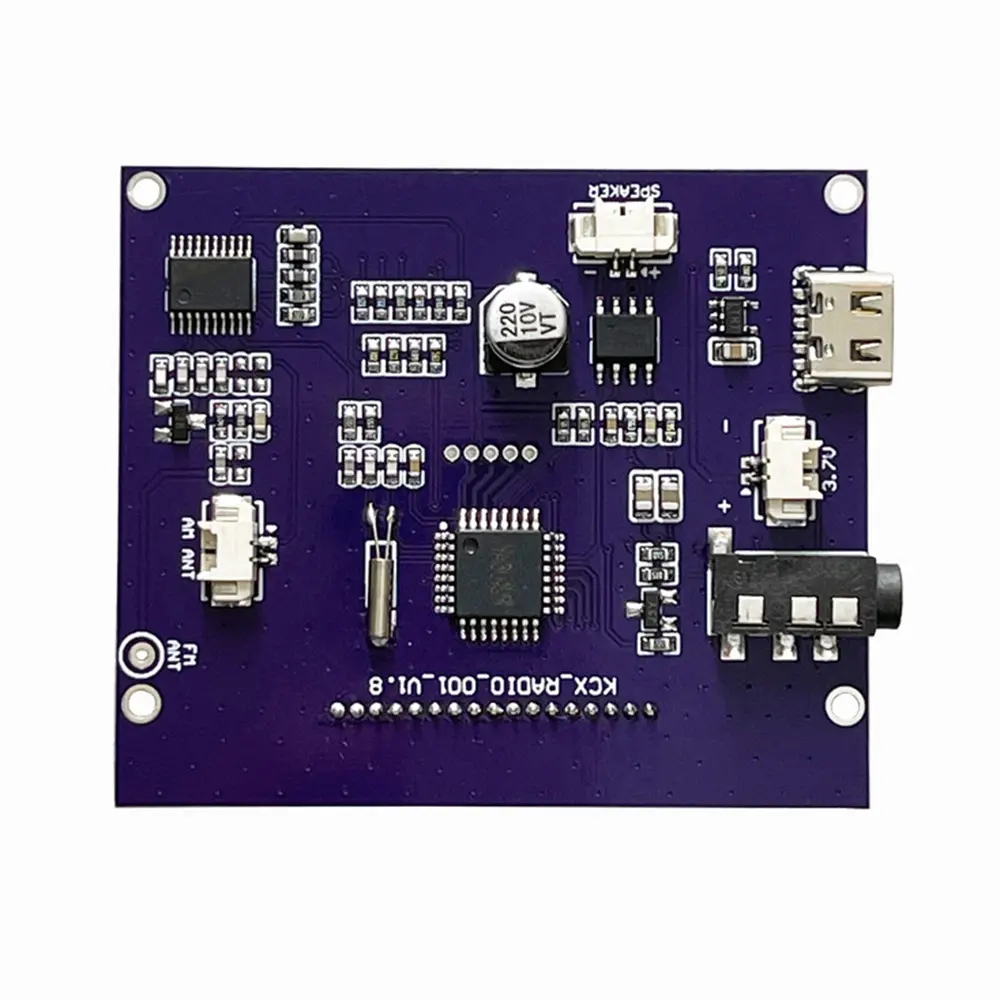
<div class="detailmodule_dynamic"><kse:widget data-widget-type="customText" id="1005000004351622" type="relation"></kse:widget></div><div class="detailmodule_html"><div class="detail-desc-decorate-richtext"><br/><span style="font-size:20px"><strong>Product features:</strong></span><br/>1.3 frequency ranges, frequency modulation (FM) 87-108MHz, medium wave (MW): 522-1620KHz, short wave (SW): 4.75-21.85MHz<br/>2. Low distortion, with a maximum output distortion of ≤ 10%<br/>3. Low energy consumption, clock mode standby static current only ≤ 25uA<br/>4. Fully functional and easy to operate<br/>5. Support timed startup switch<br/><span style="font-size:20px"><strong><br/>Product technical indicators</strong></span><br/>1. Frequency range<br/>Frequency modulation (FM): 87-108MHz<br/>Medium wave (MW): 522-1620KHz<br/>Short wave (SW): 4.75-21.85MHz<br/>2. Noise limiting sensitivity<br/>Frequency modulation (FM): 30dB ≤ 8dBu<br/>Amplitude modulated medium wave (MW): 26dB ≤ 60dBu<br/>Amplitude modulated short wave (SW): 26dB ≤ 32dB<br/>3. FM stereo separation: 98MHz ≥ 20dB<br/>4. Signal to noise ratio<br/>Frequency modulation (FM): 98MHz ≥ 50dB<br/>Medium wave (MW): 1000KHz ≥ 40dB<br/>5. Maximum output power<br/>Earphone: ≥ 100mW * 2<br/>Speaker: 4 ohms/5W<br/>6. Maximum instantaneous working current: ≤ 500mA<br/>7. Maximum output distortion: ≤ 10%<br/>8. Clock mode standby static current: ≤ 25uA (lithium battery can stand by for 1 year when fully charged)<br/>9. Power supply: 3.7V/1000mAH lithium battery (battery not included in the product)<br/>10. PCBA size: 58x49x10mm<br/><br/><span style="font-size:20px"><strong>Kind reminder:</strong></span><br/>The radio is used to receive signals emitted by broadcasting stations, and the reception effect varies depending on the listening environment. For areas or buildings near large signal stations, due to signal interference or shielding, when listening to a certain radio wave, there may be mixed or all noise, which cannot be eliminated! When listening, it is recommended to stay as far away from household appliances as possible and adjust the antenna direction as close to the doors and windows as possible!<br/><br/><span style="font-size:20px"><strong>Product List:</strong></span><br/>1X radio module<br/><br/><span style="font-size:20px"><strong>Function and operating instructions</strong></span><br/><1> Power switch<br/>Press the 'POWER' button to display the 'ON' pattern on the screen for 2 seconds before displaying the radio frequency and frequency units. Adjust other buttons to receive your favorite radio programs. After pressing this button again, the "OFF" pattern will be displayed on the screen for 2 seconds, and the radio will be turned off and restored to the clock mode for standby.<br/><2> Volume adjustment (VOL+/VOL -)<br/>In playback mode, short press the VOL+key to increase the volume once, long press to continuously increase, short press the VOL - key to decrease the volume once, long press to continuously decrease, and the adjustable range of the volume is 00-31.<br/><3> TUNING UP/DOWN<br/>In any band while listening, press the "UP" frequency increase search button and the "DOWN" frequency decrease search button to change the current radio frequency. Press briefly once to create one radio frequency stepper unit. If the button is held down for more than 1 second and then released, it is in continuous step search mode. The radio frequency will quickly increase or decrease until a frequency with a radio program is found before automatically stopping to play sound. If it is necessary to replace the radio program, the above operation can be repeated.<br/><4> Sleep switch (Lock_SLEEP)<br/>Press the "LOCK_SLEEP" button for the first time, and the screen will display the sleep shutdown time and the "sleep icon" flashing. The number '90' indicates that the radio will automatically shut down after 90 minutes of listening time, and the 'sleep icon' indicates that the radio is in a sleep timed state. The sleep timer "time number" on the display screen can be repeatedly pressed during the flashing period. The sleep time can be selected from "90 60 45 30 15 10 OFF" minutes. When "OFF" is selected, it means the sleep timer function is cancelled. During the sleep scheduled program listening process, when pressing the "POWER" button, the radio function can be turned off in advance and automatically restored to the clock state for standby.<br/>Press the button once in the listening mode to check the remaining time of sleep timer playback. If you press it again, you can change the sleep timer parameters!<br/><span style="color:rgb(255, 0, 0)"><strong>Note:</strong></span> Press and hold the "LOCK_SLEEP" button for more than 2 seconds, which is the "key lock" function. The "lock" symbol is displayed on the screen before releasing, and at this moment, the "lock" symbol flashes, indicating that all key functions have been locked (the button is not working). If unlocking is required, press and hold the "Lock_SLEEP" button for more than 2 seconds until the "lock" symbol disappears on the screen before releasing it. The lock is released, and other key functions resume normal use.<br/><5> Clock setting (TIME)<br/>(1) Press and hold the "TIME" button for 2 seconds, and the screen will display "12/24" flashing and the 12/24 hour system can be selected. The first time the battery is installed, the display will start running from 12:00 AM. The clock setting must be set in the clock display interface, and the clock setting button and radio setting button can be used in combination. When the 12/24 hour clock setting option flashes, press the "TUNING_UP" or "TUNING_DOWN" button to switch the clock system. If there is no operation within 5 seconds, the system will automatically exit the current setting.<br/>(2) Following the above steps, press the "TIME" button again, and the 12:00 hour position displayed on the screen will continuously flash. Press the "TUNINGUP" button or the "TUNINGDOWN" button to change the hour time. When held down for more than 2 seconds, the hour will quickly change. When not operated within 5 seconds, the system will automatically exit the current setting.<br/>(3) Press the "TIME" button for the third time following the above steps, and the 00 minute time bit in the screen display will continuously flash. Press the "TUNINGUP" button or the "TUNINGDOWN" button to change the minute time. When held down for more than 2 seconds, the minute will quickly change. If not operated within 5 seconds, the system will automatically exit the current setting.<br/>(4) Continue with step 4 above and press the "TIME" button to exit the current settings. Note: The current time can be divided into 12 hour and 24 hour formats, with the "AM" icon illuminated indicating morning time and the "PM" icon illuminated indicating 12 o'clock in the afternoon time. This is the 12 hour format. If there is no AM/PM symbol, it is a 24-hour format!<br/><6> Timing startup time setting (ALARM)<br/>The setting of the ARM timed boot time must be done in the clock display mode, and the ARM timed boot setting button is used in combination with the radio function button.<br/>(1) Press and hold the "ALARM" key for 2 seconds, and the AL (alarm clock) hour time bit displayed on the screen will continuously flash. Press the "TUNINGUP" or "TUNINGDOWN" key to change the AL hour time. After holding down the button for more than 2 seconds, the AL hour time quickly changes. If there is no operation within 5 seconds, the system will automatically exit the current setting.<br/>(2) Refer to the previous operation for AL minute settings. Press the "ALARM" key for the third time to exit the setup.<br/><7> . Timed startup switch (ALARM ON/OFF)<br/>ALARM_ The ON/OFF timed startup switch must be set in the clock display mode, LARM_ The ON/OFF timed power on switch setting button is used in combination with the radio function button.<br/>(1) Press and hold the "AL-ON/OFF" button for 2 seconds, and the "Alarm" icon will appear on the screen, indicating that the AL function is turned on. Press and hold for another 2 seconds, and the "Alarm" icon will disappear, indicating that the AL function is turned off.<br/><8> Band selection (AM/FM)<br/>After selecting one of the above two methods to turn on the listening function, press the band switch button once to select your favorite band program. The frequency band change for each single press is a cycle between FM frequency modulation, AM amplitude modulation (medium wave), and SW amplitude modulation (short wave).<br/><9> Scan and store radio stations<br/>In any frequency band while listening, press and hold the "TIME" button for more than 2 seconds to enter the scan storage mode. The current radio frequency will rapidly increase. If a radio frequency with a program is encountered during the increase process, it will be automatically stored in the memory chip. The display on the screen indicates that the first radio frequency has been stored, indicating that the second radio frequency has been stored. When the number of stored radio stations equals or the radio frequency increases to the highest point (high end), the scanning storage state immediately ends, and the radio returns to the stored program station or the lowest frequency (low end) state.<br/><10> M+/M - Storage and retrieval<br/>Long press and hold the ALARM key to activate the "M -" function. Long press and hold the ALARM key_ The ON/OFF key is the "M+" function.<br/>Press the "M+" or "M -" button for storing and retrieving channels in any band while listening, and the address number stored in the frequency will increase by one unit or decrease by one unit<br/>Move the address number to the high position (the highest position depends on the number of stored radio stations). Users can quickly change programs by pressing the "M+" or "M -" buttons.<br/>To save the current radio frequency, press and hold the "M+" or "M -" button until the "PRE" symbol appears. During the symbol flashing, quickly press the "M+" or "M -" button to select the address you want to keep.<br/>Note: To use the M+/M-storage address number retrieval function, it is necessary to first complete the scanning and storage of radio programs in the relevant band or manually save the channel in order to make sense. Otherwise, pressing the retrieval button will only return to the lowest end and display the radio frequency.<br/><11> Function description of rod antenna<br/>The rod antenna is crucial for the reception performance of the product, and it is recommended to use FM dedicated rod antennas for this machine. When listening to FM radio or shortwave SW radio programs, it is necessary to open the rod antenna in conjunction with it. When receiving a radio program, slowly rotate the angle of the rod antenna by hand until the radio sound is clear and loud. For radio programs in different directions, the rod antenna needs to be rotated at different angles. By adjusting the angle of the antenna, this device can achieve the best reception effect. In addition, receiving MW medium wave band programs does not require a rod antenna, it relies on a magnetic rod coil to receive signals. If you want to receive better results, you must rotate the machine body to find the direction where the radio station sounds the loudest.<br/><br/><span style="font-size:20px"><strong>Frequently asked questions:</strong></span><br/>Why can't the radio be powered by a mobile phone charger, mobile power supply, and computer USB?<br/>1: The power supplies from mobile phone chargers, power banks, and computer USB interfaces are all filtered and rectified through switch conversion. After the power supply undergoes switch conversion, it will generate a considerable amount of high-frequency harmonic interference. The high-frequency harmonics are transmitted and added through multiple channels to interfere with the radio receiver receiving the radio signals we need, which will make the radio unable to receive the radio or cause high interference noise.<br/>2: The module was designed according to the standard of connecting to a 3.7V/1000mAH lithium battery. The USB interface serves as the charging interface, and the power input from the USB interface needs to go through the charging management chip and then connect to the external lithium battery of the module. At the same time, the battery also bears the function of voltage stabilization. So, it is necessary to connect a 3.7V lithium battery to power the module for normal use! When using a USB interface to input 5V to power the module without connecting the battery, abnormal charging icon display and abnormal operation caused by unstable chip voltage may occur.<br/>If the AL function is turned on, the playback function will automatically turn on when the real-time time is consistent with the AL time, and the playback function will automatically turn off after 30 minutes of listening. This AL function can only listen and cannot operate buttons. Once operated, it will exit this function.<br/>There are three ways to activate radio playback, but due to the inability to perform button operations when AL is timed to activate the radio function, only the other two methods for activating the radio function are introduced.<br/>Advantages and disadvantages of FM/MW/SW<br/>FM (FM broadcasting): (radio wave signal: amplitude unchanged, its frequency adjusted) Listening to FM broadcasting is characterized by low interference, clean sound, stereo (dual channel) programs can be received, and the audio range is wide; Disadvantages: Because the FM frequency band mainly propagates through straight lines and reflects ground objects, signals transmitted through radio stations have a short propagation distance and small coverage, and can generally only be listened to by local stations.<br/>SW (Short Wave): The propagation of short waves is mainly carried out by sky waves, which can transmit over long distances with very low power through sky waves. The characteristics of short waves are unstable signal drift, high noise during listening, single channel, and poor sound quality. The advantages are long transmission distance, wide coverage, and the ability to hear international radio programs.<br/>MW (medium wave): It can be transmitted through sky waves and ground waves. But Tianbo is very unstable. In the process of skywave propagation, path attenuation, time delay, Atmospheric noise, multipath effect, ionospheric fading and other factors will cause signal weakening and distortion, affecting the communication effect. Its characteristics include noise, strong directionality, weak anti-interference ability, decent sound quality, and the advantage of being able to receive distant wireless broadcasts and mono channels. Due to the influence of the ionosphere, signals are generally not received during the day.<br/><br/></div></div><p><br/></p>
$29.105
$28.175
- Category : Consumer Electronics
- Brand : diy_electronics_module_999_store DIY Electronics Module 999 Store
Colors
Sizes
-
+
<div class="detailmodule_dynamic"><kse:widget data-widget-type="customText" id="1005000004351622" type="relation"></kse:widget></div><div class="detailmodule_html"><div class="detail-desc-decorate-richtext"><br/><span style="font-size:20px"><strong>Product features:</strong></span><br/>1.3 frequency ranges, frequency modulation (FM) 87-108MHz, medium wave (MW): 522-1620KHz, short wave (SW): 4.75-21.85MHz<br/>2. Low distortion, with a maximum output distortion of ≤ 10%<br/>3. Low energy consumption, clock mode standby static current only ≤ 25uA<br/>4. Fully functional and easy to operate<br/>5. Support timed startup switch<br/><span style="font-size:20px"><strong><br/>Product technical indicators</strong></span><br/>1. Frequency range<br/>Frequency modulation (FM): 87-108MHz<br/>Medium wave (MW): 522-1620KHz<br/>Short wave (SW): 4.75-21.85MHz<br/>2. Noise limiting sensitivity<br/>Frequency modulation (FM): 30dB ≤ 8dBu<br/>Amplitude modulated medium wave (MW): 26dB ≤ 60dBu<br/>Amplitude modulated short wave (SW): 26dB ≤ 32dB<br/>3. FM stereo separation: 98MHz ≥ 20dB<br/>4. Signal to noise ratio<br/>Frequency modulation (FM): 98MHz ≥ 50dB<br/>Medium wave (MW): 1000KHz ≥ 40dB<br/>5. Maximum output power<br/>Earphone: ≥ 100mW * 2<br/>Speaker: 4 ohms/5W<br/>6. Maximum instantaneous working current: ≤ 500mA<br/>7. Maximum output distortion: ≤ 10%<br/>8. Clock mode standby static current: ≤ 25uA (lithium battery can stand by for 1 year when fully charged)<br/>9. Power supply: 3.7V/1000mAH lithium battery (battery not included in the product)<br/>10. PCBA size: 58x49x10mm<br/><br/><span style="font-size:20px"><strong>Kind reminder:</strong></span><br/>The radio is used to receive signals emitted by broadcasting stations, and the reception effect varies depending on the listening environment. For areas or buildings near large signal stations, due to signal interference or shielding, when listening to a certain radio wave, there may be mixed or all noise, which cannot be eliminated! When listening, it is recommended to stay as far away from household appliances as possible and adjust the antenna direction as close to the doors and windows as possible!<br/><br/><span style="font-size:20px"><strong>Product List:</strong></span><br/>1X radio module<br/><br/><span style="font-size:20px"><strong>Function and operating instructions</strong></span><br/><1> Power switch<br/>Press the 'POWER' button to display the 'ON' pattern on the screen for 2 seconds before displaying the radio frequency and frequency units. Adjust other buttons to receive your favorite radio programs. After pressing this button again, the "OFF" pattern will be displayed on the screen for 2 seconds, and the radio will be turned off and restored to the clock mode for standby.<br/><2> Volume adjustment (VOL+/VOL -)<br/>In playback mode, short press the VOL+key to increase the volume once, long press to continuously increase, short press the VOL - key to decrease the volume once, long press to continuously decrease, and the adjustable range of the volume is 00-31.<br/><3> TUNING UP/DOWN<br/>In any band while listening, press the "UP" frequency increase search button and the "DOWN" frequency decrease search button to change the current radio frequency. Press briefly once to create one radio frequency stepper unit. If the button is held down for more than 1 second and then released, it is in continuous step search mode. The radio frequency will quickly increase or decrease until a frequency with a radio program is found before automatically stopping to play sound. If it is necessary to replace the radio program, the above operation can be repeated.<br/><4> Sleep switch (Lock_SLEEP)<br/>Press the "LOCK_SLEEP" button for the first time, and the screen will display the sleep shutdown time and the "sleep icon" flashing. The number '90' indicates that the radio will automatically shut down after 90 minutes of listening time, and the 'sleep icon' indicates that the radio is in a sleep timed state. The sleep timer "time number" on the display screen can be repeatedly pressed during the flashing period. The sleep time can be selected from "90 60 45 30 15 10 OFF" minutes. When "OFF" is selected, it means the sleep timer function is cancelled. During the sleep scheduled program listening process, when pressing the "POWER" button, the radio function can be turned off in advance and automatically restored to the clock state for standby.<br/>Press the button once in the listening mode to check the remaining time of sleep timer playback. If you press it again, you can change the sleep timer parameters!<br/><span style="color:rgb(255, 0, 0)"><strong>Note:</strong></span> Press and hold the "LOCK_SLEEP" button for more than 2 seconds, which is the "key lock" function. The "lock" symbol is displayed on the screen before releasing, and at this moment, the "lock" symbol flashes, indicating that all key functions have been locked (the button is not working). If unlocking is required, press and hold the "Lock_SLEEP" button for more than 2 seconds until the "lock" symbol disappears on the screen before releasing it. The lock is released, and other key functions resume normal use.<br/><5> Clock setting (TIME)<br/>(1) Press and hold the "TIME" button for 2 seconds, and the screen will display "12/24" flashing and the 12/24 hour system can be selected. The first time the battery is installed, the display will start running from 12:00 AM. The clock setting must be set in the clock display interface, and the clock setting button and radio setting button can be used in combination. When the 12/24 hour clock setting option flashes, press the "TUNING_UP" or "TUNING_DOWN" button to switch the clock system. If there is no operation within 5 seconds, the system will automatically exit the current setting.<br/>(2) Following the above steps, press the "TIME" button again, and the 12:00 hour position displayed on the screen will continuously flash. Press the "TUNINGUP" button or the "TUNINGDOWN" button to change the hour time. When held down for more than 2 seconds, the hour will quickly change. When not operated within 5 seconds, the system will automatically exit the current setting.<br/>(3) Press the "TIME" button for the third time following the above steps, and the 00 minute time bit in the screen display will continuously flash. Press the "TUNINGUP" button or the "TUNINGDOWN" button to change the minute time. When held down for more than 2 seconds, the minute will quickly change. If not operated within 5 seconds, the system will automatically exit the current setting.<br/>(4) Continue with step 4 above and press the "TIME" button to exit the current settings. Note: The current time can be divided into 12 hour and 24 hour formats, with the "AM" icon illuminated indicating morning time and the "PM" icon illuminated indicating 12 o'clock in the afternoon time. This is the 12 hour format. If there is no AM/PM symbol, it is a 24-hour format!<br/><6> Timing startup time setting (ALARM)<br/>The setting of the ARM timed boot time must be done in the clock display mode, and the ARM timed boot setting button is used in combination with the radio function button.<br/>(1) Press and hold the "ALARM" key for 2 seconds, and the AL (alarm clock) hour time bit displayed on the screen will continuously flash. Press the "TUNINGUP" or "TUNINGDOWN" key to change the AL hour time. After holding down the button for more than 2 seconds, the AL hour time quickly changes. If there is no operation within 5 seconds, the system will automatically exit the current setting.<br/>(2) Refer to the previous operation for AL minute settings. Press the "ALARM" key for the third time to exit the setup.<br/><7> . Timed startup switch (ALARM ON/OFF)<br/>ALARM_ The ON/OFF timed startup switch must be set in the clock display mode, LARM_ The ON/OFF timed power on switch setting button is used in combination with the radio function button.<br/>(1) Press and hold the "AL-ON/OFF" button for 2 seconds, and the "Alarm" icon will appear on the screen, indicating that the AL function is turned on. Press and hold for another 2 seconds, and the "Alarm" icon will disappear, indicating that the AL function is turned off.<br/><8> Band selection (AM/FM)<br/>After selecting one of the above two methods to turn on the listening function, press the band switch button once to select your favorite band program. The frequency band change for each single press is a cycle between FM frequency modulation, AM amplitude modulation (medium wave), and SW amplitude modulation (short wave).<br/><9> Scan and store radio stations<br/>In any frequency band while listening, press and hold the "TIME" button for more than 2 seconds to enter the scan storage mode. The current radio frequency will rapidly increase. If a radio frequency with a program is encountered during the increase process, it will be automatically stored in the memory chip. The display on the screen indicates that the first radio frequency has been stored, indicating that the second radio frequency has been stored. When the number of stored radio stations equals or the radio frequency increases to the highest point (high end), the scanning storage state immediately ends, and the radio returns to the stored program station or the lowest frequency (low end) state.<br/><10> M+/M - Storage and retrieval<br/>Long press and hold the ALARM key to activate the "M -" function. Long press and hold the ALARM key_ The ON/OFF key is the "M+" function.<br/>Press the "M+" or "M -" button for storing and retrieving channels in any band while listening, and the address number stored in the frequency will increase by one unit or decrease by one unit<br/>Move the address number to the high position (the highest position depends on the number of stored radio stations). Users can quickly change programs by pressing the "M+" or "M -" buttons.<br/>To save the current radio frequency, press and hold the "M+" or "M -" button until the "PRE" symbol appears. During the symbol flashing, quickly press the "M+" or "M -" button to select the address you want to keep.<br/>Note: To use the M+/M-storage address number retrieval function, it is necessary to first complete the scanning and storage of radio programs in the relevant band or manually save the channel in order to make sense. Otherwise, pressing the retrieval button will only return to the lowest end and display the radio frequency.<br/><11> Function description of rod antenna<br/>The rod antenna is crucial for the reception performance of the product, and it is recommended to use FM dedicated rod antennas for this machine. When listening to FM radio or shortwave SW radio programs, it is necessary to open the rod antenna in conjunction with it. When receiving a radio program, slowly rotate the angle of the rod antenna by hand until the radio sound is clear and loud. For radio programs in different directions, the rod antenna needs to be rotated at different angles. By adjusting the angle of the antenna, this device can achieve the best reception effect. In addition, receiving MW medium wave band programs does not require a rod antenna, it relies on a magnetic rod coil to receive signals. If you want to receive better results, you must rotate the machine body to find the direction where the radio station sounds the loudest.<br/><br/><span style="font-size:20px"><strong>Frequently asked questions:</strong></span><br/>Why can't the radio be powered by a mobile phone charger, mobile power supply, and computer USB?<br/>1: The power supplies from mobile phone chargers, power banks, and computer USB interfaces are all filtered and rectified through switch conversion. After the power supply undergoes switch conversion, it will generate a considerable amount of high-frequency harmonic interference. The high-frequency harmonics are transmitted and added through multiple channels to interfere with the radio receiver receiving the radio signals we need, which will make the radio unable to receive the radio or cause high interference noise.<br/>2: The module was designed according to the standard of connecting to a 3.7V/1000mAH lithium battery. The USB interface serves as the charging interface, and the power input from the USB interface needs to go through the charging management chip and then connect to the external lithium battery of the module. At the same time, the battery also bears the function of voltage stabilization. So, it is necessary to connect a 3.7V lithium battery to power the module for normal use! When using a USB interface to input 5V to power the module without connecting the battery, abnormal charging icon display and abnormal operation caused by unstable chip voltage may occur.<br/>If the AL function is turned on, the playback function will automatically turn on when the real-time time is consistent with the AL time, and the playback function will automatically turn off after 30 minutes of listening. This AL function can only listen and cannot operate buttons. Once operated, it will exit this function.<br/>There are three ways to activate radio playback, but due to the inability to perform button operations when AL is timed to activate the radio function, only the other two methods for activating the radio function are introduced.<br/>Advantages and disadvantages of FM/MW/SW<br/>FM (FM broadcasting): (radio wave signal: amplitude unchanged, its frequency adjusted) Listening to FM broadcasting is characterized by low interference, clean sound, stereo (dual channel) programs can be received, and the audio range is wide; Disadvantages: Because the FM frequency band mainly propagates through straight lines and reflects ground objects, signals transmitted through radio stations have a short propagation distance and small coverage, and can generally only be listened to by local stations.<br/>SW (Short Wave): The propagation of short waves is mainly carried out by sky waves, which can transmit over long distances with very low power through sky waves. The characteristics of short waves are unstable signal drift, high noise during listening, single channel, and poor sound quality. The advantages are long transmission distance, wide coverage, and the ability to hear international radio programs.<br/>MW (medium wave): It can be transmitted through sky waves and ground waves. But Tianbo is very unstable. In the process of skywave propagation, path attenuation, time delay, Atmospheric noise, multipath effect, ionospheric fading and other factors will cause signal weakening and distortion, affecting the communication effect. Its characteristics include noise, strong directionality, weak anti-interference ability, decent sound quality, and the advantage of being able to receive distant wireless broadcasts and mono channels. Due to the influence of the ionosphere, signals are generally not received during the day.<br/><br/></div></div><p><br/></p>