FM Radio DIY Kit FM Radio Receiver 76MHz-108MHz DIY Radio Speaker Kit Frequency Modification LCD Display Soldering Practice
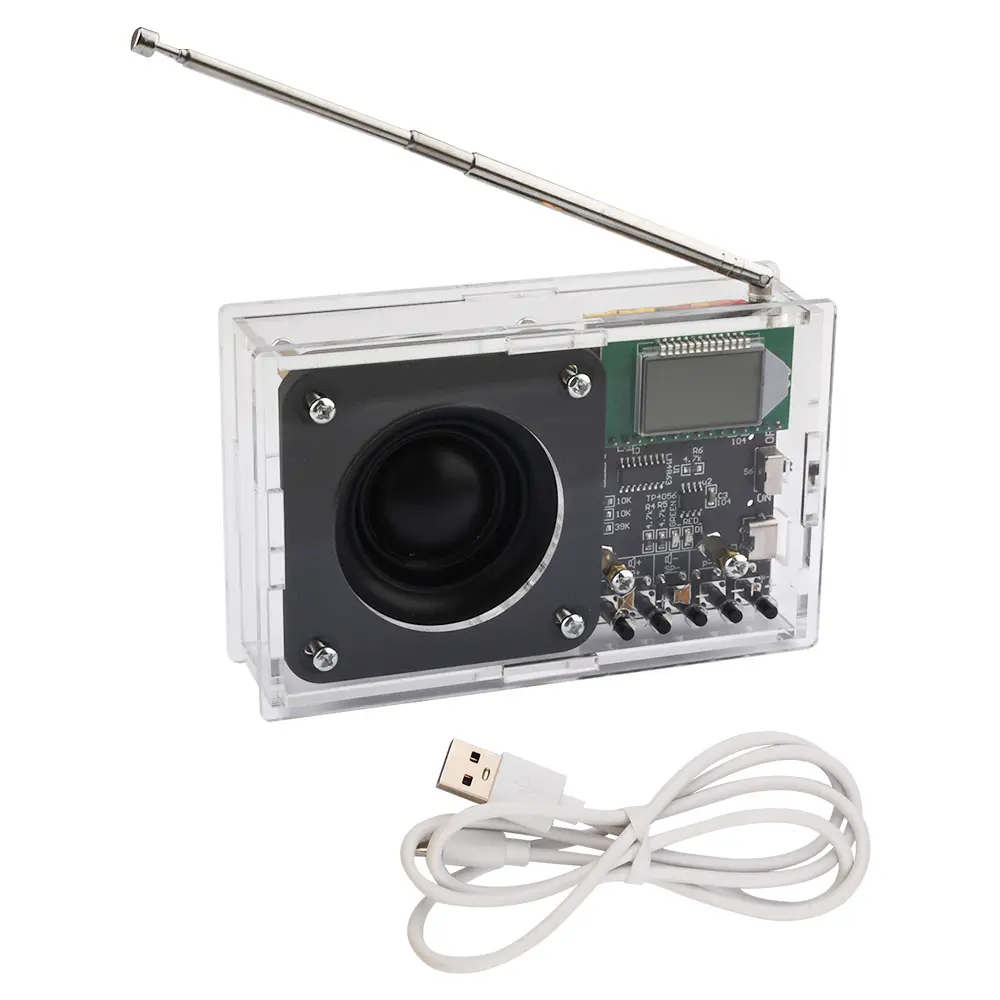
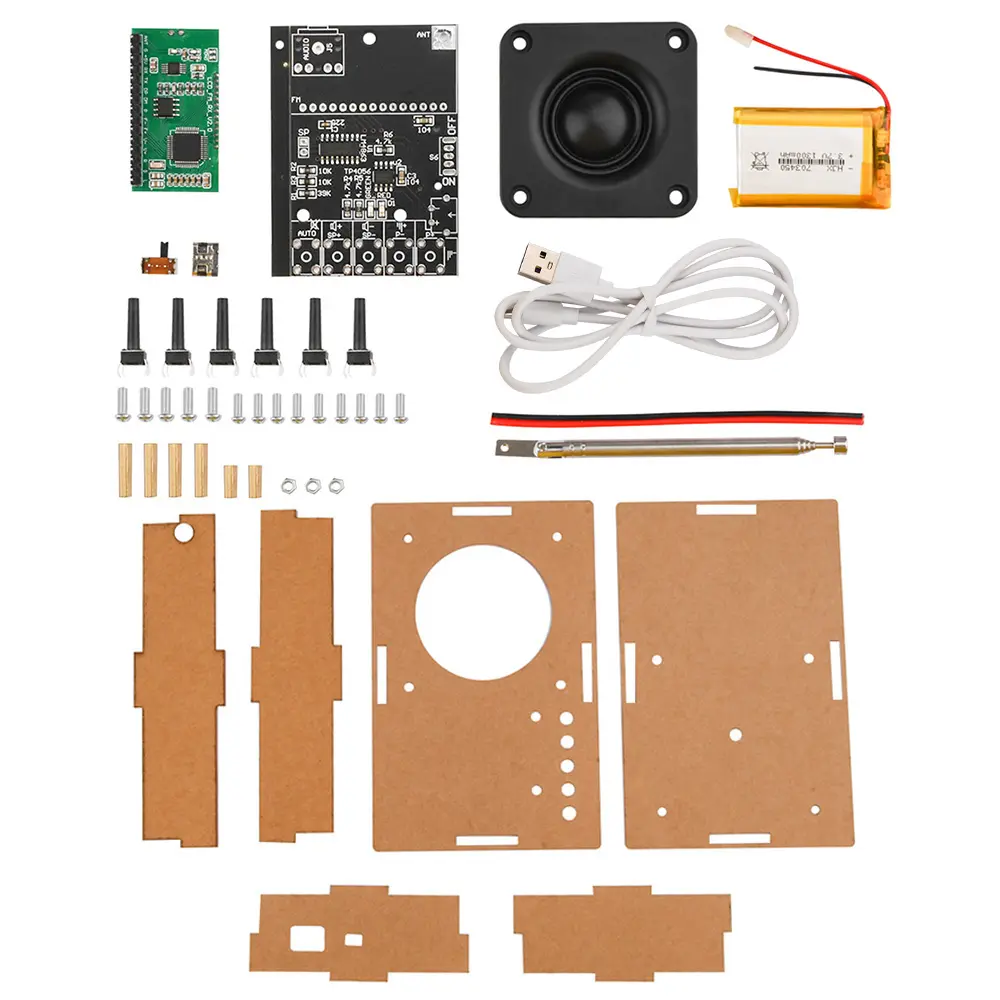
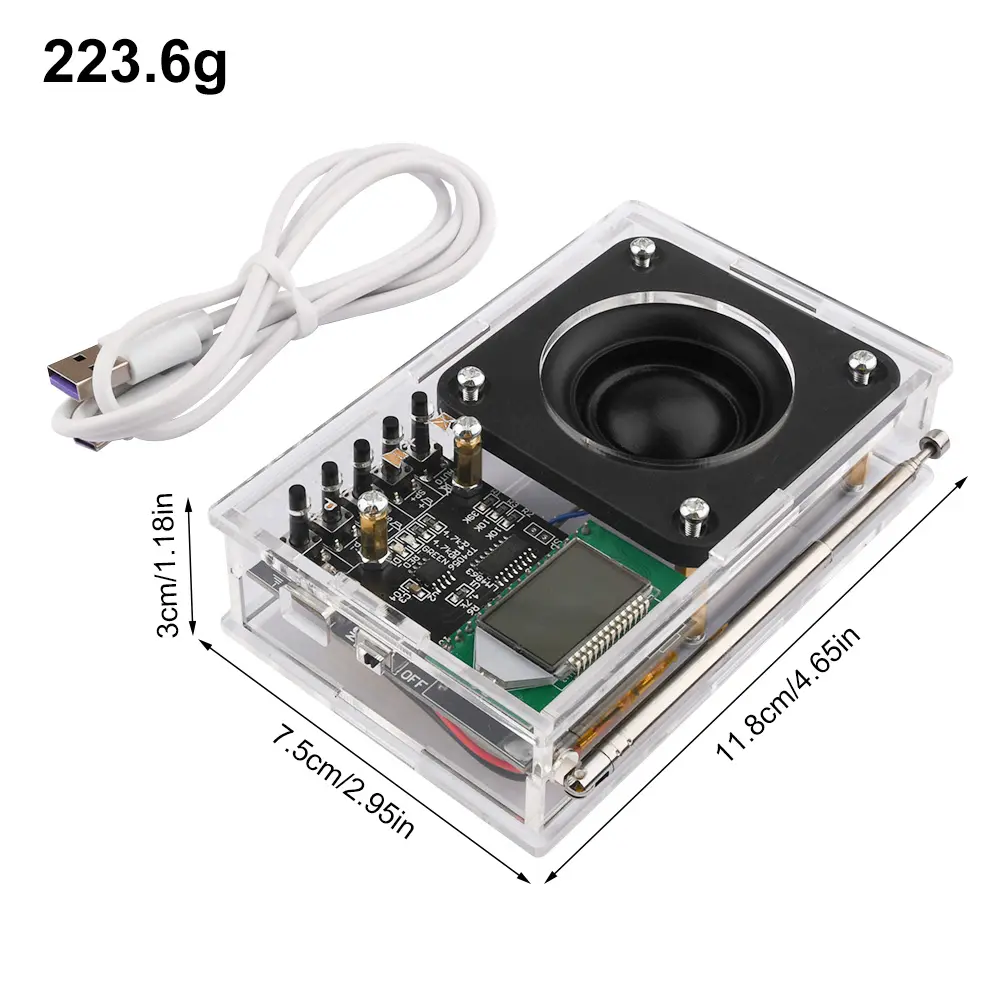
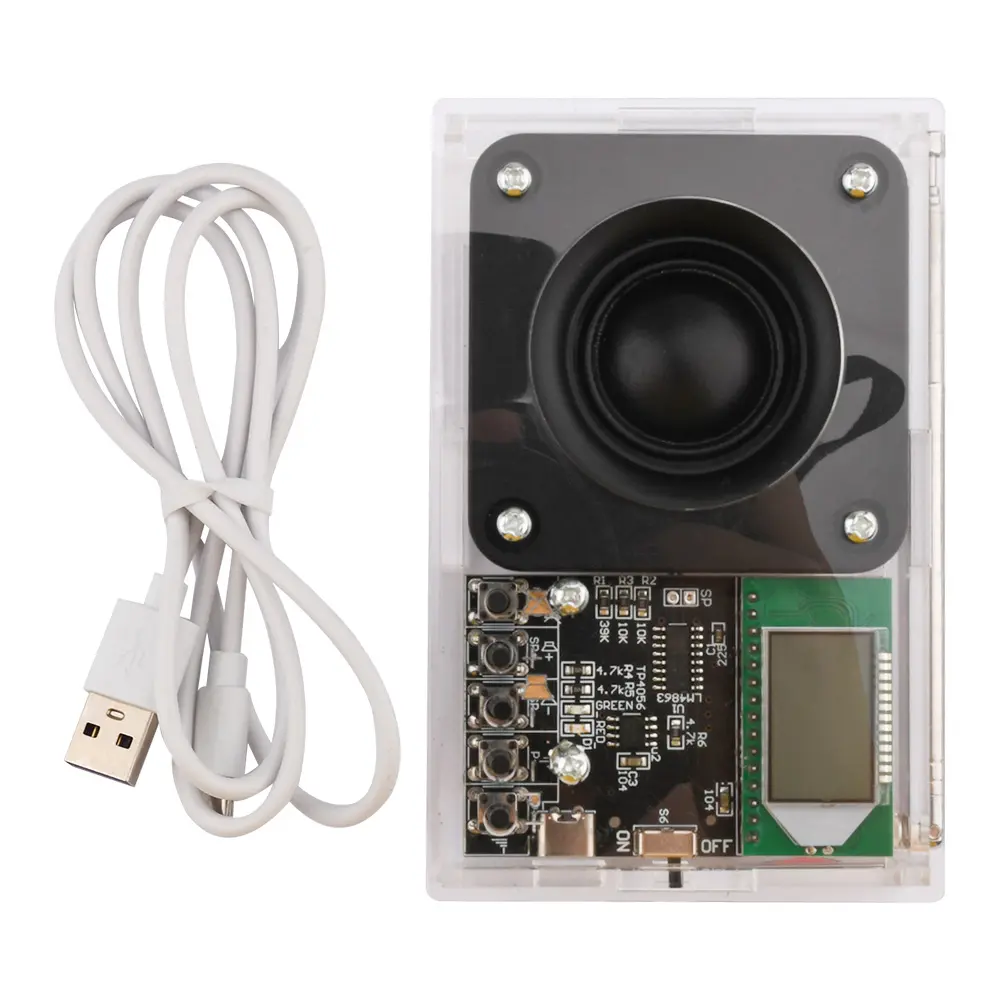
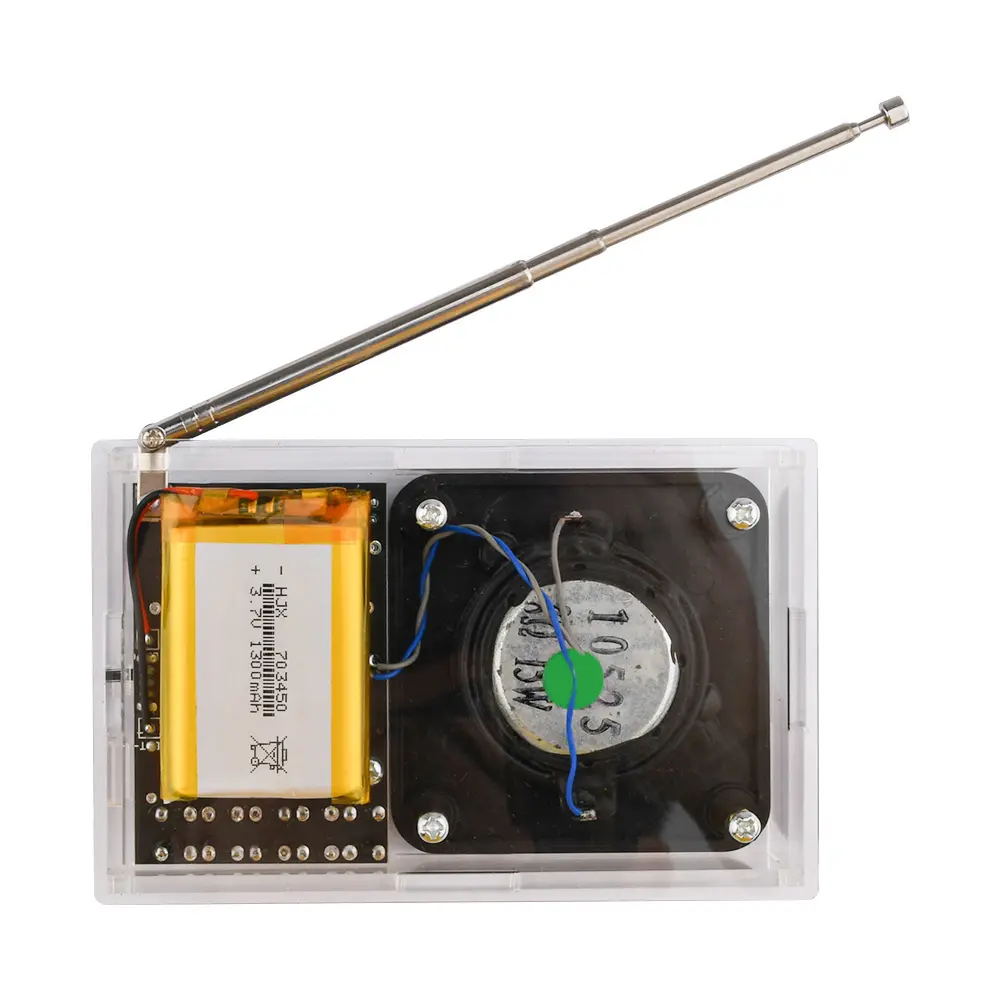
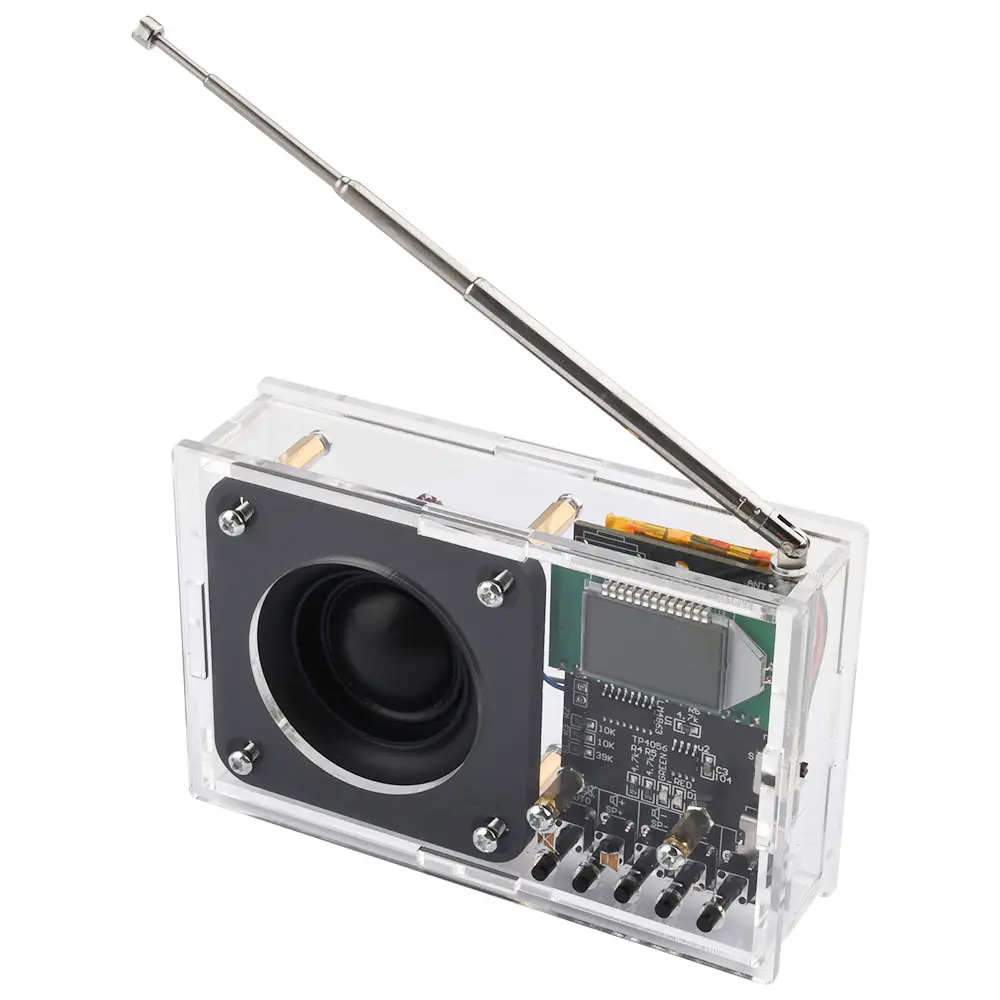
<div class="detailmodule_html"><div class="detail-desc-decorate-richtext"><span style="font-size:20px"><strong>Product features:</strong></span><br/>1: Advanced digital audio signal processing technology (DSP) and FM phase-locked loop modulation technology (PLL) are used to make the sound quality more realistic, the performance more stable, and the working frequency does not shift for a long time.<br/>Good signal reception, we can receive around 20 stations locally.<br/>2: LCD display is more intuitive and accurate, with extremely low power consumption and minimal noise interference. <br/>3: It has the function of automatically searching for and storing radio stations, making it easy to operate and use. <br/>4: Built in 30 level digital volume adjustment, easy to complete with button operation.<br/>5: Automatic memory of data before power outage.<br/>6: Using quartz crystal to stabilize the frequency, the emission frequency no longer drifts when the temperature changes.<br/>7: All frequency bands (76-108MHz) automatically search for signal frequency bands and store memory. <br/>8: Equipped with a rechargeable lithium battery and charging circuit, it can be charged with a mobile phone charger. The charging light will turn red and the charging light will turn green when fully charged.<br/><span style="font-size:20px"><strong><br/>Product parameters:</strong></span><br/>Power supply voltage: 3.0V-5.0V<br/>Built-in battery: 3.7V 1300MAH (fully charged for approximately 7-8 hours)<br/>Built in: 2.5-inch 8-euro 15W speaker<br/>Frequency response range: 50Hz to 18KHz<br/>Receiving frequency adjustment range:<br/>Turn off campus radio at 87.0MHz-108.0MHz and turn on campus radio at 76.0MHz-108.0MHz<br/>Equivalent noise: ≥ 30dB<br/>PCB board size: 6.4CM * 4.3CM<br/>Shell size: 11.85CM * 7.6CM * 3.14CM<br/><span style="font-size:20px"><strong><br/>Instructions for use:</strong></span><br/>After each module is completed, it will automatically search for channels first. Long press and hold the "AUTO key" to start automatic search and store the stations that can be heard,<br/>2. After the search is completed, the first radio station P01 will automatically play. Users can press the "Previous Station" or "Next Station" button to switch to the searched station.<br/>3. This module can set the backlight status and whether to listen to the campus radio frequency band based on the specific usage of the user. The setting method is as follows.<br/>4. When the power is off, press and hold the VOL+button. After powering on, the LCD will display C1 to turn on campus broadcasting and C0 to turn off the campus broadcasting frequency band. After restarting, the settings will take effect.<br/>5. To set the backlight status, press and hold the up and down radio buttons simultaneously in the power off state to turn on the device. The display B1 indicates that the backlight is constantly on, and B0 indicates that the backlight is turned off for 20 seconds. After restarting, the setting will take effect. Change the setting status and repeat this step to switch. The factory is uniformly set to not turn on the campus broadcast frequency band, and the backlight is turned off for 20 seconds without operation.<br/><span style="font-size:20px"><strong><br/>Precautions:</strong></span><br/>1. During operation, do not touch the back components of the module to avoid affecting its normal operation or causing short circuits to burn the module.<br/>2. This module is a radio sensitive device, and interference from the power supply or nearby sources may affect the normal operation of the module. Therefore, it is recommended to use a battery or power frequency transformer to stabilize the power supply for the module.<br/>3. Switching power supplies (such as mobile phone chargers and any other switching power supplies), power banks, and nearby devices such as Class D amplifiers and microwave ovens should not be used. Otherwise, the interference generated by these devices will affect the reception effect of this module. Friends who purchase DIY components and develop them themselves should pay attention. <br/><br/><span style="font-size:20px"><strong>Product List:</strong></span><br/><strong><br/>Package 1:</strong><br/>DIY loose parts shipping list (without battery or shell):<br/>PCB board soldered with SMD device * 1 piece<br/>6 * 6 * 17 buttons * 6<br/>TPEC_ C interface * 1 piece<br/>12D07 side toggle switch * 1 piece<br/>Radio module * 1 unit<br/>2-core wire 10CM * 1 section<br/>Antenna * 1 piece<br/>USB to TYPE_ C line * 1 piece<br/><strong><br/>Package 2:</strong><br/>Full set of loose parts shipping list:<br/>PCB board soldered with SMD device * 1 piece<br/>6 * 6 * 17 buttons * 6<br/>TPEC_ C interface * 1 piece<br/>12D07 side toggle switch * 1 piece<br/>Radio module * 1 unit<br/>2-core wire 10CM * 1 section<br/>Antenna * 1 piece<br/>USB to TYPE_ C line * 1 piece<br/>703450 lithium battery 1300MAH (pasted with foam glue) * 1<br/>Huiwei 2.5-inch speaker * 1<br/>Acrylic board * 1 set<br/><strong><br/>Screw pack:</strong><br/>M3 * 10 * 5 pieces<br/>M3 * 8 * 9 pieces<br/>M3 * 10 double pass copper column * 2 pieces<br/>M3 * 20 double pass copper column * 4 pieces<br/>M3 nut * 3 pieces<br/><strong>Set Three:</strong><br/>FM digital radio finished product * 1 set<br/>USB to TYPE_ C line * 1 piece<br/>Package 4:<br/><strong>Shell:</strong><br/>Acrylic board * 1 set<br/>Screw pack:<br/>M3 * 10 * 5 pieces<br/>M3 * 8 * 9 pieces<br/>M3 * 10 double pass copper column * 2 pieces<br/>M3 * 20 double pass copper column * 4 pieces<br/>M3 nut * 3 pieces<br/><span style="color:rgb(255, 0, 0)"><strong>Note: The outer shell will have a layer of earthy yellow paper attached to it to protect it from scratches. After tearing off the protective film, it will be made of transparent material.<br/><br/></strong></span><span style="color:rgb(255, 0, 0)"><strong><br/></strong></span></div></div><p><br/></p>
$3.815
$2.855
- Category : Consumer Electronics
- Brand : diy_electronics_module_999_store DIY Electronics Module 999 Store
Colors
Sizes
-
+
<div class="detailmodule_html"><div class="detail-desc-decorate-richtext"><span style="font-size:20px"><strong>Product features:</strong></span><br/>1: Advanced digital audio signal processing technology (DSP) and FM phase-locked loop modulation technology (PLL) are used to make the sound quality more realistic, the performance more stable, and the working frequency does not shift for a long time.<br/>Good signal reception, we can receive around 20 stations locally.<br/>2: LCD display is more intuitive and accurate, with extremely low power consumption and minimal noise interference. <br/>3: It has the function of automatically searching for and storing radio stations, making it easy to operate and use. <br/>4: Built in 30 level digital volume adjustment, easy to complete with button operation.<br/>5: Automatic memory of data before power outage.<br/>6: Using quartz crystal to stabilize the frequency, the emission frequency no longer drifts when the temperature changes.<br/>7: All frequency bands (76-108MHz) automatically search for signal frequency bands and store memory. <br/>8: Equipped with a rechargeable lithium battery and charging circuit, it can be charged with a mobile phone charger. The charging light will turn red and the charging light will turn green when fully charged.<br/><span style="font-size:20px"><strong><br/>Product parameters:</strong></span><br/>Power supply voltage: 3.0V-5.0V<br/>Built-in battery: 3.7V 1300MAH (fully charged for approximately 7-8 hours)<br/>Built in: 2.5-inch 8-euro 15W speaker<br/>Frequency response range: 50Hz to 18KHz<br/>Receiving frequency adjustment range:<br/>Turn off campus radio at 87.0MHz-108.0MHz and turn on campus radio at 76.0MHz-108.0MHz<br/>Equivalent noise: ≥ 30dB<br/>PCB board size: 6.4CM * 4.3CM<br/>Shell size: 11.85CM * 7.6CM * 3.14CM<br/><span style="font-size:20px"><strong><br/>Instructions for use:</strong></span><br/>After each module is completed, it will automatically search for channels first. Long press and hold the "AUTO key" to start automatic search and store the stations that can be heard,<br/>2. After the search is completed, the first radio station P01 will automatically play. Users can press the "Previous Station" or "Next Station" button to switch to the searched station.<br/>3. This module can set the backlight status and whether to listen to the campus radio frequency band based on the specific usage of the user. The setting method is as follows.<br/>4. When the power is off, press and hold the VOL+button. After powering on, the LCD will display C1 to turn on campus broadcasting and C0 to turn off the campus broadcasting frequency band. After restarting, the settings will take effect.<br/>5. To set the backlight status, press and hold the up and down radio buttons simultaneously in the power off state to turn on the device. The display B1 indicates that the backlight is constantly on, and B0 indicates that the backlight is turned off for 20 seconds. After restarting, the setting will take effect. Change the setting status and repeat this step to switch. The factory is uniformly set to not turn on the campus broadcast frequency band, and the backlight is turned off for 20 seconds without operation.<br/><span style="font-size:20px"><strong><br/>Precautions:</strong></span><br/>1. During operation, do not touch the back components of the module to avoid affecting its normal operation or causing short circuits to burn the module.<br/>2. This module is a radio sensitive device, and interference from the power supply or nearby sources may affect the normal operation of the module. Therefore, it is recommended to use a battery or power frequency transformer to stabilize the power supply for the module.<br/>3. Switching power supplies (such as mobile phone chargers and any other switching power supplies), power banks, and nearby devices such as Class D amplifiers and microwave ovens should not be used. Otherwise, the interference generated by these devices will affect the reception effect of this module. Friends who purchase DIY components and develop them themselves should pay attention. <br/><br/><span style="font-size:20px"><strong>Product List:</strong></span><br/><strong><br/>Package 1:</strong><br/>DIY loose parts shipping list (without battery or shell):<br/>PCB board soldered with SMD device * 1 piece<br/>6 * 6 * 17 buttons * 6<br/>TPEC_ C interface * 1 piece<br/>12D07 side toggle switch * 1 piece<br/>Radio module * 1 unit<br/>2-core wire 10CM * 1 section<br/>Antenna * 1 piece<br/>USB to TYPE_ C line * 1 piece<br/><strong><br/>Package 2:</strong><br/>Full set of loose parts shipping list:<br/>PCB board soldered with SMD device * 1 piece<br/>6 * 6 * 17 buttons * 6<br/>TPEC_ C interface * 1 piece<br/>12D07 side toggle switch * 1 piece<br/>Radio module * 1 unit<br/>2-core wire 10CM * 1 section<br/>Antenna * 1 piece<br/>USB to TYPE_ C line * 1 piece<br/>703450 lithium battery 1300MAH (pasted with foam glue) * 1<br/>Huiwei 2.5-inch speaker * 1<br/>Acrylic board * 1 set<br/><strong><br/>Screw pack:</strong><br/>M3 * 10 * 5 pieces<br/>M3 * 8 * 9 pieces<br/>M3 * 10 double pass copper column * 2 pieces<br/>M3 * 20 double pass copper column * 4 pieces<br/>M3 nut * 3 pieces<br/><strong>Set Three:</strong><br/>FM digital radio finished product * 1 set<br/>USB to TYPE_ C line * 1 piece<br/>Package 4:<br/><strong>Shell:</strong><br/>Acrylic board * 1 set<br/>Screw pack:<br/>M3 * 10 * 5 pieces<br/>M3 * 8 * 9 pieces<br/>M3 * 10 double pass copper column * 2 pieces<br/>M3 * 20 double pass copper column * 4 pieces<br/>M3 nut * 3 pieces<br/><span style="color:rgb(255, 0, 0)"><strong>Note: The outer shell will have a layer of earthy yellow paper attached to it to protect it from scratches. After tearing off the protective film, it will be made of transparent material.<br/><br/></strong></span><span style="color:rgb(255, 0, 0)"><strong><br/></strong></span></div></div><p><br/></p>