


For Acura Integra 1986-2025 DB1 DB2 DC2 DB8 FE1 Paint Repair Pen Touch Up Scratch Remover DIY Auto Accessories Black White Blue
<div class="detailmodule_html"><div class="detail-desc-decorate-richtext"><table>
<thead>
<tr>
<th><span style="font-size:24px;">Generation</span></th>
<th><span style="font-size:24px;">Chassis Code</span></th>
<th><span style="font-size:24px;">Production Years</span></th>
<th><span style="font-size:24px;">Model</span></th>
</tr>
</thead>
</table>
<table>
<tbody>
<tr>
<td><span style="font-size:24px;"><strong>1st Generation</strong></span></td>
<td><span style="font-size:24px;">DB1</span></td>
<td><span style="font-size:24px;">1986 - 1989</span></td>
<td><span style="font-size:24px;">For Acura Integra, Acura Integra GS</span></td>
</tr>
</tbody>
</table>
<table>
<tbody>
<tr>
<td><span style="font-size:24px;"><strong>2nd Generation</strong></span></td>
<td><span style="font-size:24px;">DB2</span></td>
<td><span style="font-size:24px;">1990 - 1993</span></td>
<td><span style="font-size:24px;">For Acura Integra RS, Acura Integra LS, Acura Integra GS, Acura Integra GS-R</span></td>
</tr>
</tbody>
</table>
<table>
<tbody>
<tr>
<td><span style="font-size:24px;"><strong>3rd Generation</strong></span></td>
<td><span style="font-size:24px;">DC2</span></td>
<td><span style="font-size:24px;">1994 - 2001</span></td>
<td><span style="font-size:24px;">For Acura Integra RS, Acura Integra LS, Acura Integra GS, Acura Integra GSR, Acura Integra Type R</span></td>
</tr>
</tbody>
</table>
<table>
<tbody>
<tr>
<td><span style="font-size:24px;"><strong>4th Generation</strong></span></td>
<td><span style="font-size:24px;">DB8</span></td>
<td><span style="font-size:24px;">2002 - 2006</span></td>
<td><span style="font-size:24px;">For Acura Integra, Acura Integra GS-R</span></td>
</tr>
</tbody>
</table>
<table>
<tbody>
<tr>
<td><span style="font-size:24px;"><strong>5th Generation</strong></span></td>
<td><span style="font-size:24px;">FE1</span></td>
<td><span style="font-size:24px;">2022 - Present</span></td>
<td><span style="font-size:24px;">For Acura Integra, Acura Integra A-Spec, Acura Integra Type S</span></td>
</tr>
</tbody>
</table>
<br>
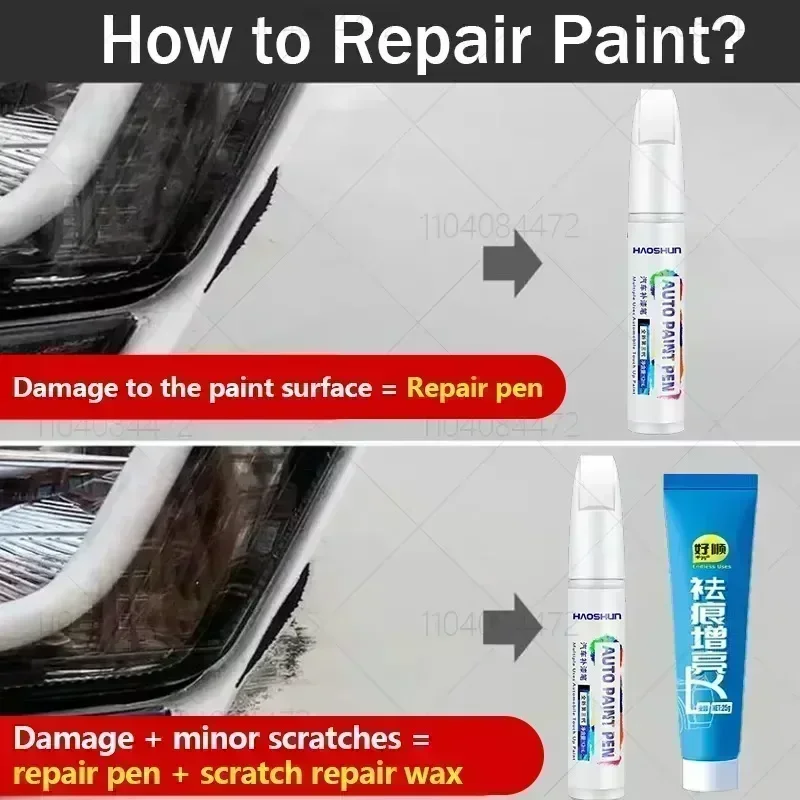
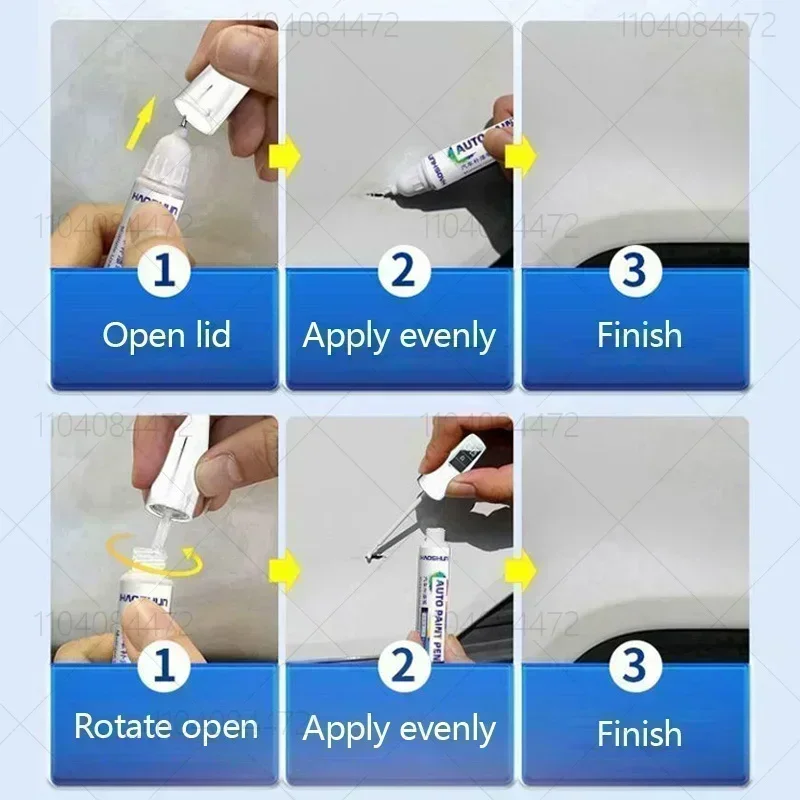
<span style="font-size:20px;"><strong>How to use paint repair pen: </strong><br>
<br>
Step 1: Shake the bottle for more than 10 seconds before use to ensure that the paint is fully mixed.<br>
<br>
Step 2: Before applying, wipe the repaired surface and clean it with scratch repair paste (to be purchased separately), turn the pen cap counterclockwise, and apply the brush with appropriate amount of paint on the repaired surface.<br>
<br>
Step 3: If the repair site is not completely covered, you need to wait for the first coat of paint to dry (about 3 hours), apply the second coat of paint again until the defect is completely covered, if you buy a transparent gloss paint pen, wait until the previous smear is completely dry before use. (Make sure the paint is dry before reapplying)<br>
<br>
Apply this product to the small paint damage, you can repair, cover up the wound. Easy to use, just compare the body, choose the right paint pen.<br>
<br>
The brush coating method of this product can only repair small scars, especially metal paint. Due to the limitations of the brush coating method, the metal particles in the paint cannot be evenly dispersed, and there may be a certain color difference and the surface is not smooth.<br>
Capacity :12 ml<br>
</span>
<div> </div>
</div></div>
$30.755
$20.12
- Category : Automobiles, Parts & Accessories
- Brand : shop1102513561_store Shop1102513561 Store
Colors
-
+
<div class="detailmodule_html"><div class="detail-desc-decorate-richtext"><table>
<thead>
<tr>
<th><span style="font-size:24px;">Generation</span></th>
<th><span style="font-size:24px;">Chassis Code</span></th>
<th><span style="font-size:24px;">Production Years</span></th>
<th><span style="font-size:24px;">Model</span></th>
</tr>
</thead>
</table>
<table>
<tbody>
<tr>
<td><span style="font-size:24px;"><strong>1st Generation</strong></span></td>
<td><span style="font-size:24px;">DB1</span></td>
<td><span style="font-size:24px;">1986 - 1989</span></td>
<td><span style="font-size:24px;">For Acura Integra, Acura Integra GS</span></td>
</tr>
</tbody>
</table>
<table>
<tbody>
<tr>
<td><span style="font-size:24px;"><strong>2nd Generation</strong></span></td>
<td><span style="font-size:24px;">DB2</span></td>
<td><span style="font-size:24px;">1990 - 1993</span></td>
<td><span style="font-size:24px;">For Acura Integra RS, Acura Integra LS, Acura Integra GS, Acura Integra GS-R</span></td>
</tr>
</tbody>
</table>
<table>
<tbody>
<tr>
<td><span style="font-size:24px;"><strong>3rd Generation</strong></span></td>
<td><span style="font-size:24px;">DC2</span></td>
<td><span style="font-size:24px;">1994 - 2001</span></td>
<td><span style="font-size:24px;">For Acura Integra RS, Acura Integra LS, Acura Integra GS, Acura Integra GSR, Acura Integra Type R</span></td>
</tr>
</tbody>
</table>
<table>
<tbody>
<tr>
<td><span style="font-size:24px;"><strong>4th Generation</strong></span></td>
<td><span style="font-size:24px;">DB8</span></td>
<td><span style="font-size:24px;">2002 - 2006</span></td>
<td><span style="font-size:24px;">For Acura Integra, Acura Integra GS-R</span></td>
</tr>
</tbody>
</table>
<table>
<tbody>
<tr>
<td><span style="font-size:24px;"><strong>5th Generation</strong></span></td>
<td><span style="font-size:24px;">FE1</span></td>
<td><span style="font-size:24px;">2022 - Present</span></td>
<td><span style="font-size:24px;">For Acura Integra, Acura Integra A-Spec, Acura Integra Type S</span></td>
</tr>
</tbody>
</table>
<br>
<span style="font-size:20px;"><strong>How to use paint repair pen: </strong><br>
<br>
Step 1: Shake the bottle for more than 10 seconds before use to ensure that the paint is fully mixed.<br>
<br>
Step 2: Before applying, wipe the repaired surface and clean it with scratch repair paste (to be purchased separately), turn the pen cap counterclockwise, and apply the brush with appropriate amount of paint on the repaired surface.<br>
<br>
Step 3: If the repair site is not completely covered, you need to wait for the first coat of paint to dry (about 3 hours), apply the second coat of paint again until the defect is completely covered, if you buy a transparent gloss paint pen, wait until the previous smear is completely dry before use. (Make sure the paint is dry before reapplying)<br>
<br>
Apply this product to the small paint damage, you can repair, cover up the wound. Easy to use, just compare the body, choose the right paint pen.<br>
<br>
The brush coating method of this product can only repair small scars, especially metal paint. Due to the limitations of the brush coating method, the metal particles in the paint cannot be evenly dispersed, and there may be a certain color difference and the surface is not smooth.<br>
Capacity :12 ml<br>
</span>
<div> </div>
</div></div>
Related Product
Browse The Collection of Top Products.


Black Stainless Steel Pressure Washer Surface Cleaner
$72.7
$143.41


Waterproof Car Glass Coating Agent Rain Repellent
$10.96
$19.91


Emergency Safety Hammer Car Tool for Driving Escape
$10.6
$19.54


Electric Foam Sprayer for Car Wash and Home Cleaning
$42.95
$89.12


Stainless Steel High Pressure Car Washer Lance Nozzle
$23.21
$44.42


Microfiber Car Wash Towel Set for Car Care and Detailing
$11.68
$21.34


O
N
L
I
N
E
G
A
L
A
X
Y
Loading