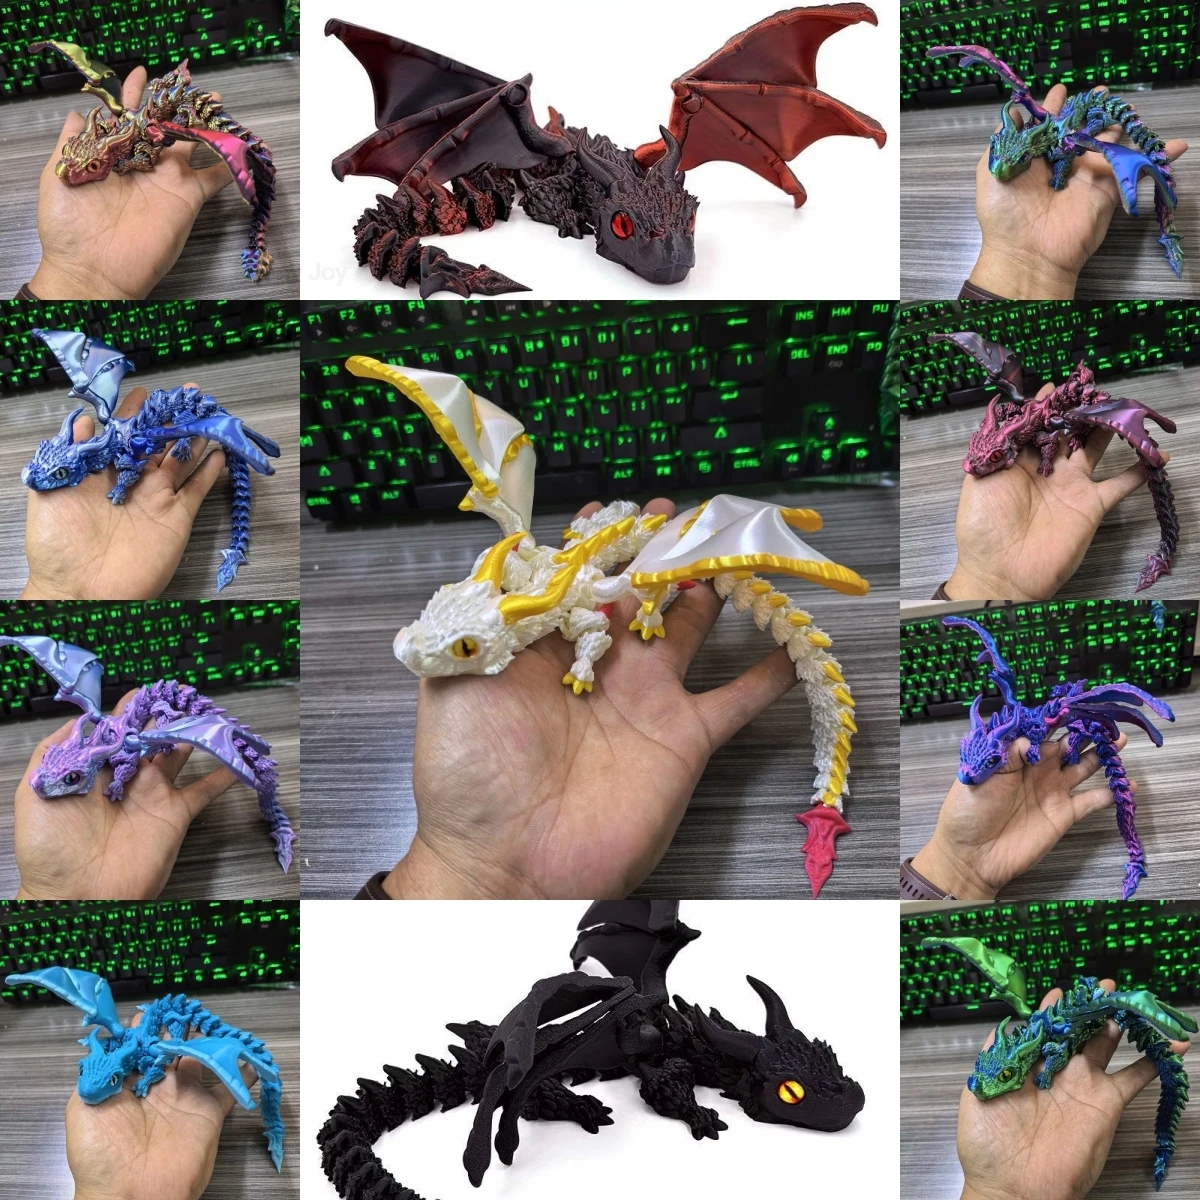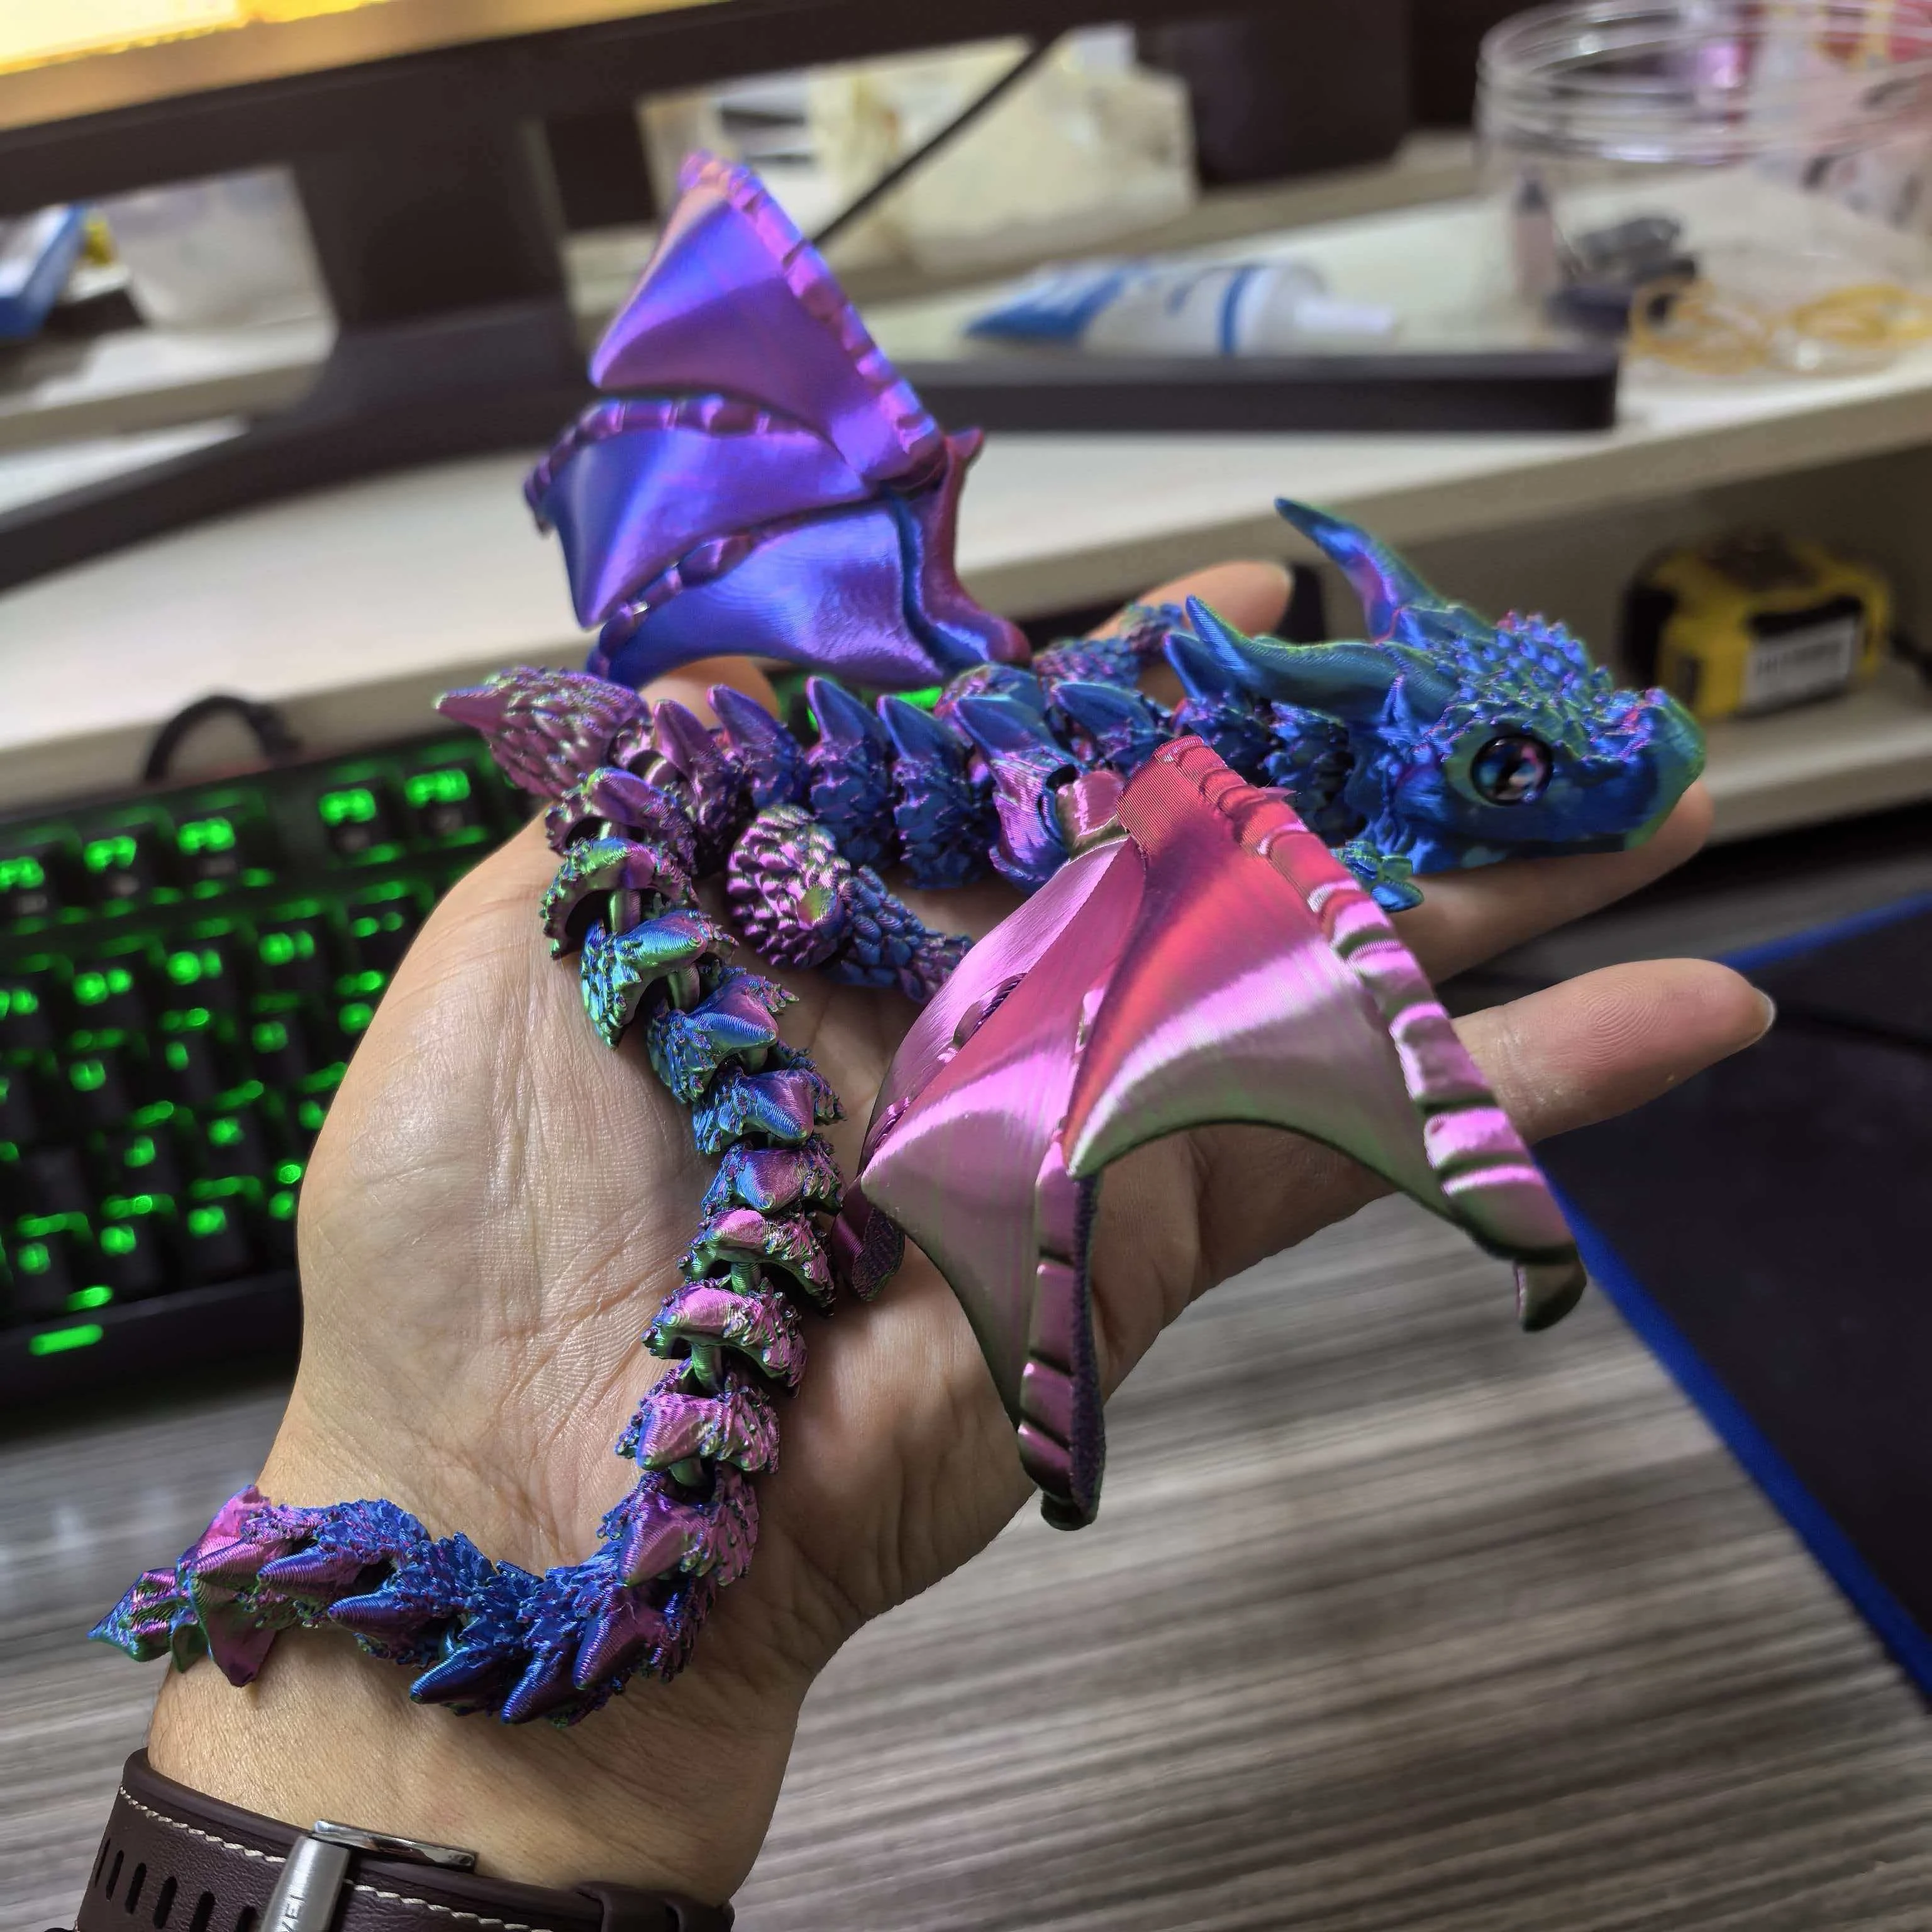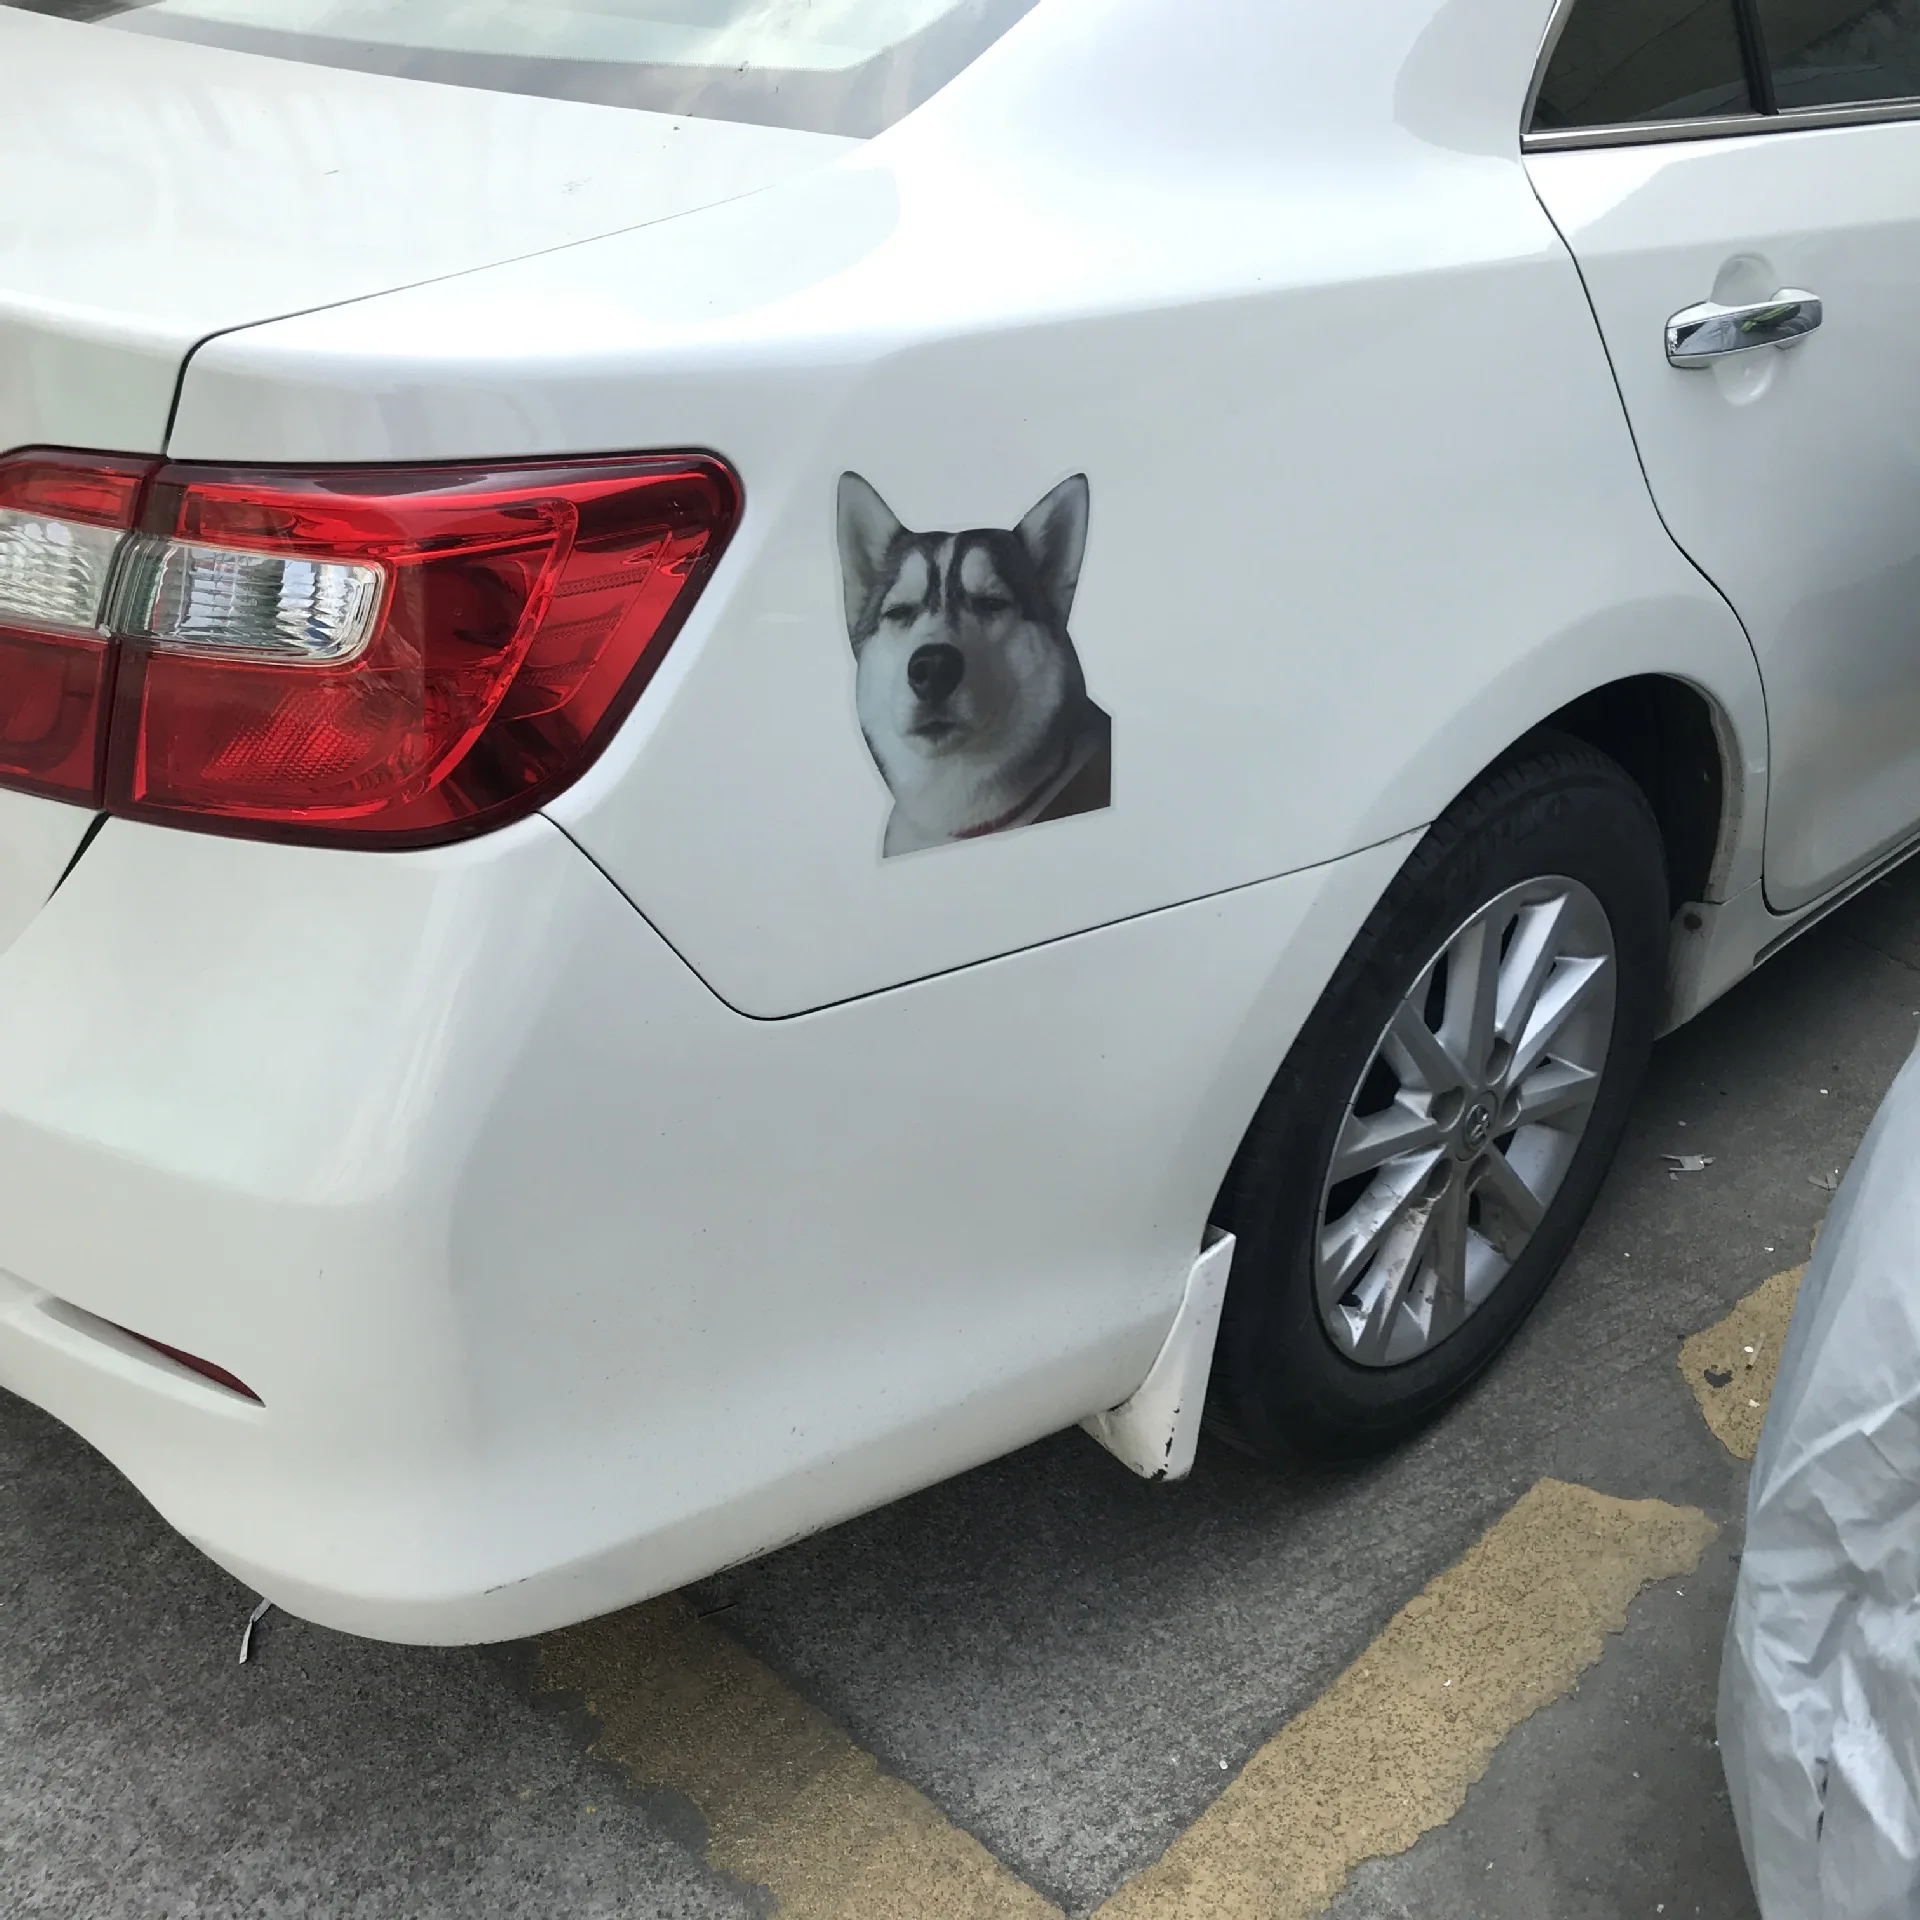
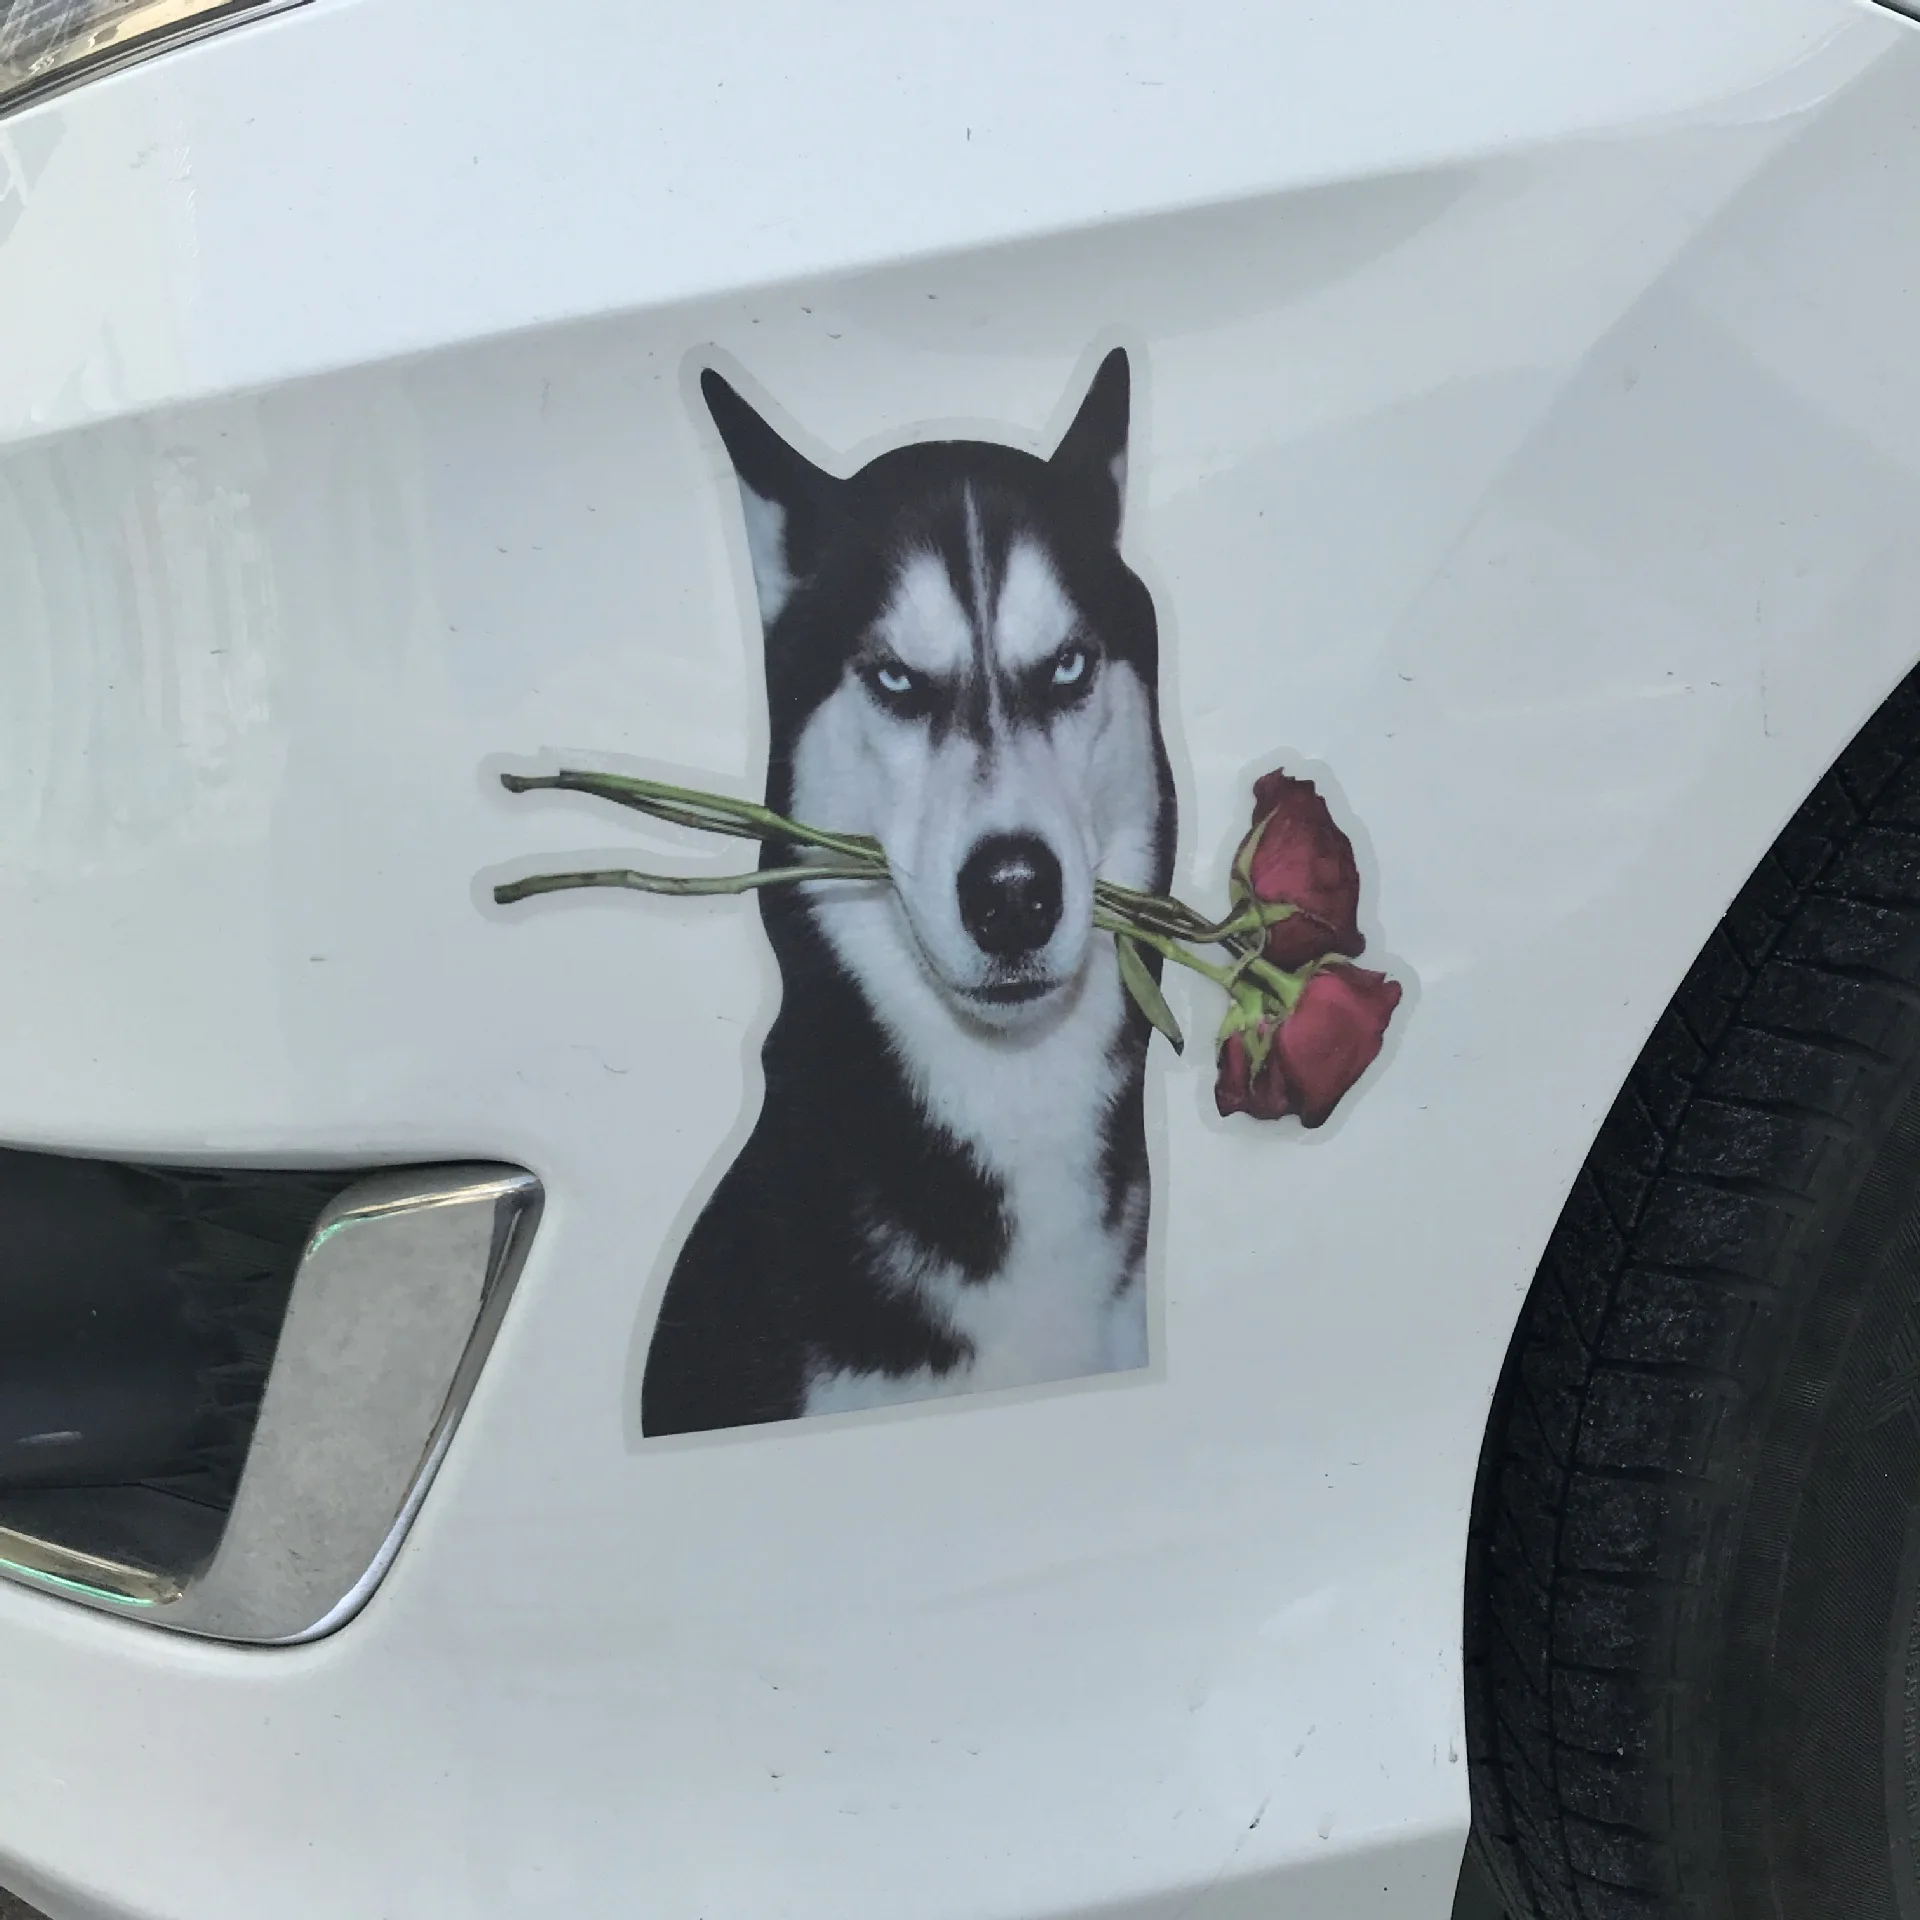
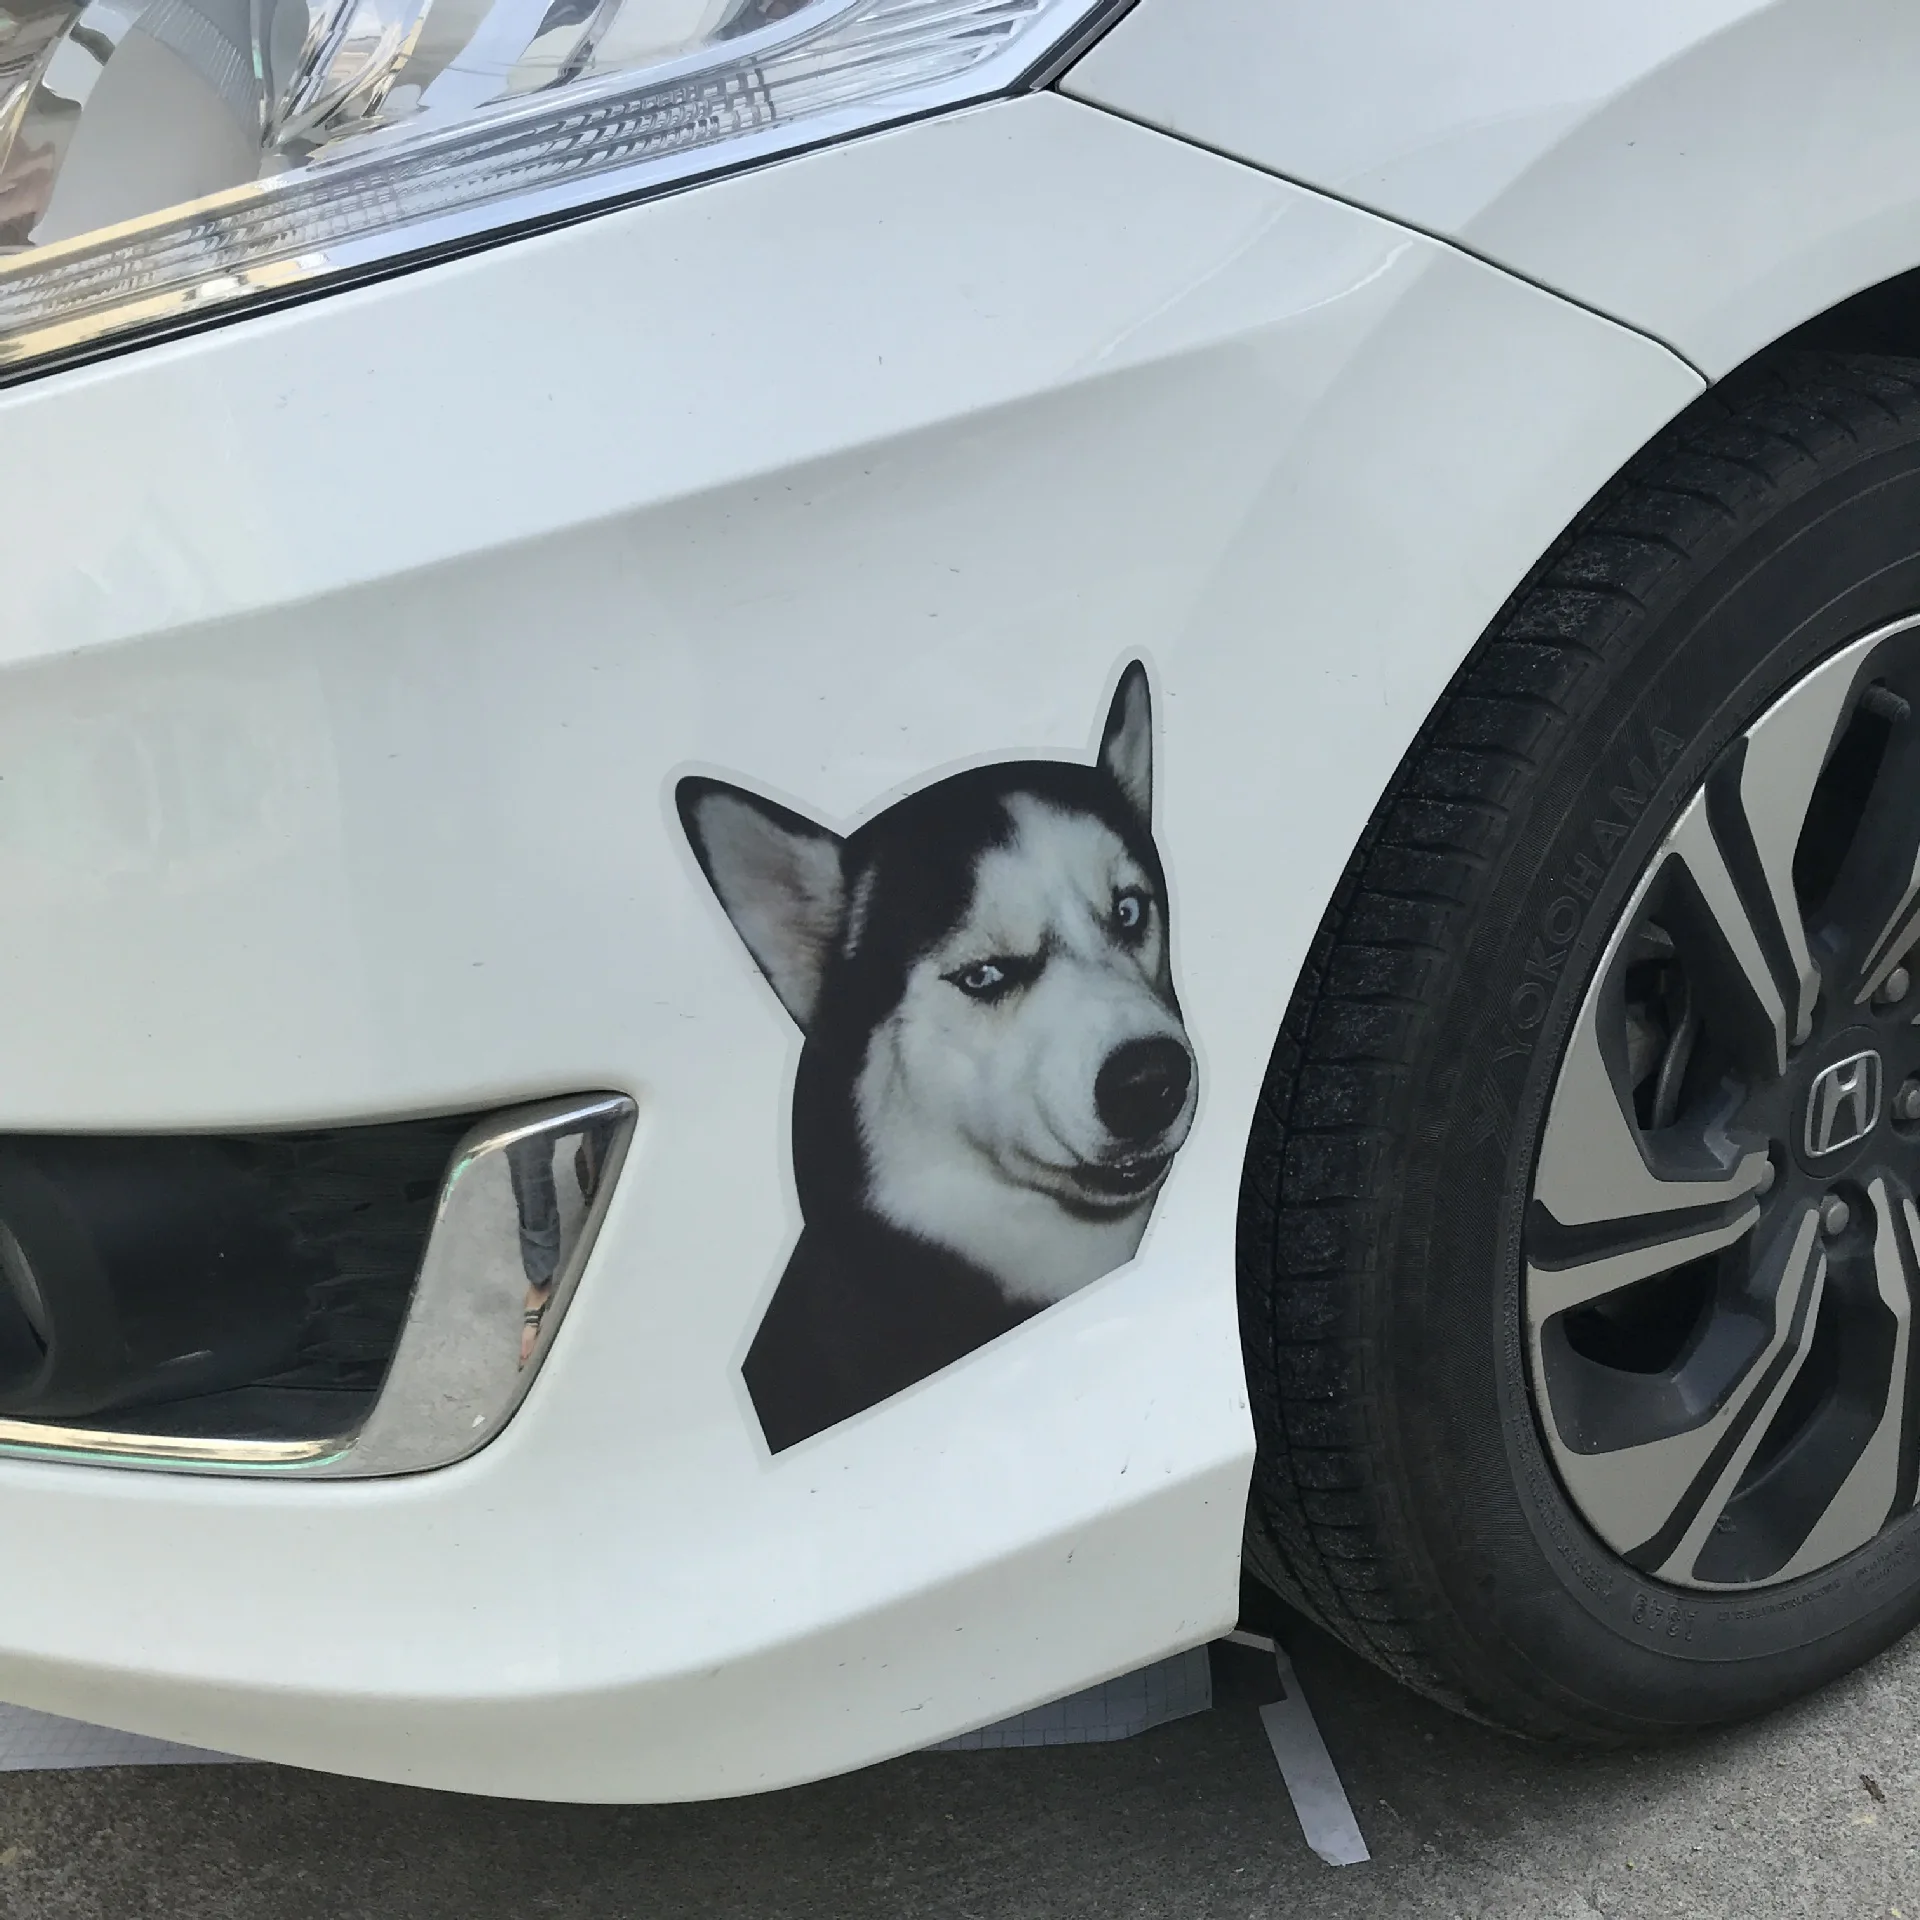
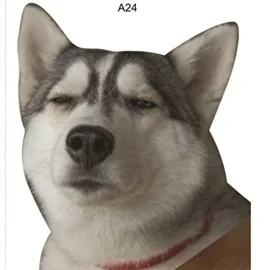

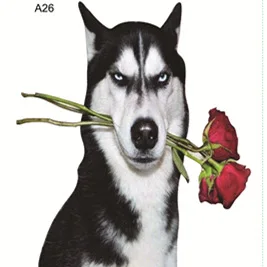
New Funny Husky Emoji Stickers Personality Scratch Creative Erha Eyes High Beam Light Car Stickers
<div class="detailmodule_html"><div class="detail-desc-decorate-richtext"><div><span style="width: 0.0px;height: 0.0px;float: right;overflow: hidden;" title="GLYX6997">你删除了关联营销模版标志了,请按CTRL+Z撤销修改保留模版标志</span>
<div style="height: auto;overflow: hidden;max-width: 748.0px;font: 12.0px / 1.5 tahoma , arial , hiragino sans gb , sans-serif;background: #ffffff;border: 1.0px solid #e7e7e7;">
<div style="color: #f27c79;padding: 20.0px 20.0px 15.0px 20.0px;height: 30.0px;background: #ffffff;">
<h3 style="display: block;float: left;font-family: impact , 微软雅黑 , 仿宋;font-size: 30.0px;height: 30.0px;overflow: hidden;line-height: 30.0px;text-transform: uppercase;font-weight: normal;margin: 0;padding: 0;color: #f27c79;"> </h3>
<br>
<br>
<br>
</div>
</div>
</div>
<p><span style="font-size: 26.0pt;"><span style="color: #000040;"><strong></strong><span style="font-size:22px;"><strong>Installation method for small car stickers with transparent transfer membrane (dry stickers):</strong><br>
Tools: rags, sprinklers, scrapers or credit cards<br>
1. Clean the car body and keep it dry.<br>
2. Determine the location you need to post. Generally, slowly apply it while scraping it flat with tools, and peeling the bottom paper.<br>
3. If the graphics are not big, you can tear off all the transparent transfer film and stickers before applying. But be careful not to cause accidental adhesions.<br>
4. After pasting, scrape and press it several times. Remove the transparent transfer membrane.<br>
5. Use a utility knife to cut the door and sewing the car, and put it inward.<br>
6. Do not let the car stickers and the car body have any separation or protrusions. <br>
<br>
<strong>Installation method for large-scale car stickers with transparent transfer film (wet stickers):</strong><br>
Tools: rags, sprinklers, scrapers or credit cards<br>
1. Clean the car body and evenly sprinkle water on the body parts to be pasted - to reduce the viscosity of the stickers and facilitate adjustment of position.<br>
2. Determine the location where the car stickers need to be pasted. Slowly apply it, gently scrape it flat with the tool, and remove the bottom paper.<br>
3. When encountering door handles or anti-scratch strips, cut the materials and wrap them in according to the situation.<br>
4. Adjust appropriately, after confirming the overall position of the figure, scrape away the water and bubbles repeatedly. Remove the transparent transfer membrane.<br>
5. Use a utility to cut the door and sewing the car, and put it inward.<br>
6. Do not let the car stickers have any separation or protrusions from the body.<br>
7. Try to keep the moisture in the car sticker dry as much as possible, and heat and dry properly if possible.<br>
<br>
According to the weather conditions, wash it after one or two days.<br>
1. Installation method of small car stickers (dry stickers): 1. Clean the car body and keep it dry. <br>
2. Determine the location you need to post. Generally, slowly apply it while scraping it flat with tools, and peeling the bottom paper.<br>
3. If the graphics are not big, you can tear off all the transparent transfer film and stickers before applying. But be careful not to cause accidental adhesions. <br>
4. After pasting, scrape and press it several times. Remove the transparent transfer membrane. <br>
5. Use a utility to cut the door and sewing the car, and put it inward. <br>
6. Do not let the car stickers and the car body have any separation or protrusions. <br>
<br>
Installation method for large-scale car stickers (wet stickers):<br>
Tools: rags, sprinklers, scrapers or credit cards<br>
1. Clean the car body and evenly sprinkle water on the body parts to be pasted - to reduce the viscosity of the stickers and facilitate adjustment of the position. <br>
2. Determine the location you need to post. Slowly apply it, gently scrape it flat with the tool, and remove the bottom paper.<br>
3. When encountering door handles or anti-scratch strips, cut the materials and wrap them in according to the situation. <br>
4. Adjust appropriately, after confirming the overall position of the figure, scrape away the water and bubbles repeatedly. Remove the transparent transfer membrane. <br>
5. Use a utility knife to cut the door and sewing the car, and put it inward. <br>
6. Do not let the car stickers and the body have any separation or protrusions. <br>
7. Try to keep the moisture in the car sticker dry as much as possible, and heat and dry properly if possible. Depending on the weather conditions, wash the car after one or two days. <br>
<br>
In order to reduce the difficulty of installing customers, the car patches we provide have been covered with transfer film in advance. (Except for the entire continuous figure) <br>
1. Do not wax a week before deciding to decorate your car, as the wax will make the stickers stick hard; please do not wash the car within three days after the car stickers are pasted, and do not stick them on rainy days, as this effect will be bad! <br>
2. If the sticker needs to be pasted on the door crack or other places where it needs to be moved, don’t worry. After pasting, just cut it with a quick knife. 3. If you really don’t want to do it, please go to the local area where you paste the sun film and ask for help. Note 1: Ask our customer service from the number of notes, we will ship the goods randomly without specifying the style.<br>
<br>
Note 2:<br>
The product surface and product description are for general reference only. There are shortcomings in shooting effects, colors, renderings, and manual measurements. Please make careful choices for customers who pay great attention to details to avoid causing you unnecessary trouble. We also try our best to improve the shortcomings. It brings you some inconvenience and understanding.<br>
Note 3:<br>
Whether the customer designated logistics and explains the shipping fee payment method, such as designated logistics or express delivery, contact our customer service to see if we can ship the goods in the manner you specified.<br>
Note 4:<br>
If the product is a single model or a single color, ship according to the pictures provided by us. It cannot be changed. Unless it is customized, please consult online customers for customization. <br>
<br>
1. Do not wax a week before deciding to dress up your car, as the wax will not stick firmly; the film should not be applied when the car is hot, and the car must be clean. The car must not be washed within a week after the sticker is applied. It is recommended not to expose the sun within 24 hours after the sticker is applied. Please do not wash the car within three days after the car is pasted, and do not stick it on rainy days, as this effect will be bad.<br>
2. If the sticker needs to be pasted on the door crack or other places that need to be moved, don’t worry. After pasting, use a quick knife to cut it open.<br>
3. If you really don’t want to do it, please go to the local area where you paste the sun film and ask for help. Use your fingernails to gently scrape the edges of the sticker and tear them off as a whole, so that there will be no trace or damage to the car paint. If the edges and corners are not blown up in winter, you can use a hair dryer to heat the adhesive paper appropriately. The adhesive can be easily removed after it is melted and softened.</span><br>
<strong><br>
The effect of the black position is average, and the white position works best Please note</strong></span></span></p>
<p><br>
<br>
<br>
<br>
<br>
<br>
<br>
<br>
<br>
<br>
<br>
<br>
<br>
<br>
<br>
<br>
<br>
<br>
<br>
<br>
<br>
<br>
<br>
<br>
<br>
<br>
<br>
<br>
<br>
<br>
<br>
<strong><span style="font-size: 16.0pt;"><span style="background-color: #ffffff;"><span style="color: #000040;"><br>
带透明转移膜的小型车贴安装方法(干贴法):</span><br>
<span style="color: #000040;">工具:抹布、刮板或信用卡带透明转移膜的大型车贴安装方法(湿贴法):</span><br>
<span style="color: #000040;">工具:抹布、洒水器皿、刮板或信用卡</span><br>
<span style="color: #000040;">1</span><span style="color: #000040;">、清洁车身,保持干燥。</span><br>
<span style="color: #000040;">2</span><span style="color: #000040;">、确定好需要贴的位置。一般情况下,慢慢的一边贴、一边用 工具刮平、一边揭底纸。</span><br>
<span style="color: #000040;">3</span><span style="color: #000040;">、如果图形实在不大,也可把透明转移膜和贴纸全部撕下再贴。但必须小心,不要发生意外粘连。</span><br>
<span style="color: #000040;">4</span><span style="color: #000040;">、贴好后,再反复刮压几遍。撕除透明转移膜。</span><br>
<span style="color: #000040;">5</span><span style="color: #000040;">、在车门和车缝用美工刀划一刀,向内包伏贴。</span><br>
<span style="color: #000040;">6</span><span style="color: #000040;">、不要让车贴和车 身有任何分离或突起。</span><br>
<br>
<span style="color: #000040;">带透明转移膜的大型车贴安装方法(湿贴法):</span><br>
<span style="color: #000040;">工具:抹布、洒水器皿、刮板或信用卡</span><br>
<span style="color: #000040;">1</span><span style="color: #000040;">、清洁车身,在将要贴的车身部位上均匀撒水——以降低贴纸粘度、方便调整位置。</span><br>
<span style="color: #000040;">2</span><span style="color: #000040;">、 确定好汽车贴纸需要贴的位置。慢慢的一边贴、一边轻轻用工具刮平、一边揭底纸。</span><br>
<span style="color: #000040;">3</span><span style="color: #000040;">、遇到门把手或防擦条要根据情况把材料割开并包 入。</span><br>
<span style="color: #000040;">4</span><span style="color: #000040;">、适当调整,将图形大体位置确定无误后,用力反复刮去水和气泡。撕除透明转移膜。</span><br>
<span style="color: #000040;">5</span><span style="color: #000040;">、在车门和车缝用美工刀划一 刀,向内包服贴。</span><br>
<span style="color: #000040;">6</span><span style="color: #000040;">、不要让汽车贴纸和车身有任何分离或突起。</span><br>
<span style="color: #000040;">7</span><span style="color: #000040;">、尽量让汽车贴纸里的水分干透,有条件可以适度加热烘干。根据 天气情况,过一两天以后再洗</span></span></span></strong></p>
<p><br>
<strong><span style="font-size: 16.0pt;"></span></strong></p>
<div class="tinymce-module fd-clr">
<p align="left"><strong><span style="font-size: 16.0pt;"> </span></strong></p>
<p align="left"><strong><span style="font-size: 16.0pt;">一.小型车贴安装方法(干贴法):</span></strong></p>
<p align="left"><strong><span style="font-size: 16.0pt;">1、清洁车身,保持干燥。</span></strong></p>
<p align="left"><strong><span style="font-size: 16.0pt;">2、确定好需要贴的位置。一般情况下,慢慢的一边贴、一边用 工具刮平、一边揭底纸。</span></strong></p>
<p align="left"><strong><span style="font-size: 16.0pt;">3、如果图形实在不大,也可把透明转移膜和贴纸全部撕下再贴。但必须小心,不要发生意外粘连。</span></strong></p>
<p align="left"><strong><span style="font-size: 16.0pt;">4、贴好后,再反复刮压几遍。撕除透明转移膜。</span></strong></p>
<p align="left"><strong><span style="font-size: 16.0pt;">5、在车门和车缝用美工刀划一刀,向内包伏贴。</span></strong></p>
<p align="left"><strong><span style="font-size: 16.0pt;">6、不要让车贴和车 身有任何分离或突起。</span></strong></p>
<p align="left"><strong><span style="font-size: 16.0pt;"> </span></strong></p>
<p align="left"><strong><span style="font-size: 16.0pt;">二.大型车贴安装方法(湿贴法): 工具:抹布、洒水器皿、刮板或信用卡</span></strong></p>
<p align="left"><strong><span style="font-size: 16.0pt;">1、清洁车身,在将要贴的车身部位上均匀撒水——以降低贴纸粘度、方便调整位置。</span></strong></p>
<p align="left"><strong><span style="font-size: 16.0pt;">2、确定好需要贴的位置。慢慢的一边贴、一边轻轻用工具刮平、一边揭底纸。 3、遇到门把手或防擦条要根据情况把材料割开并包 入。</span></strong></p>
<p align="left"><strong><span style="font-size: 16.0pt;">4、适当调整,将图形大体位置确定无误后,用力反复刮去水和气泡。撕除透明转移膜。</span></strong></p>
<p align="left"><strong><span style="font-size: 16.0pt;">5、在车门和车缝用美工刀划一 刀,向内包服贴。</span></strong></p>
<p align="left"><strong><span style="font-size: 16.0pt;">6、不要让车贴和车身有任何分离或突起。</span></strong></p>
<p align="left"><strong><span style="font-size: 16.0pt;">7、尽量让车贴里的水分干透,有条件可以适度加热烘干。根据 天气情况,过一两天以后再洗车。</span></strong></p>
<p align="left"><strong><span style="font-size: 16.0pt;">为降低客户安装难度,我们提供的车贴都已事先覆好转移膜。(整块连续图形除外) </span></strong></p>
<p align="left"><strong><span style="font-size: 16.0pt;"> </span></strong></p>
<p align="left"><strong><span style="font-size: 16.0pt;"> </span></strong></p>
<p align="left"><strong><span style="font-size: 16.0pt;"> </span></strong></p>
<p align="left"><strong><span style="font-size: 16.0pt;">1、在决定装扮爱车前一个星期不要打蜡,蜡会让贴纸粘不牢;车贴粘贴好后三天内请勿洗车,不要在阴雨天贴,这样效果会不好哦!</span></strong></p>
<p align="left"><strong><span style="font-size: 16.0pt;">2、如贴纸需要贴在门缝上或其它需活动的地方,也不用担心,贴好后用快刀裁开即可。</span></strong></p>
<p align="left"><strong><span style="font-size: 16.0pt;">3、如自己实在不愿动手,请到当地贴太阳膜的地方请求帮助。</span></strong></p>
</div>
<div>
<div class="tinymce-module fd-clr"><strong><span style="font-size: 16.0pt;"> </span></strong></div>
<div class="tinymce-module fd-clr"><strong><span style="font-size: 16.0pt;">注1:备注数量多少起询问我们客服,不指定款式我们随机发货。</span></strong></div>
<div class="tinymce-module fd-clr">
<div class="tinymce-module fd-clr"><strong><span style="font-size: 16.0pt;">注2:商品表面以及商品描述仅供大致上参考,拍摄效果,色泽,效果图,手工测量存在不足,请极为注重细节的客户慎重选择,以免给您带来不必要的麻烦。我们也是尽可能把不足提高到完善。给您带来些许不便体谅体谅。</span></strong></div>
<div class="tinymce-module fd-clr"><strong><span style="font-size: 16.0pt;">注3:客官是否指定物流和说明下运费支付方式,如指定物流或快递联系我们客服看我们能否按照您指定的方式发货。</span></strong></div>
<div class="tinymce-module fd-clr"><strong><span style="font-size: 16.0pt;">注4:如产品是单个款或者单个色 按照我们提供图片发货。不可更改,除非连外定做,定做请咨询在线客户</span></strong></div>
<div class="tinymce-module fd-clr"><strong><span style="font-size: 16.0pt;"> </span></strong></div>
<div class="tinymce-module fd-clr"><strong><span style="font-size: 16.0pt;"> </span></strong></div>
<div class="tinymce-module fd-clr">
<p><strong><span style="font-size: 16.0pt;"> </span></strong></p>
<p><strong><span style="font-size: 16.0pt;"></span></strong></p>
<div><strong><span style="font-size: 16.0pt;"> </span></strong></div>
<div><strong><span style="font-size: 16.0pt;">1、在决定装扮爱车前一个星期不要打蜡,蜡会让贴纸粘不牢;贴膜不可在车子发热的时候贴,必须洗干净车子,贴上后一个星期内不可以洗车,贴上后建议24小时内不要暴晒;车贴粘贴好后三天内请勿洗车,不要在阴雨天贴,这样效果会不好哦</span></strong></div>
<div><strong><span style="font-size: 16.0pt;">2、如贴纸需要贴在门缝上或其它需活动的地方,也不用担心,贴好后用快刀裁开即可。</span></strong></div>
<div><strong><span style="font-size: 16.0pt;">3、如自己实在不愿动手,请到当地贴太阳膜的地方请求帮助。</span></strong></div>
<div><strong><span style="font-size: 16.0pt;"> </span></strong></div>
<div><strong><span style="font-size: 16.0pt;"></span></strong></div>
<div><strong><span style="font-size: 16.0pt;"> </span></strong></div>
<div><strong><span style="font-size: 16.0pt;">用指甲轻轻地将贴纸边缘刮起,再整个地撕除,不会留痕亦不会伤害车漆。冬天如果天冷无法刮起边角,可用电吹风将胶纸适当加热,胶融软后即可轻易除去。</span></strong></div>
</div>
</div>
</div>
<p><br>
</p>
<p><strong><span style="font-size: 16.0pt;"> </span></strong></p>
</div></div>
$3.89
$3.89
- Category : Home & Garden
- Brand : anlyxi_home_store ANLYXI Home Store
Colors
Sizes
-
+
<div class="detailmodule_html"><div class="detail-desc-decorate-richtext"><div><span style="width: 0.0px;height: 0.0px;float: right;overflow: hidden;" title="GLYX6997">你删除了关联营销模版标志了,请按CTRL+Z撤销修改保留模版标志</span>
<div style="height: auto;overflow: hidden;max-width: 748.0px;font: 12.0px / 1.5 tahoma , arial , hiragino sans gb , sans-serif;background: #ffffff;border: 1.0px solid #e7e7e7;">
<div style="color: #f27c79;padding: 20.0px 20.0px 15.0px 20.0px;height: 30.0px;background: #ffffff;">
<h3 style="display: block;float: left;font-family: impact , 微软雅黑 , 仿宋;font-size: 30.0px;height: 30.0px;overflow: hidden;line-height: 30.0px;text-transform: uppercase;font-weight: normal;margin: 0;padding: 0;color: #f27c79;"> </h3>
<br>
<br>
<br>
</div>
</div>
</div>
<p><span style="font-size: 26.0pt;"><span style="color: #000040;"><strong></strong><span style="font-size:22px;"><strong>Installation method for small car stickers with transparent transfer membrane (dry stickers):</strong><br>
Tools: rags, sprinklers, scrapers or credit cards<br>
1. Clean the car body and keep it dry.<br>
2. Determine the location you need to post. Generally, slowly apply it while scraping it flat with tools, and peeling the bottom paper.<br>
3. If the graphics are not big, you can tear off all the transparent transfer film and stickers before applying. But be careful not to cause accidental adhesions.<br>
4. After pasting, scrape and press it several times. Remove the transparent transfer membrane.<br>
5. Use a utility knife to cut the door and sewing the car, and put it inward.<br>
6. Do not let the car stickers and the car body have any separation or protrusions. <br>
<br>
<strong>Installation method for large-scale car stickers with transparent transfer film (wet stickers):</strong><br>
Tools: rags, sprinklers, scrapers or credit cards<br>
1. Clean the car body and evenly sprinkle water on the body parts to be pasted - to reduce the viscosity of the stickers and facilitate adjustment of position.<br>
2. Determine the location where the car stickers need to be pasted. Slowly apply it, gently scrape it flat with the tool, and remove the bottom paper.<br>
3. When encountering door handles or anti-scratch strips, cut the materials and wrap them in according to the situation.<br>
4. Adjust appropriately, after confirming the overall position of the figure, scrape away the water and bubbles repeatedly. Remove the transparent transfer membrane.<br>
5. Use a utility to cut the door and sewing the car, and put it inward.<br>
6. Do not let the car stickers have any separation or protrusions from the body.<br>
7. Try to keep the moisture in the car sticker dry as much as possible, and heat and dry properly if possible.<br>
<br>
According to the weather conditions, wash it after one or two days.<br>
1. Installation method of small car stickers (dry stickers): 1. Clean the car body and keep it dry. <br>
2. Determine the location you need to post. Generally, slowly apply it while scraping it flat with tools, and peeling the bottom paper.<br>
3. If the graphics are not big, you can tear off all the transparent transfer film and stickers before applying. But be careful not to cause accidental adhesions. <br>
4. After pasting, scrape and press it several times. Remove the transparent transfer membrane. <br>
5. Use a utility to cut the door and sewing the car, and put it inward. <br>
6. Do not let the car stickers and the car body have any separation or protrusions. <br>
<br>
Installation method for large-scale car stickers (wet stickers):<br>
Tools: rags, sprinklers, scrapers or credit cards<br>
1. Clean the car body and evenly sprinkle water on the body parts to be pasted - to reduce the viscosity of the stickers and facilitate adjustment of the position. <br>
2. Determine the location you need to post. Slowly apply it, gently scrape it flat with the tool, and remove the bottom paper.<br>
3. When encountering door handles or anti-scratch strips, cut the materials and wrap them in according to the situation. <br>
4. Adjust appropriately, after confirming the overall position of the figure, scrape away the water and bubbles repeatedly. Remove the transparent transfer membrane. <br>
5. Use a utility knife to cut the door and sewing the car, and put it inward. <br>
6. Do not let the car stickers and the body have any separation or protrusions. <br>
7. Try to keep the moisture in the car sticker dry as much as possible, and heat and dry properly if possible. Depending on the weather conditions, wash the car after one or two days. <br>
<br>
In order to reduce the difficulty of installing customers, the car patches we provide have been covered with transfer film in advance. (Except for the entire continuous figure) <br>
1. Do not wax a week before deciding to decorate your car, as the wax will make the stickers stick hard; please do not wash the car within three days after the car stickers are pasted, and do not stick them on rainy days, as this effect will be bad! <br>
2. If the sticker needs to be pasted on the door crack or other places where it needs to be moved, don’t worry. After pasting, just cut it with a quick knife. 3. If you really don’t want to do it, please go to the local area where you paste the sun film and ask for help. Note 1: Ask our customer service from the number of notes, we will ship the goods randomly without specifying the style.<br>
<br>
Note 2:<br>
The product surface and product description are for general reference only. There are shortcomings in shooting effects, colors, renderings, and manual measurements. Please make careful choices for customers who pay great attention to details to avoid causing you unnecessary trouble. We also try our best to improve the shortcomings. It brings you some inconvenience and understanding.<br>
Note 3:<br>
Whether the customer designated logistics and explains the shipping fee payment method, such as designated logistics or express delivery, contact our customer service to see if we can ship the goods in the manner you specified.<br>
Note 4:<br>
If the product is a single model or a single color, ship according to the pictures provided by us. It cannot be changed. Unless it is customized, please consult online customers for customization. <br>
<br>
1. Do not wax a week before deciding to dress up your car, as the wax will not stick firmly; the film should not be applied when the car is hot, and the car must be clean. The car must not be washed within a week after the sticker is applied. It is recommended not to expose the sun within 24 hours after the sticker is applied. Please do not wash the car within three days after the car is pasted, and do not stick it on rainy days, as this effect will be bad.<br>
2. If the sticker needs to be pasted on the door crack or other places that need to be moved, don’t worry. After pasting, use a quick knife to cut it open.<br>
3. If you really don’t want to do it, please go to the local area where you paste the sun film and ask for help. Use your fingernails to gently scrape the edges of the sticker and tear them off as a whole, so that there will be no trace or damage to the car paint. If the edges and corners are not blown up in winter, you can use a hair dryer to heat the adhesive paper appropriately. The adhesive can be easily removed after it is melted and softened.</span><br>
<strong><br>
The effect of the black position is average, and the white position works best Please note</strong></span></span></p>
<p><br>
<br>
<br>
<br>
<br>
<br>
<br>
<br>
<br>
<br>
<br>
<br>
<br>
<br>
<br>
<br>
<br>
<br>
<br>
<br>
<br>
<br>
<br>
<br>
<br>
<br>
<br>
<br>
<br>
<br>
<br>
<strong><span style="font-size: 16.0pt;"><span style="background-color: #ffffff;"><span style="color: #000040;"><br>
带透明转移膜的小型车贴安装方法(干贴法):</span><br>
<span style="color: #000040;">工具:抹布、刮板或信用卡带透明转移膜的大型车贴安装方法(湿贴法):</span><br>
<span style="color: #000040;">工具:抹布、洒水器皿、刮板或信用卡</span><br>
<span style="color: #000040;">1</span><span style="color: #000040;">、清洁车身,保持干燥。</span><br>
<span style="color: #000040;">2</span><span style="color: #000040;">、确定好需要贴的位置。一般情况下,慢慢的一边贴、一边用 工具刮平、一边揭底纸。</span><br>
<span style="color: #000040;">3</span><span style="color: #000040;">、如果图形实在不大,也可把透明转移膜和贴纸全部撕下再贴。但必须小心,不要发生意外粘连。</span><br>
<span style="color: #000040;">4</span><span style="color: #000040;">、贴好后,再反复刮压几遍。撕除透明转移膜。</span><br>
<span style="color: #000040;">5</span><span style="color: #000040;">、在车门和车缝用美工刀划一刀,向内包伏贴。</span><br>
<span style="color: #000040;">6</span><span style="color: #000040;">、不要让车贴和车 身有任何分离或突起。</span><br>
<br>
<span style="color: #000040;">带透明转移膜的大型车贴安装方法(湿贴法):</span><br>
<span style="color: #000040;">工具:抹布、洒水器皿、刮板或信用卡</span><br>
<span style="color: #000040;">1</span><span style="color: #000040;">、清洁车身,在将要贴的车身部位上均匀撒水——以降低贴纸粘度、方便调整位置。</span><br>
<span style="color: #000040;">2</span><span style="color: #000040;">、 确定好汽车贴纸需要贴的位置。慢慢的一边贴、一边轻轻用工具刮平、一边揭底纸。</span><br>
<span style="color: #000040;">3</span><span style="color: #000040;">、遇到门把手或防擦条要根据情况把材料割开并包 入。</span><br>
<span style="color: #000040;">4</span><span style="color: #000040;">、适当调整,将图形大体位置确定无误后,用力反复刮去水和气泡。撕除透明转移膜。</span><br>
<span style="color: #000040;">5</span><span style="color: #000040;">、在车门和车缝用美工刀划一 刀,向内包服贴。</span><br>
<span style="color: #000040;">6</span><span style="color: #000040;">、不要让汽车贴纸和车身有任何分离或突起。</span><br>
<span style="color: #000040;">7</span><span style="color: #000040;">、尽量让汽车贴纸里的水分干透,有条件可以适度加热烘干。根据 天气情况,过一两天以后再洗</span></span></span></strong></p>
<p><br>
<strong><span style="font-size: 16.0pt;"></span></strong></p>
<div class="tinymce-module fd-clr">
<p align="left"><strong><span style="font-size: 16.0pt;"> </span></strong></p>
<p align="left"><strong><span style="font-size: 16.0pt;">一.小型车贴安装方法(干贴法):</span></strong></p>
<p align="left"><strong><span style="font-size: 16.0pt;">1、清洁车身,保持干燥。</span></strong></p>
<p align="left"><strong><span style="font-size: 16.0pt;">2、确定好需要贴的位置。一般情况下,慢慢的一边贴、一边用 工具刮平、一边揭底纸。</span></strong></p>
<p align="left"><strong><span style="font-size: 16.0pt;">3、如果图形实在不大,也可把透明转移膜和贴纸全部撕下再贴。但必须小心,不要发生意外粘连。</span></strong></p>
<p align="left"><strong><span style="font-size: 16.0pt;">4、贴好后,再反复刮压几遍。撕除透明转移膜。</span></strong></p>
<p align="left"><strong><span style="font-size: 16.0pt;">5、在车门和车缝用美工刀划一刀,向内包伏贴。</span></strong></p>
<p align="left"><strong><span style="font-size: 16.0pt;">6、不要让车贴和车 身有任何分离或突起。</span></strong></p>
<p align="left"><strong><span style="font-size: 16.0pt;"> </span></strong></p>
<p align="left"><strong><span style="font-size: 16.0pt;">二.大型车贴安装方法(湿贴法): 工具:抹布、洒水器皿、刮板或信用卡</span></strong></p>
<p align="left"><strong><span style="font-size: 16.0pt;">1、清洁车身,在将要贴的车身部位上均匀撒水——以降低贴纸粘度、方便调整位置。</span></strong></p>
<p align="left"><strong><span style="font-size: 16.0pt;">2、确定好需要贴的位置。慢慢的一边贴、一边轻轻用工具刮平、一边揭底纸。 3、遇到门把手或防擦条要根据情况把材料割开并包 入。</span></strong></p>
<p align="left"><strong><span style="font-size: 16.0pt;">4、适当调整,将图形大体位置确定无误后,用力反复刮去水和气泡。撕除透明转移膜。</span></strong></p>
<p align="left"><strong><span style="font-size: 16.0pt;">5、在车门和车缝用美工刀划一 刀,向内包服贴。</span></strong></p>
<p align="left"><strong><span style="font-size: 16.0pt;">6、不要让车贴和车身有任何分离或突起。</span></strong></p>
<p align="left"><strong><span style="font-size: 16.0pt;">7、尽量让车贴里的水分干透,有条件可以适度加热烘干。根据 天气情况,过一两天以后再洗车。</span></strong></p>
<p align="left"><strong><span style="font-size: 16.0pt;">为降低客户安装难度,我们提供的车贴都已事先覆好转移膜。(整块连续图形除外) </span></strong></p>
<p align="left"><strong><span style="font-size: 16.0pt;"> </span></strong></p>
<p align="left"><strong><span style="font-size: 16.0pt;"> </span></strong></p>
<p align="left"><strong><span style="font-size: 16.0pt;"> </span></strong></p>
<p align="left"><strong><span style="font-size: 16.0pt;">1、在决定装扮爱车前一个星期不要打蜡,蜡会让贴纸粘不牢;车贴粘贴好后三天内请勿洗车,不要在阴雨天贴,这样效果会不好哦!</span></strong></p>
<p align="left"><strong><span style="font-size: 16.0pt;">2、如贴纸需要贴在门缝上或其它需活动的地方,也不用担心,贴好后用快刀裁开即可。</span></strong></p>
<p align="left"><strong><span style="font-size: 16.0pt;">3、如自己实在不愿动手,请到当地贴太阳膜的地方请求帮助。</span></strong></p>
</div>
<div>
<div class="tinymce-module fd-clr"><strong><span style="font-size: 16.0pt;"> </span></strong></div>
<div class="tinymce-module fd-clr"><strong><span style="font-size: 16.0pt;">注1:备注数量多少起询问我们客服,不指定款式我们随机发货。</span></strong></div>
<div class="tinymce-module fd-clr">
<div class="tinymce-module fd-clr"><strong><span style="font-size: 16.0pt;">注2:商品表面以及商品描述仅供大致上参考,拍摄效果,色泽,效果图,手工测量存在不足,请极为注重细节的客户慎重选择,以免给您带来不必要的麻烦。我们也是尽可能把不足提高到完善。给您带来些许不便体谅体谅。</span></strong></div>
<div class="tinymce-module fd-clr"><strong><span style="font-size: 16.0pt;">注3:客官是否指定物流和说明下运费支付方式,如指定物流或快递联系我们客服看我们能否按照您指定的方式发货。</span></strong></div>
<div class="tinymce-module fd-clr"><strong><span style="font-size: 16.0pt;">注4:如产品是单个款或者单个色 按照我们提供图片发货。不可更改,除非连外定做,定做请咨询在线客户</span></strong></div>
<div class="tinymce-module fd-clr"><strong><span style="font-size: 16.0pt;"> </span></strong></div>
<div class="tinymce-module fd-clr"><strong><span style="font-size: 16.0pt;"> </span></strong></div>
<div class="tinymce-module fd-clr">
<p><strong><span style="font-size: 16.0pt;"> </span></strong></p>
<p><strong><span style="font-size: 16.0pt;"></span></strong></p>
<div><strong><span style="font-size: 16.0pt;"> </span></strong></div>
<div><strong><span style="font-size: 16.0pt;">1、在决定装扮爱车前一个星期不要打蜡,蜡会让贴纸粘不牢;贴膜不可在车子发热的时候贴,必须洗干净车子,贴上后一个星期内不可以洗车,贴上后建议24小时内不要暴晒;车贴粘贴好后三天内请勿洗车,不要在阴雨天贴,这样效果会不好哦</span></strong></div>
<div><strong><span style="font-size: 16.0pt;">2、如贴纸需要贴在门缝上或其它需活动的地方,也不用担心,贴好后用快刀裁开即可。</span></strong></div>
<div><strong><span style="font-size: 16.0pt;">3、如自己实在不愿动手,请到当地贴太阳膜的地方请求帮助。</span></strong></div>
<div><strong><span style="font-size: 16.0pt;"> </span></strong></div>
<div><strong><span style="font-size: 16.0pt;"></span></strong></div>
<div><strong><span style="font-size: 16.0pt;"> </span></strong></div>
<div><strong><span style="font-size: 16.0pt;">用指甲轻轻地将贴纸边缘刮起,再整个地撕除,不会留痕亦不会伤害车漆。冬天如果天冷无法刮起边角,可用电吹风将胶纸适当加热,胶融软后即可轻易除去。</span></strong></div>
</div>
</div>
</div>
<p><br>
</p>
<p><strong><span style="font-size: 16.0pt;"> </span></strong></p>
</div></div>
Related Product
Browse The Collection of Top Products.