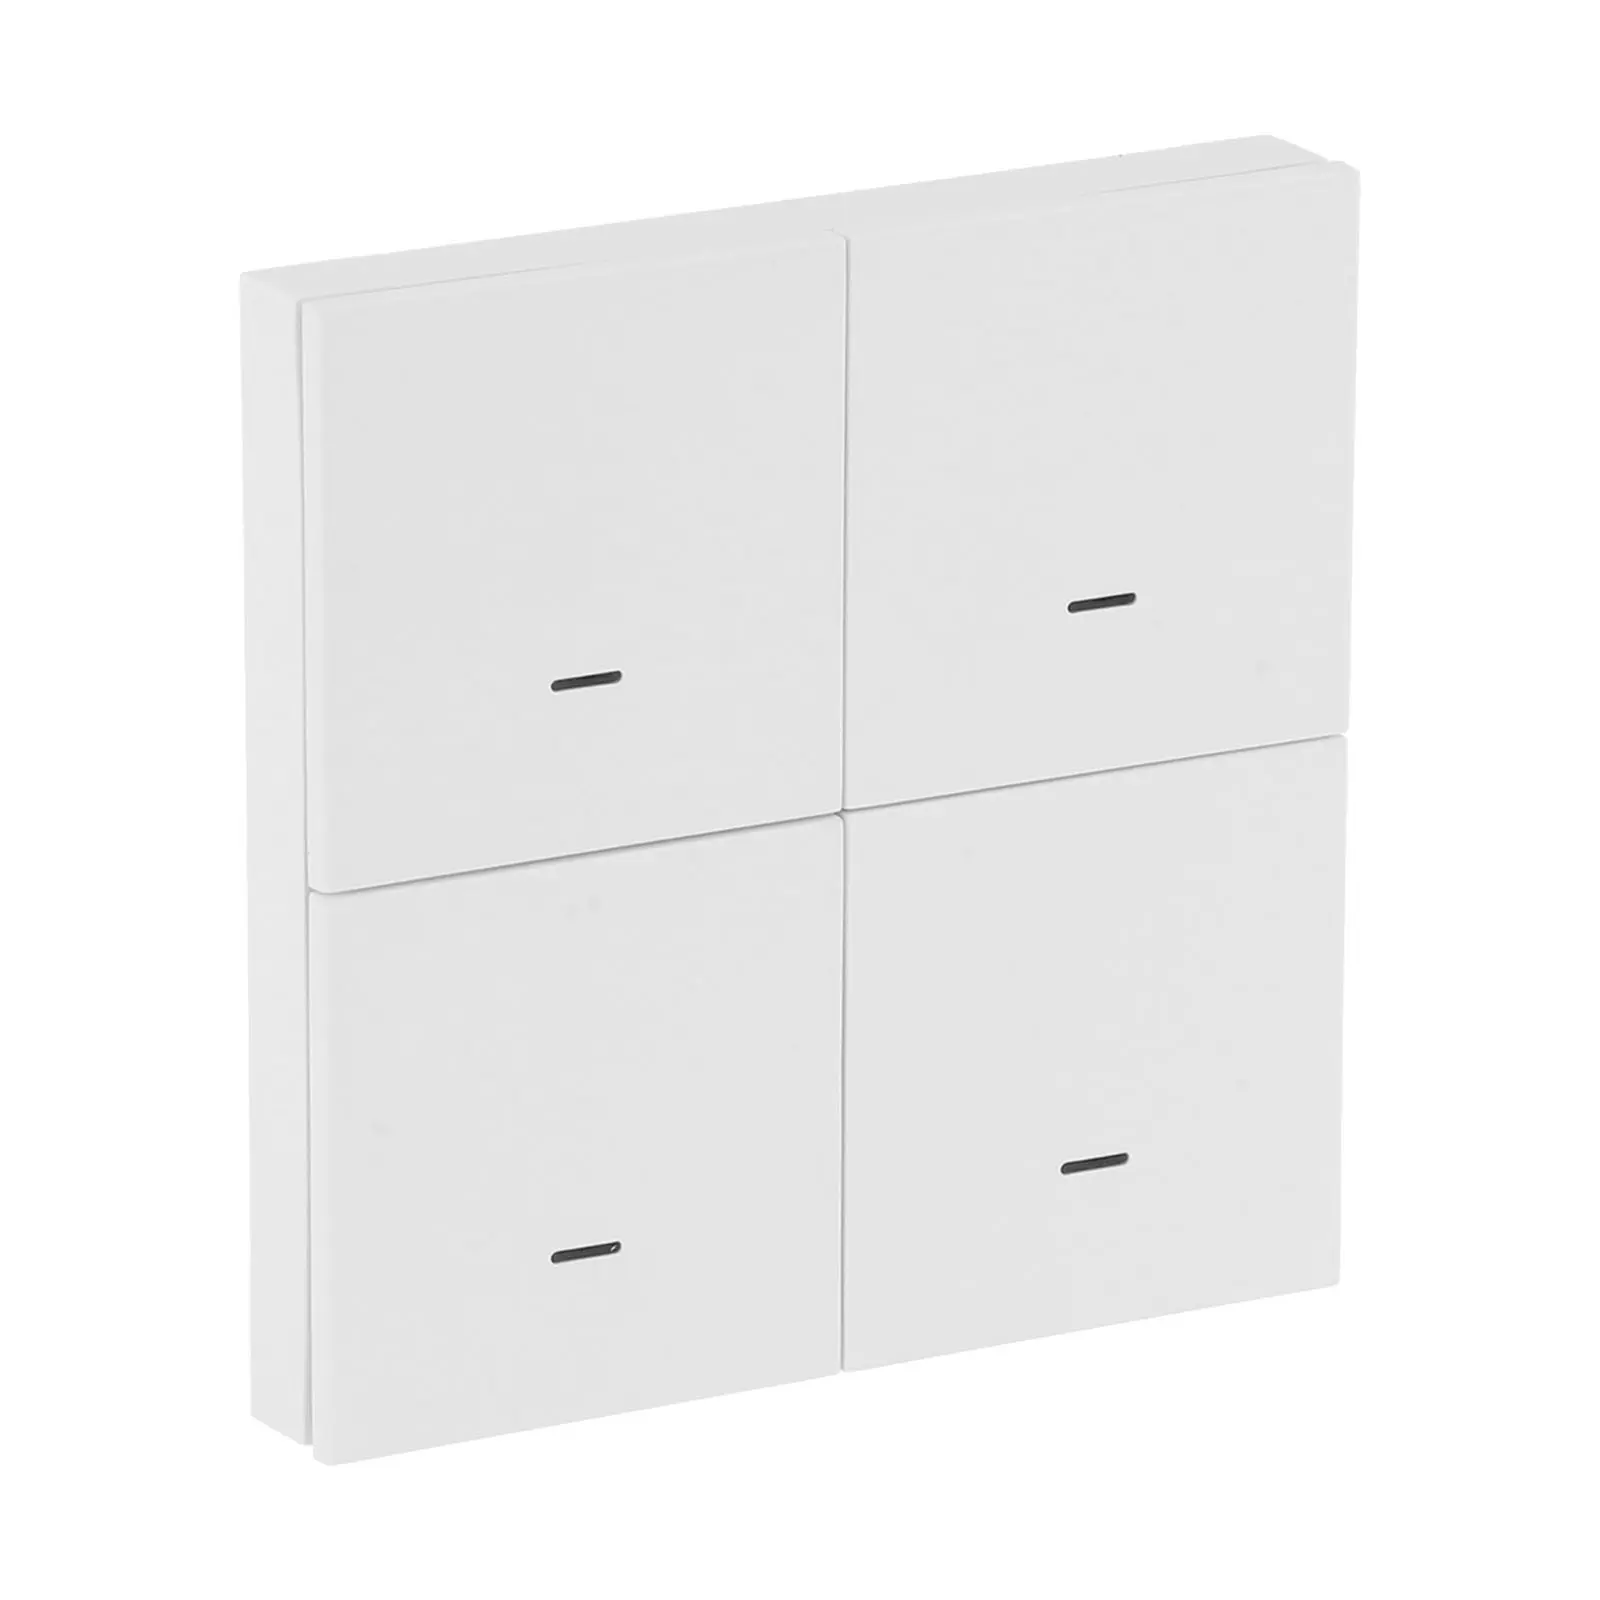
RF 433MHz Fan Smart Switch AC 100~240V 16A Relay 1/2/3 Gang Wall Panel Switch Mini Round Button Remote Control For Home Led Lamp
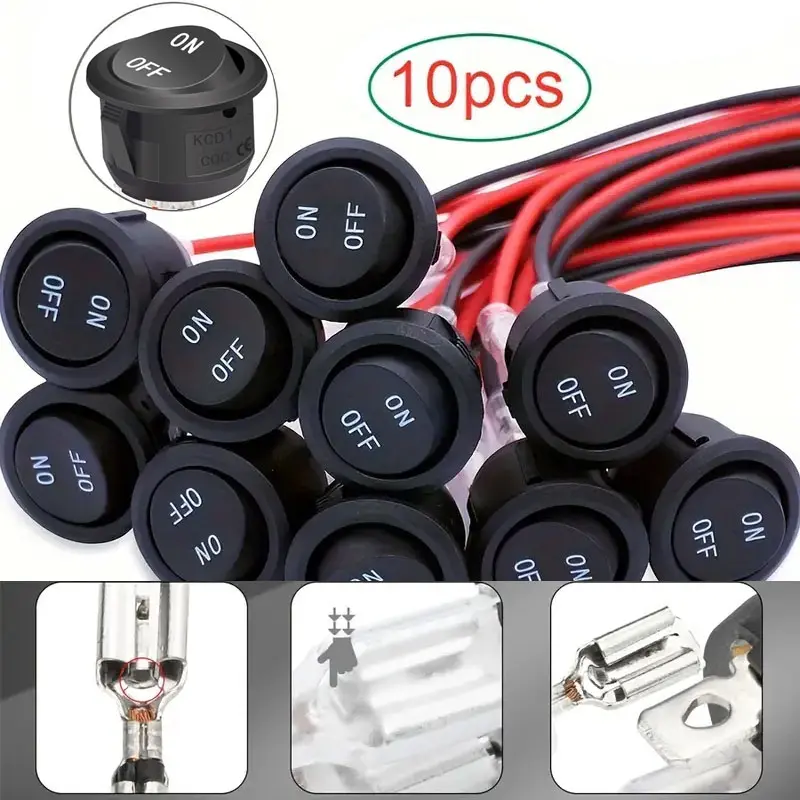
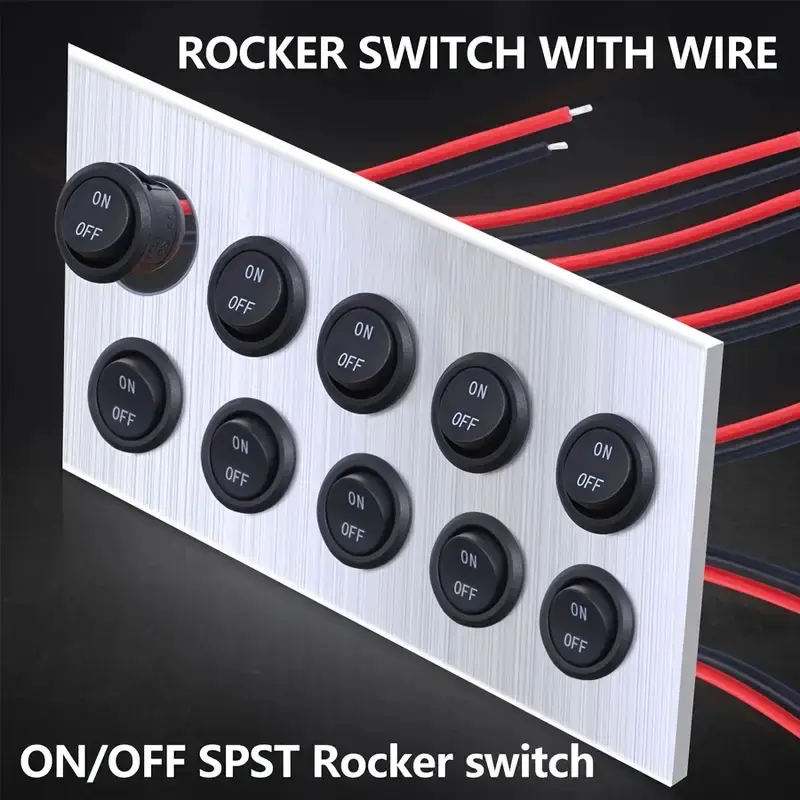
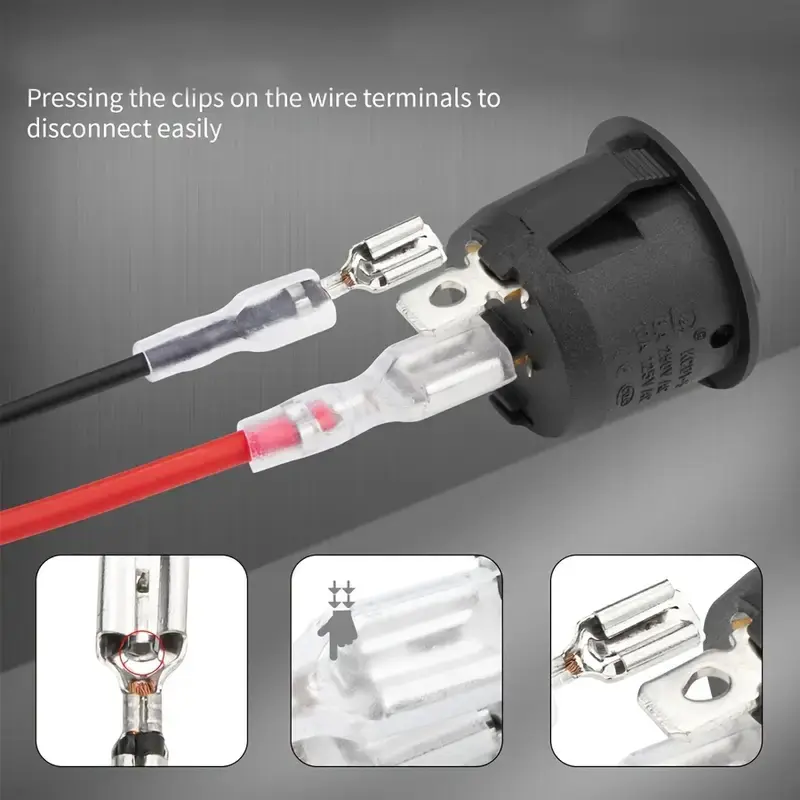
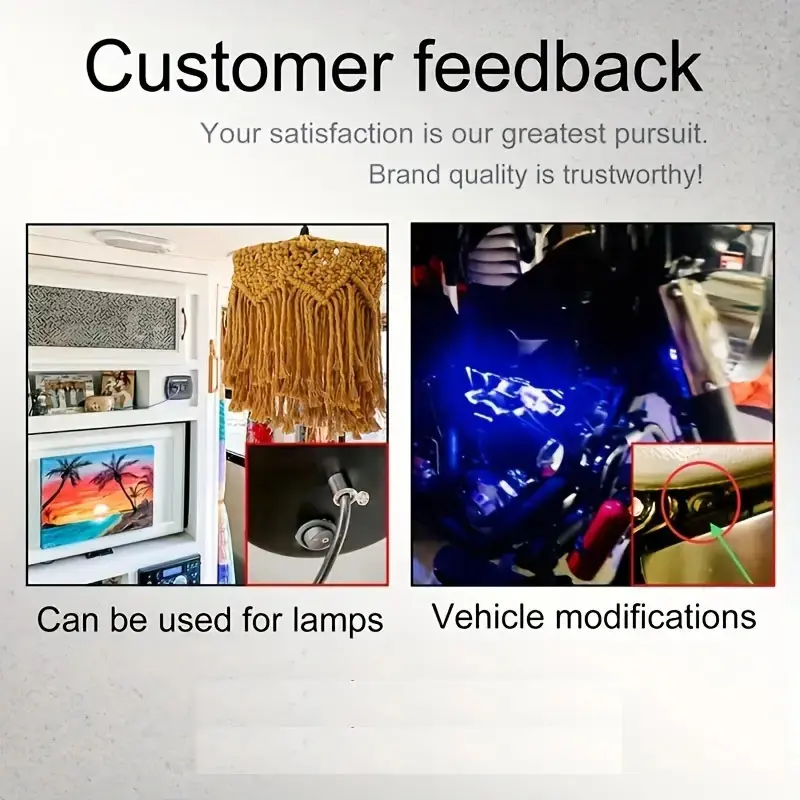
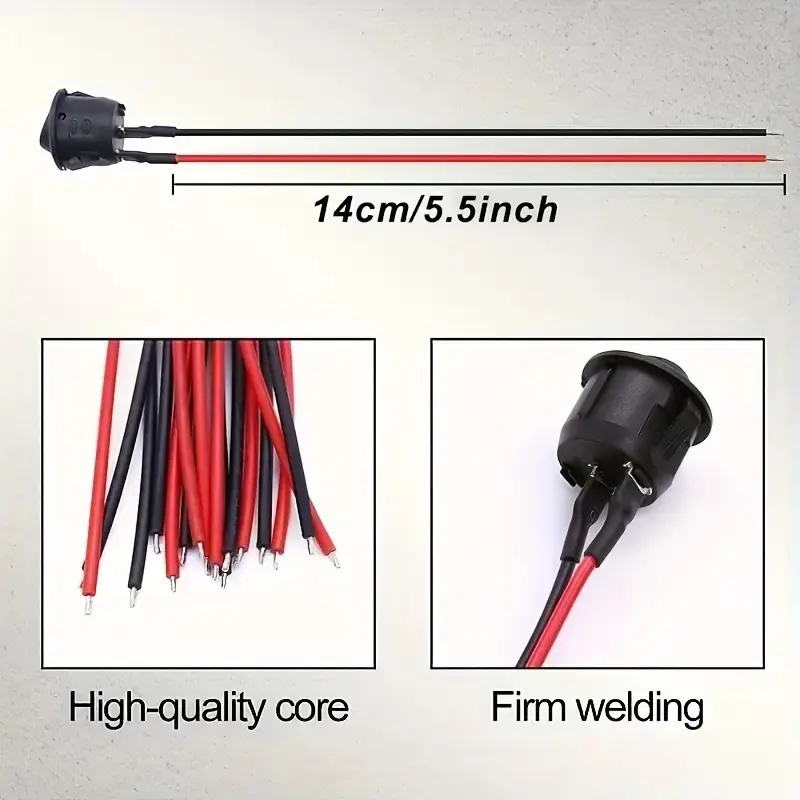
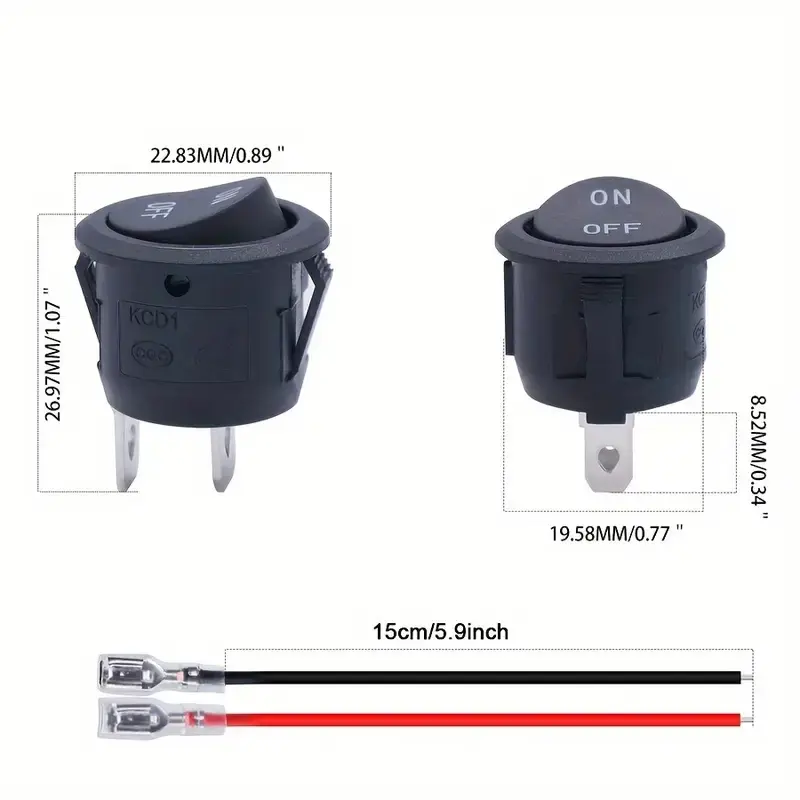
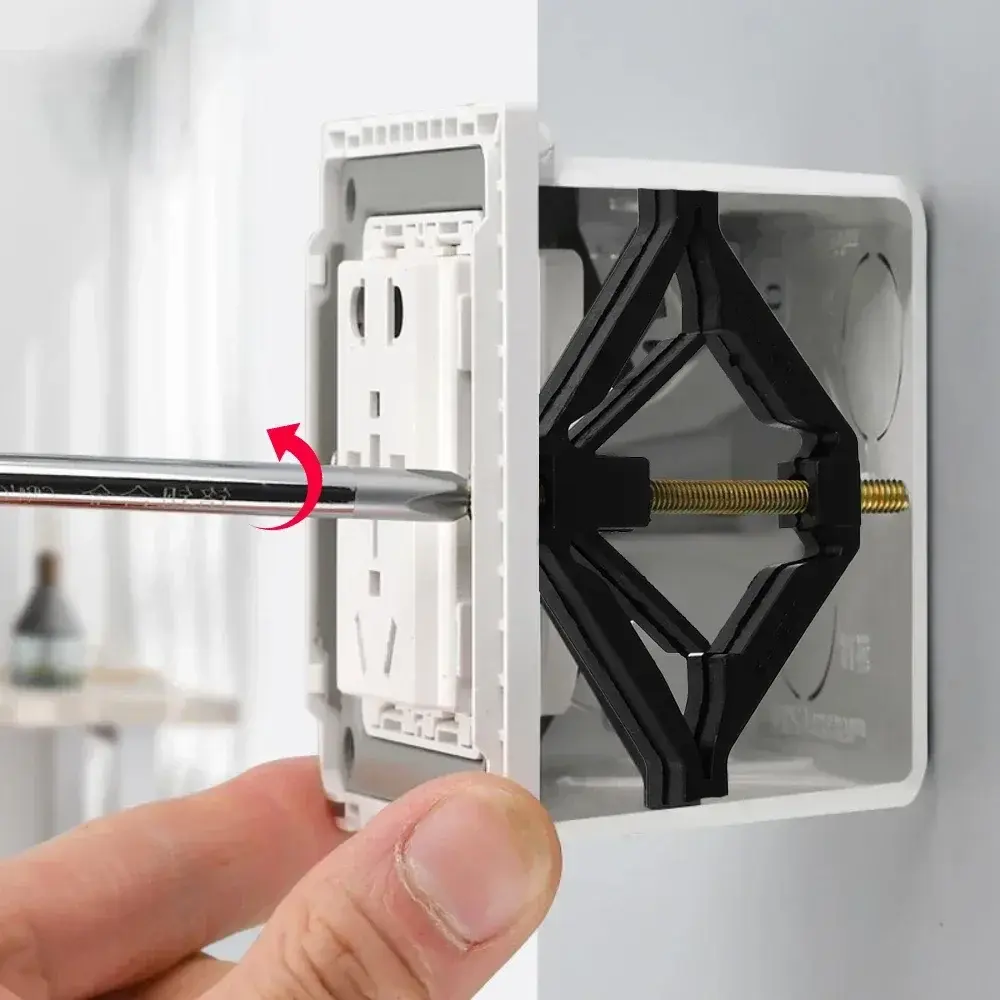
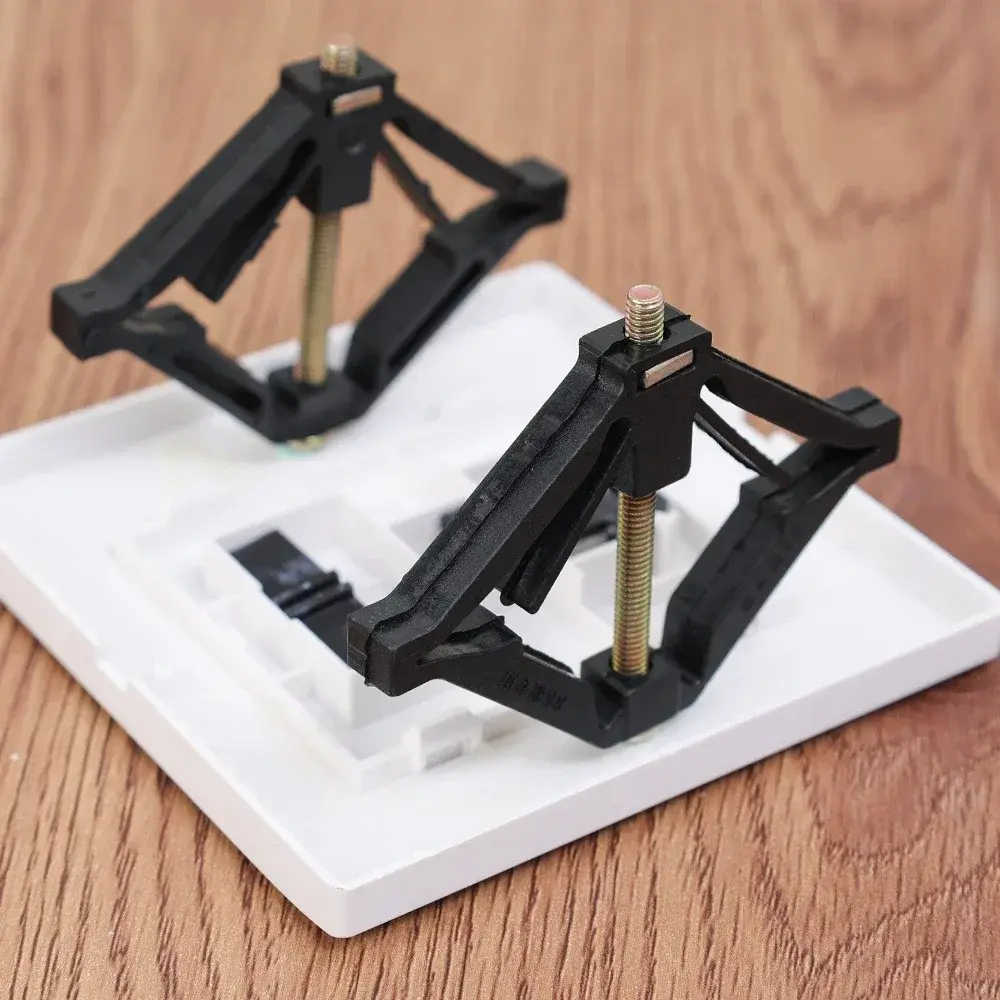
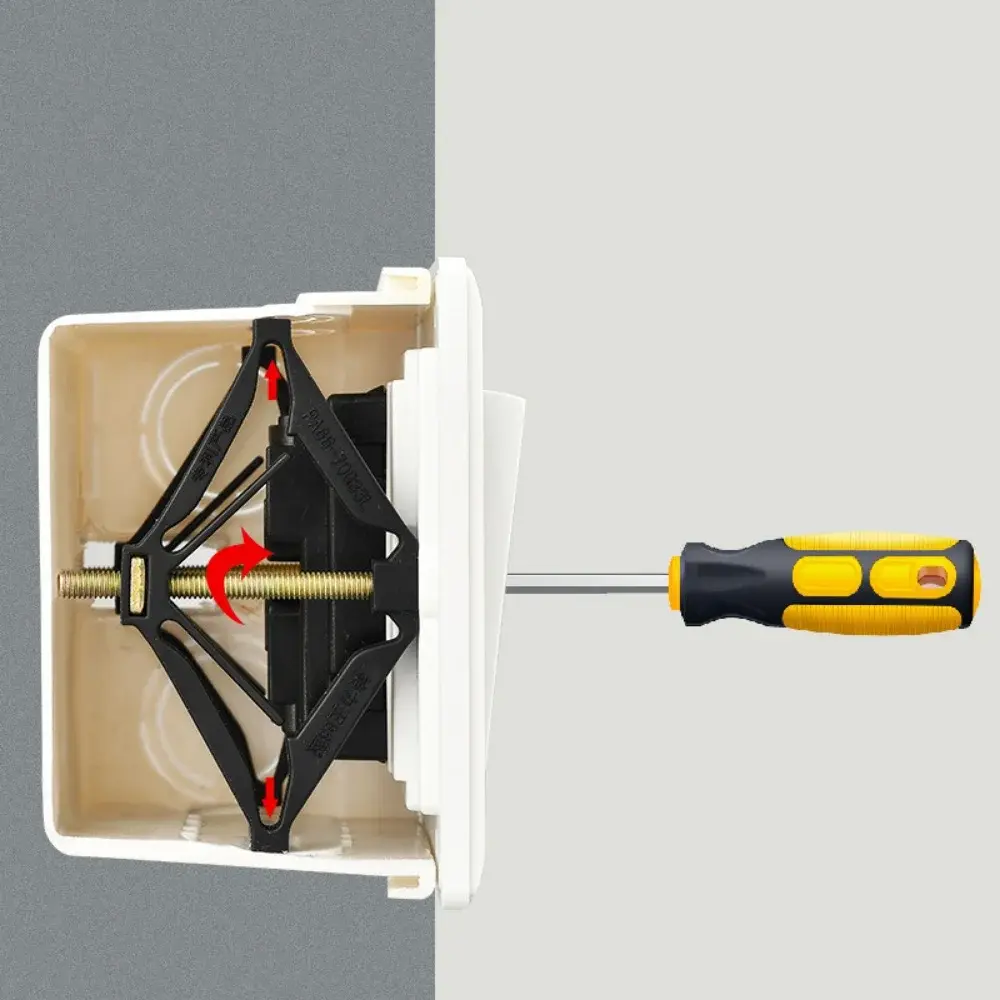
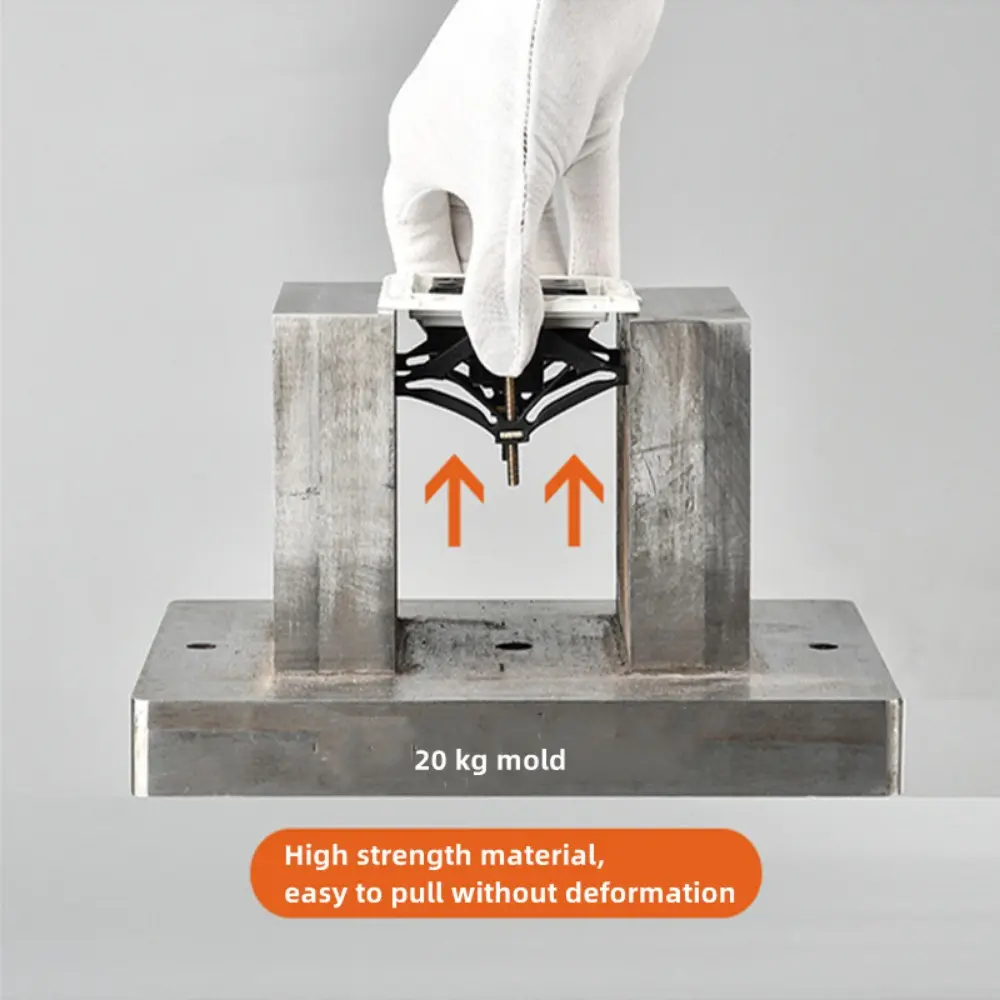
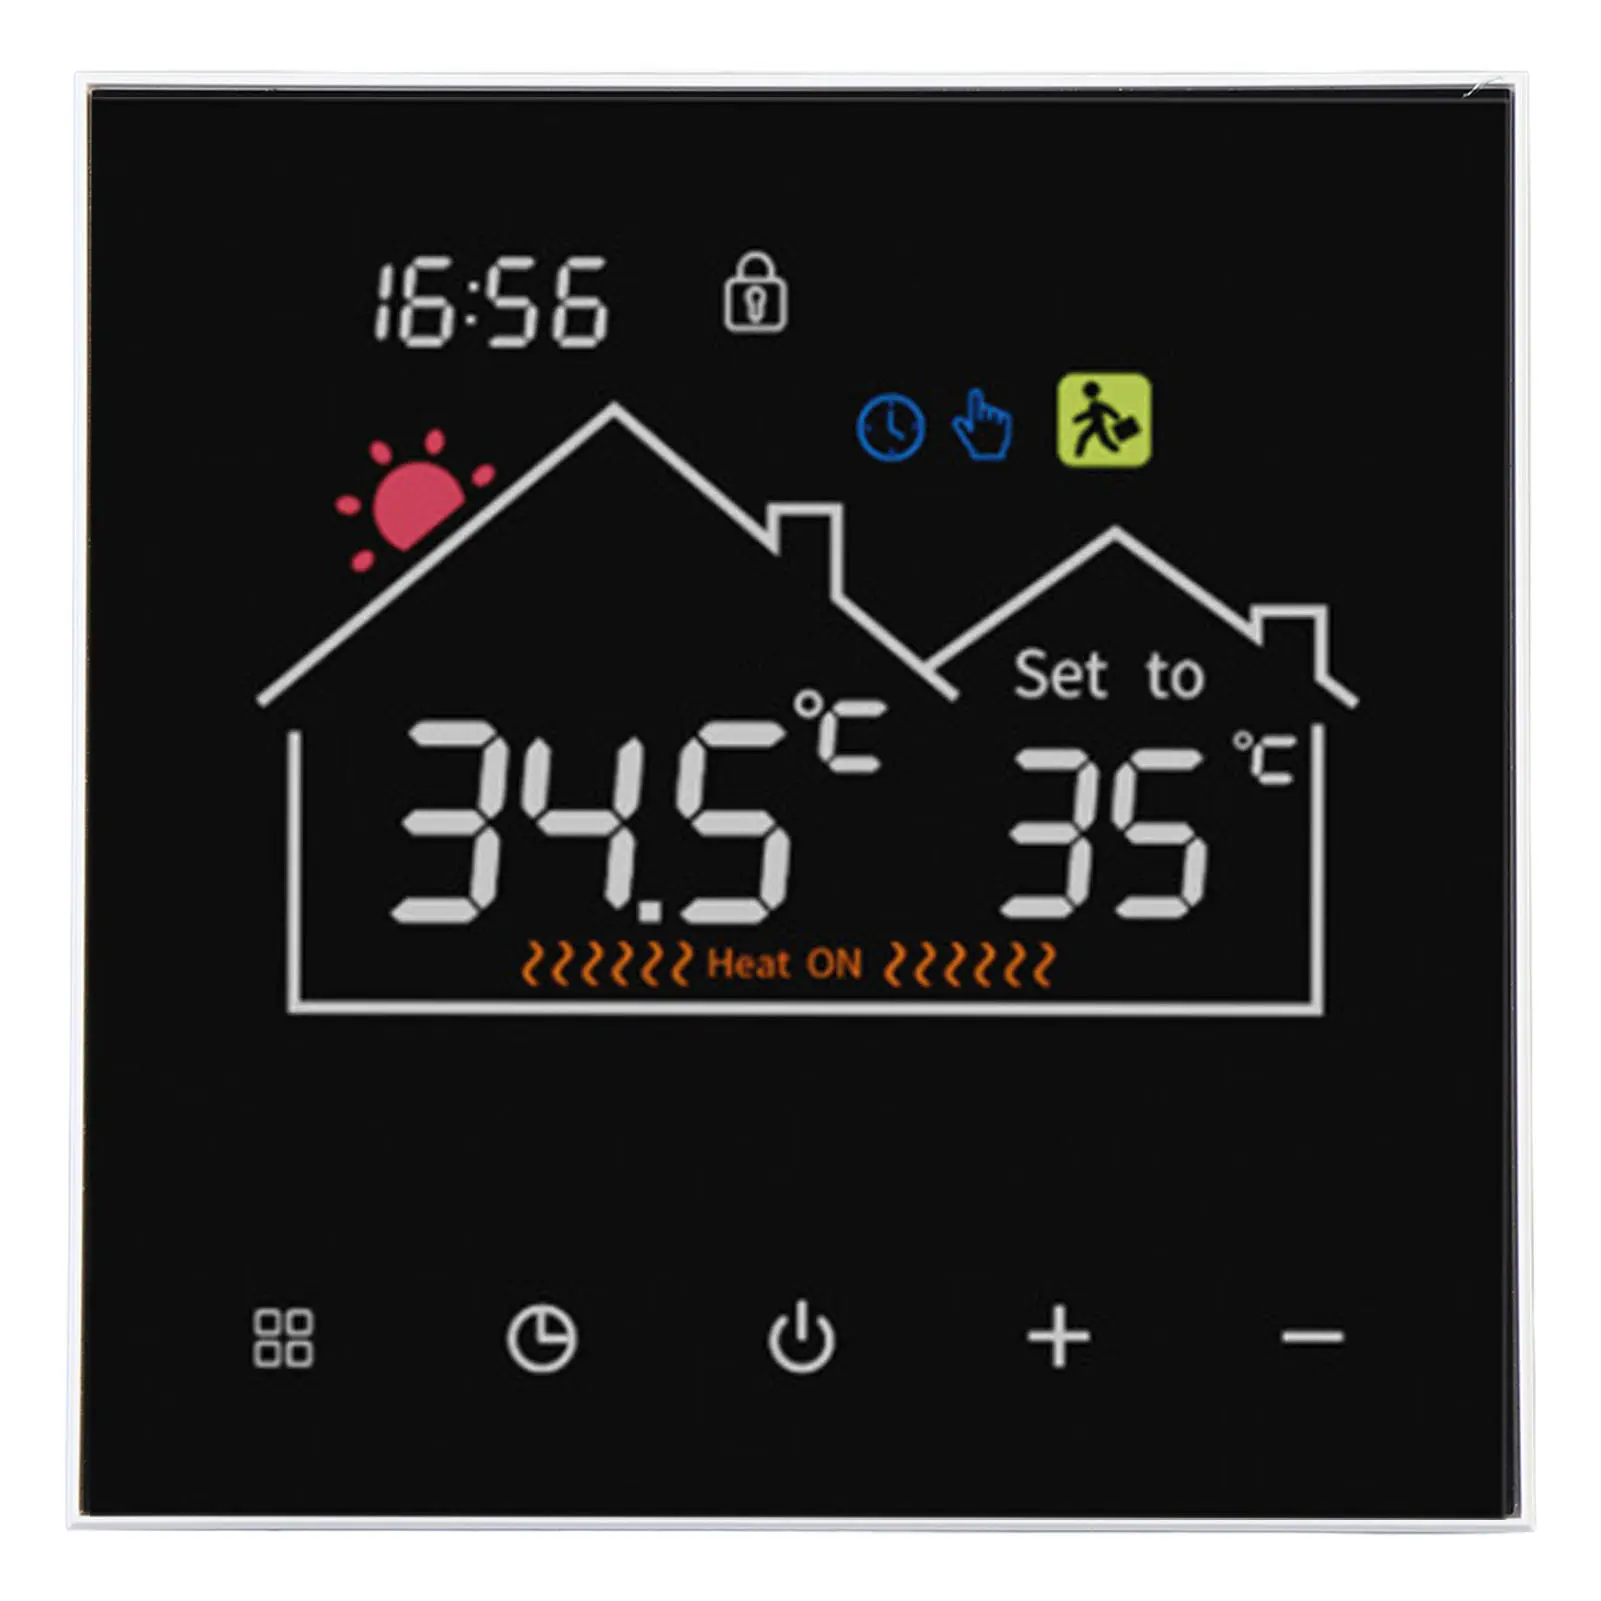
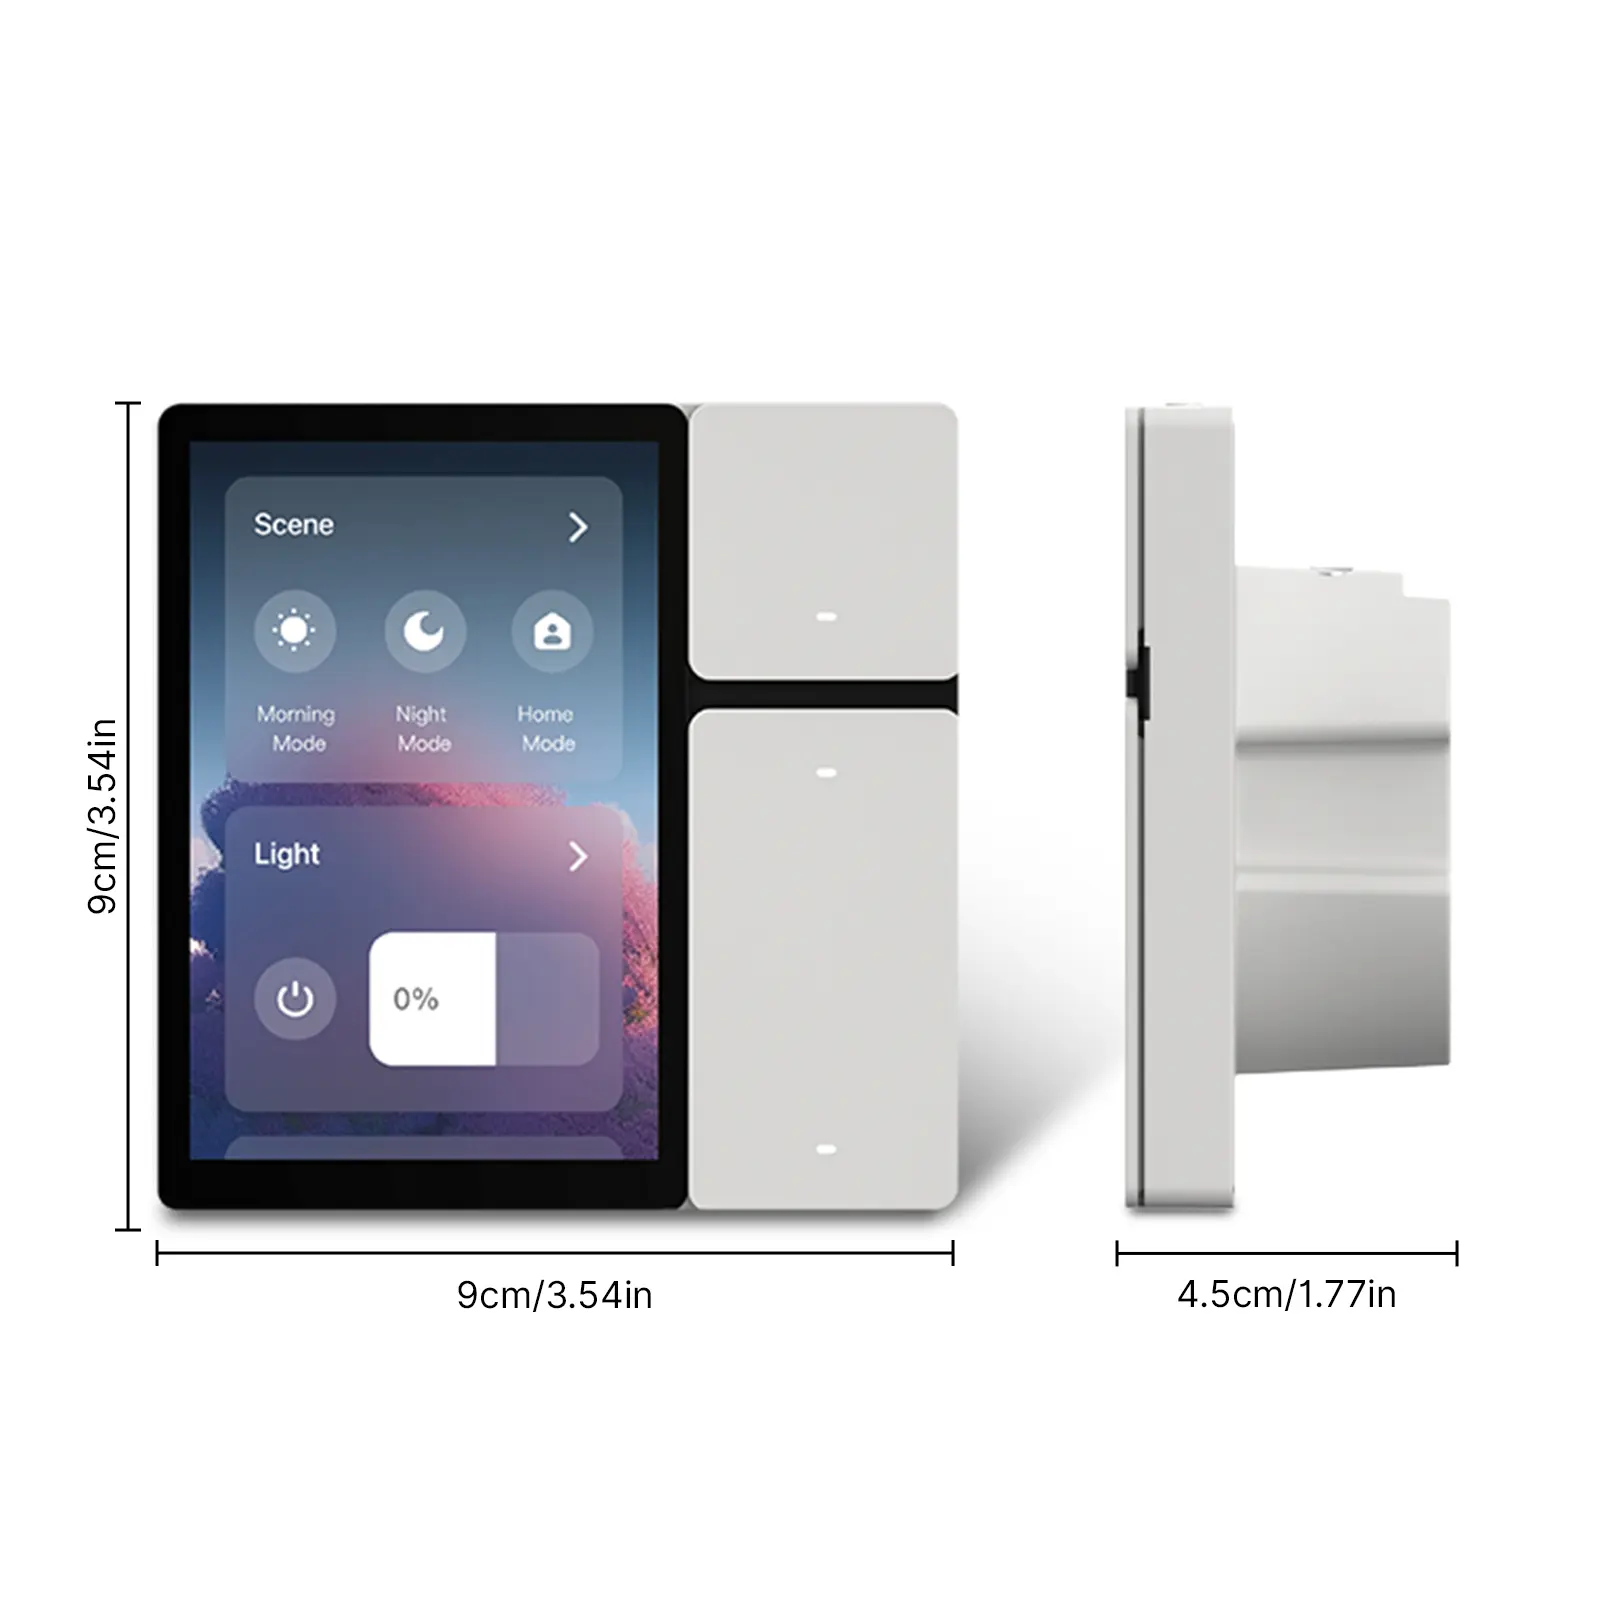
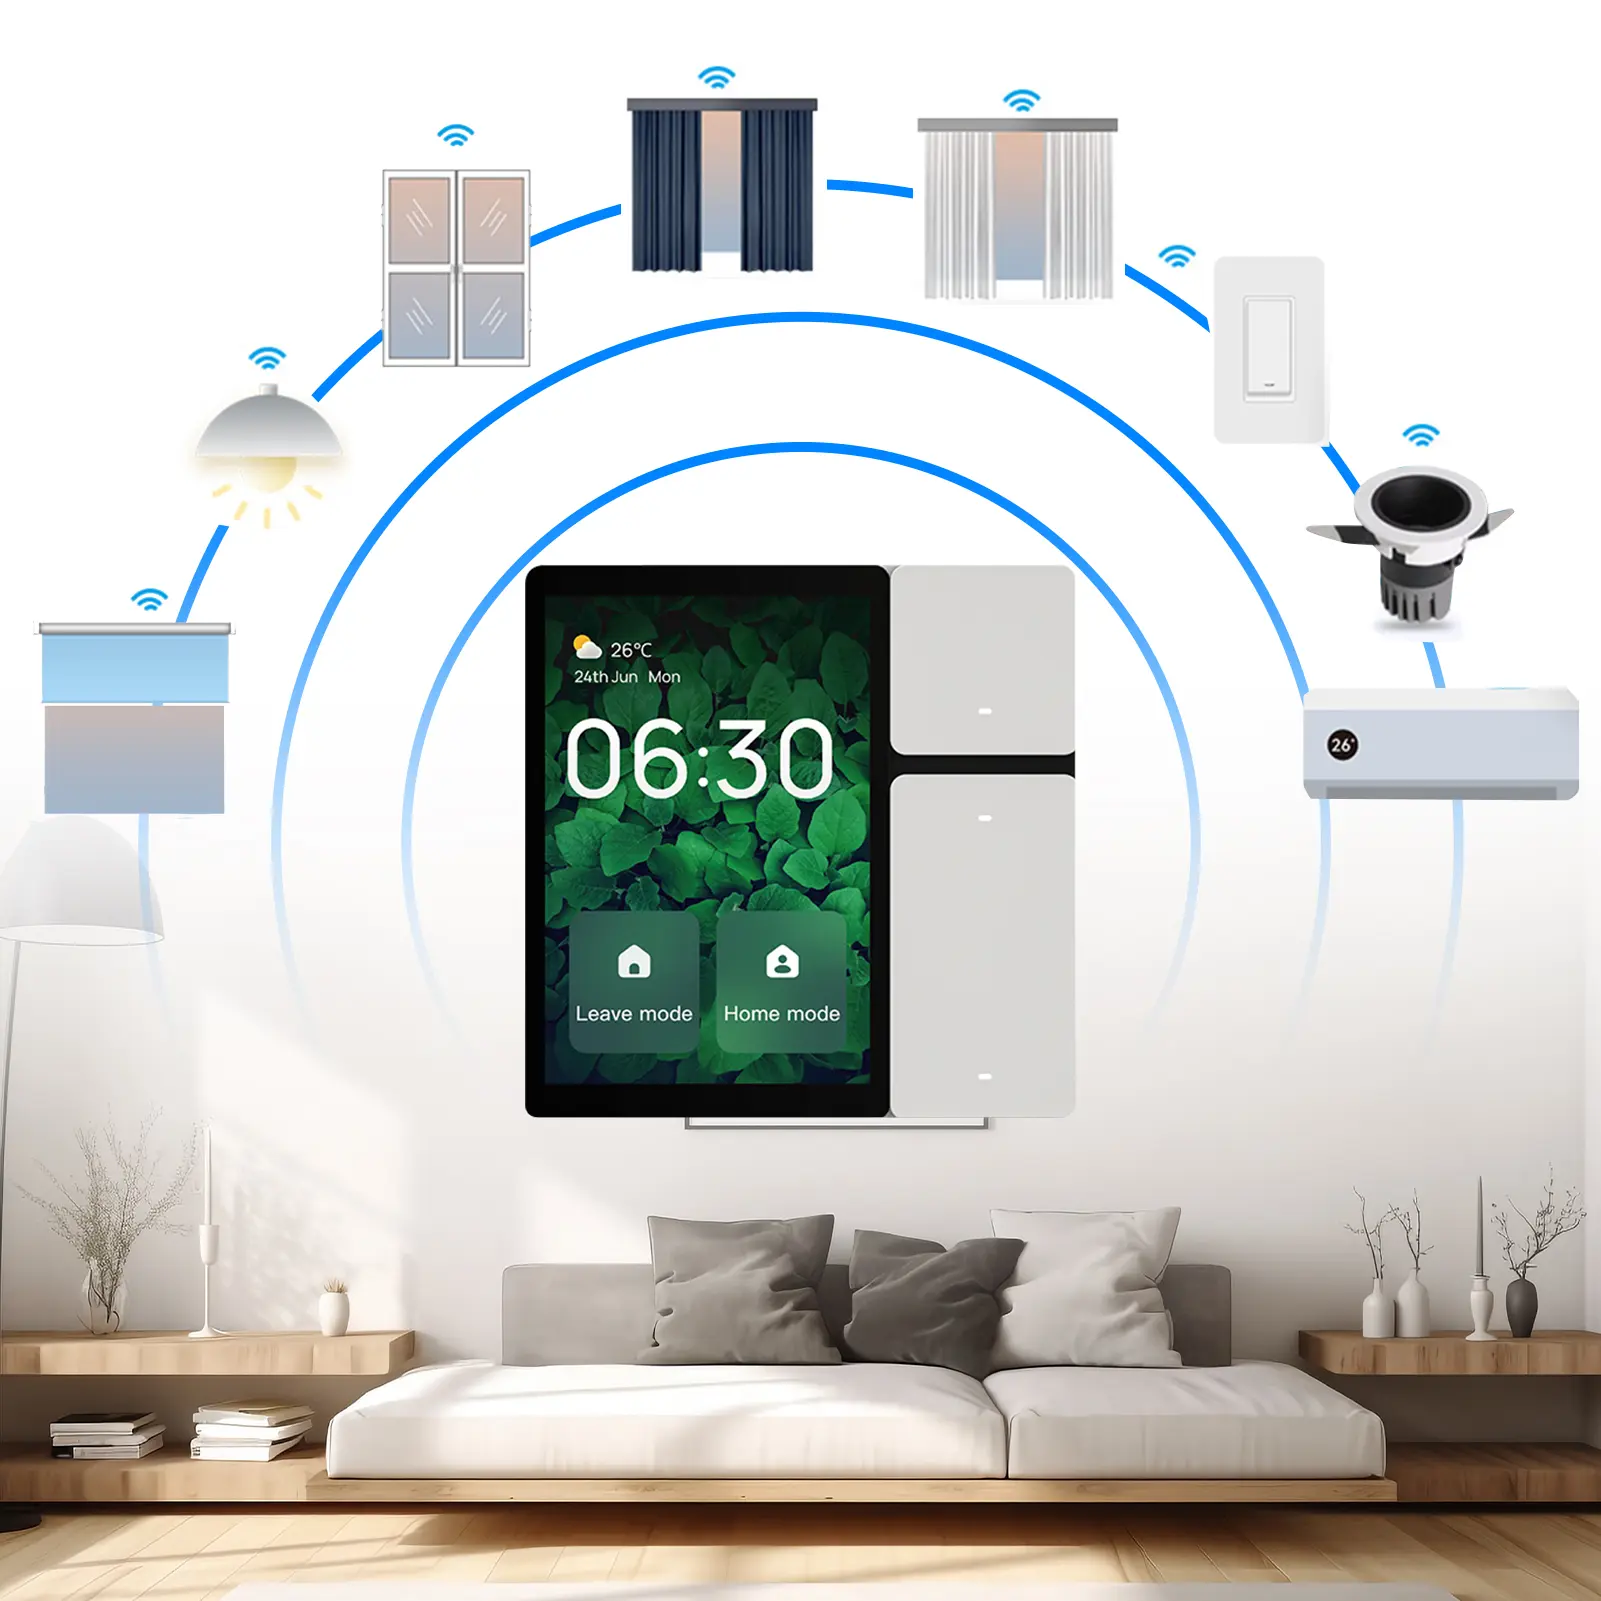
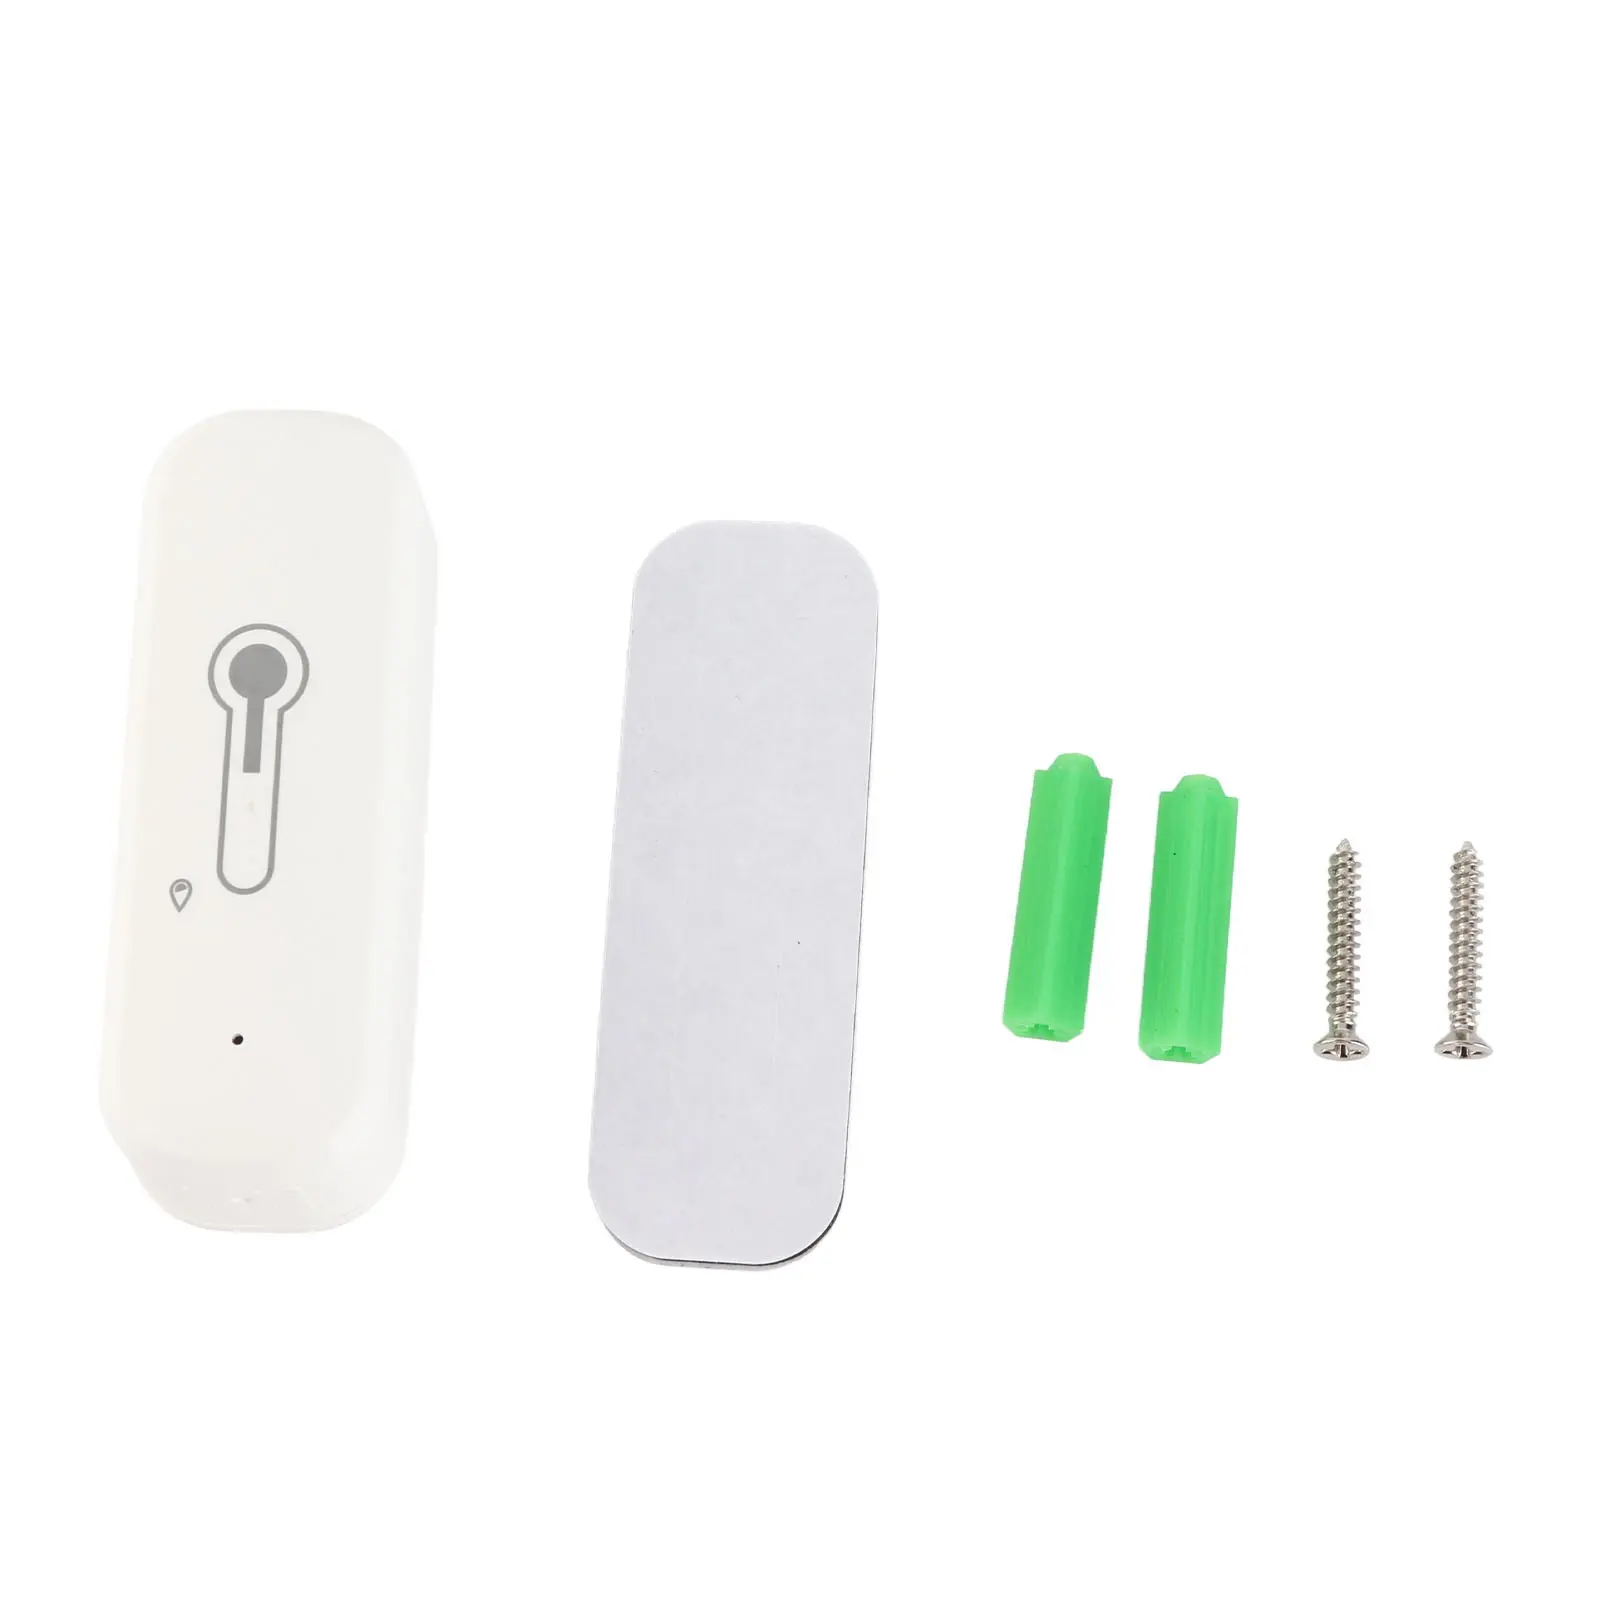
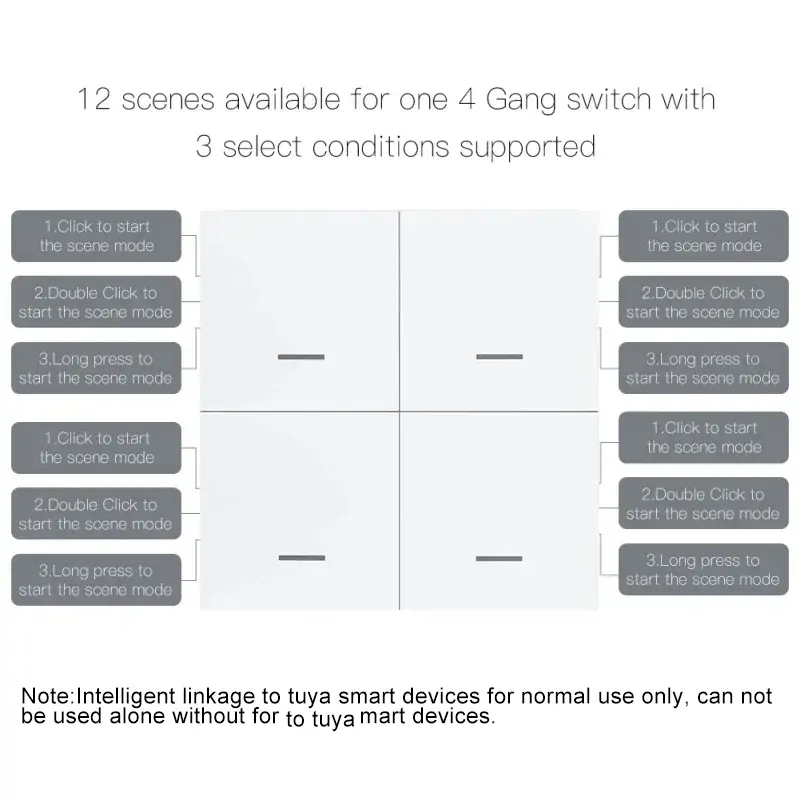
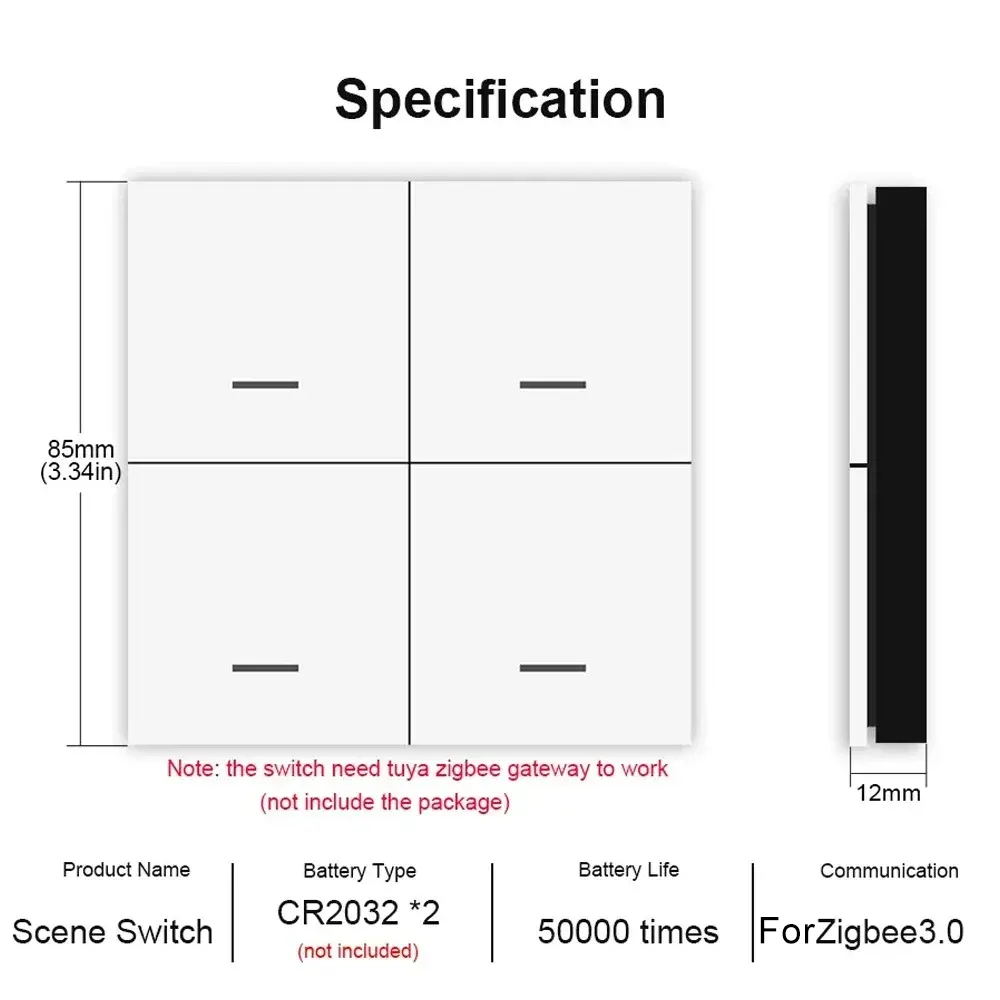
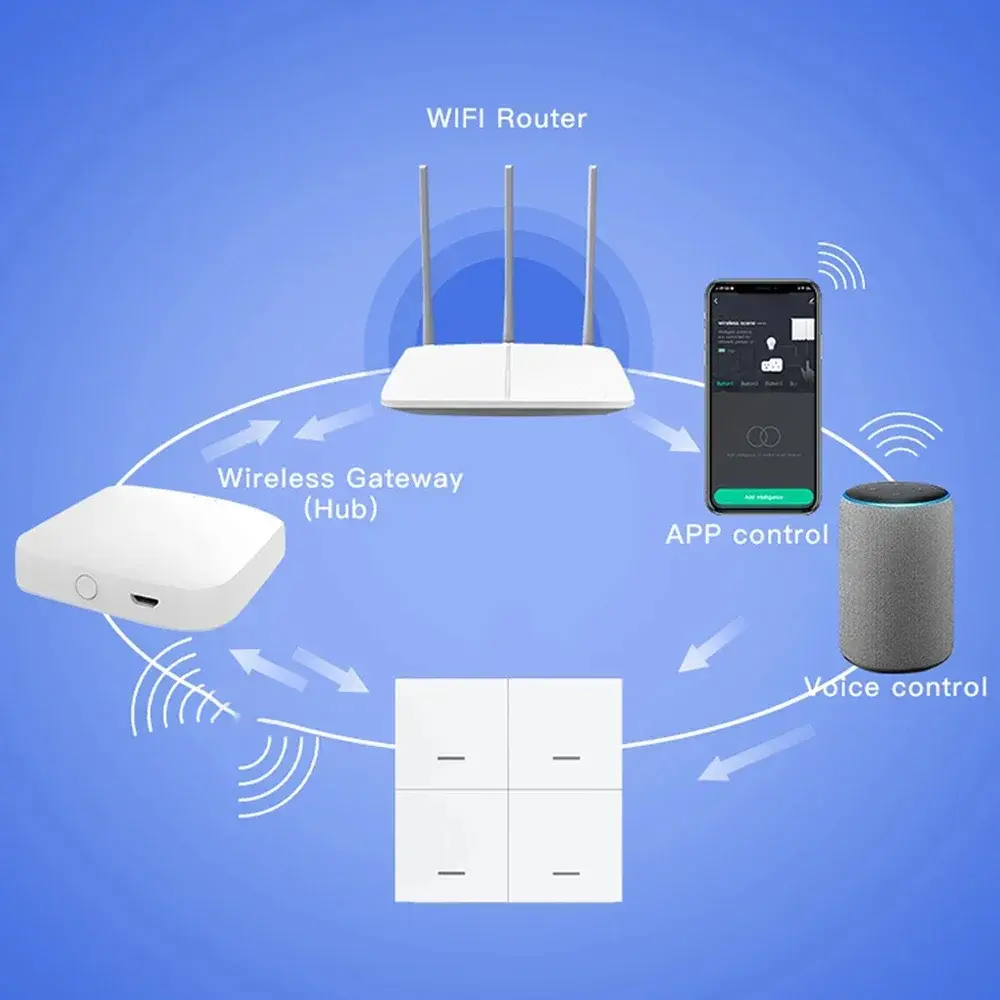
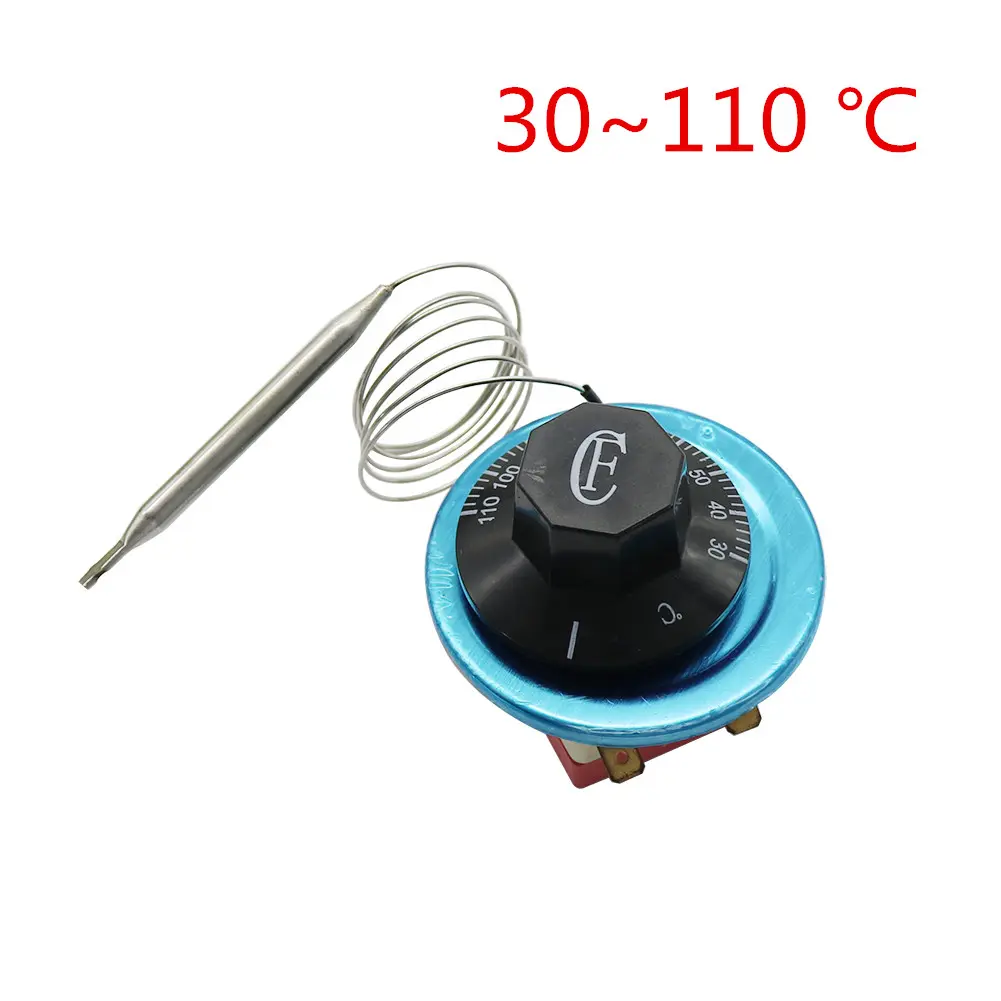
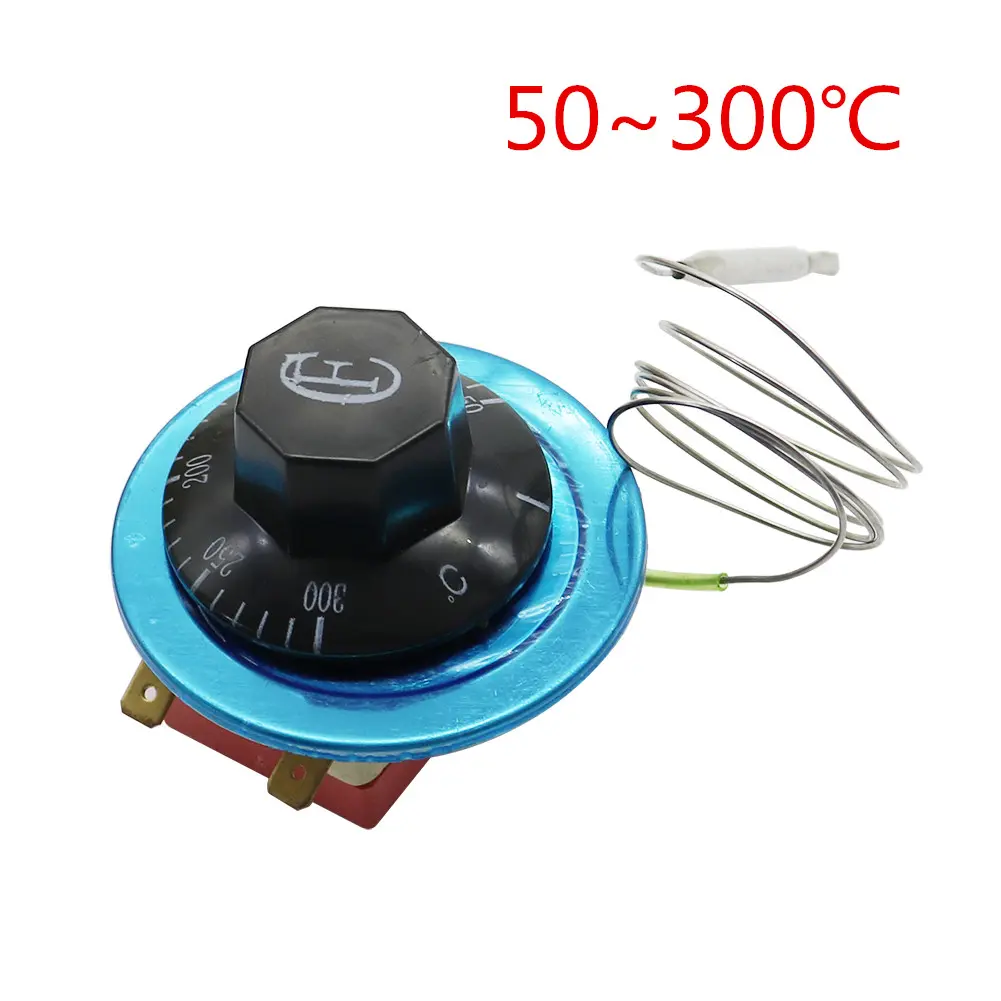
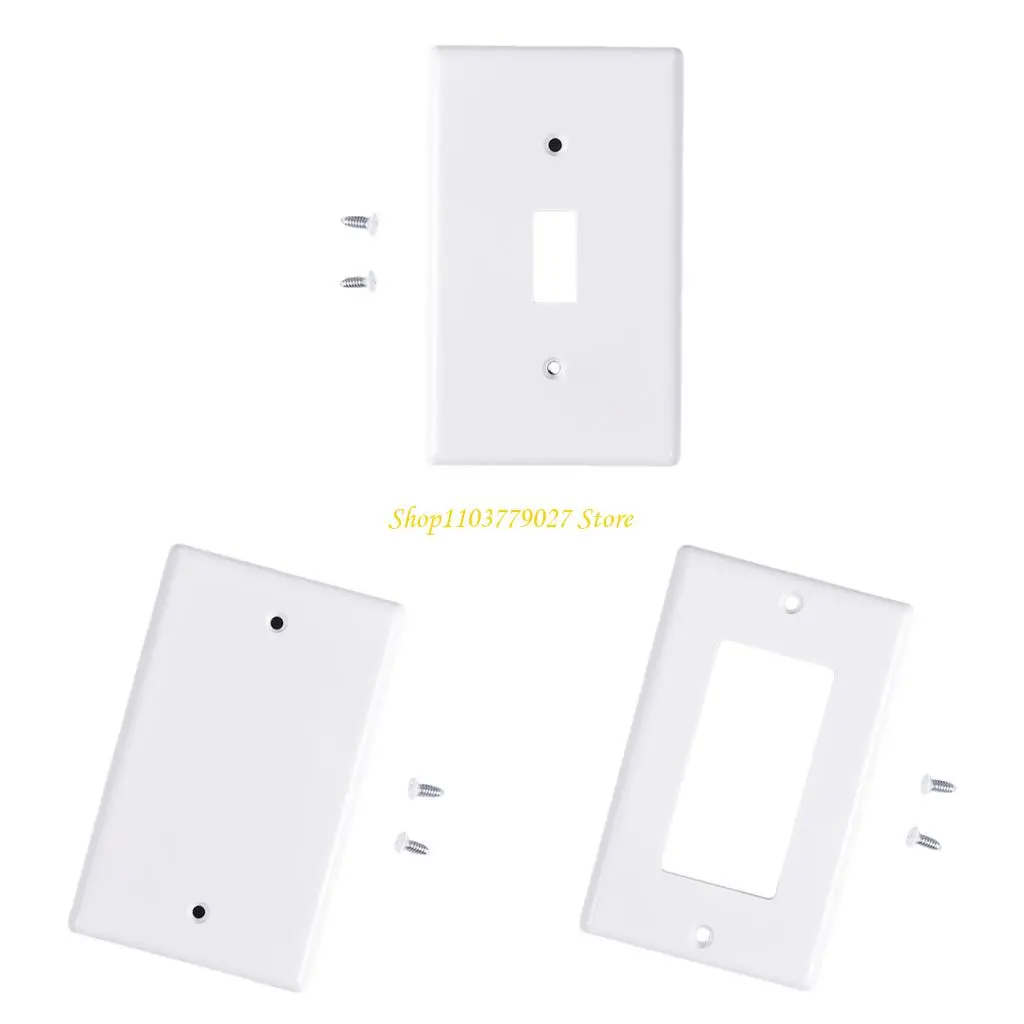
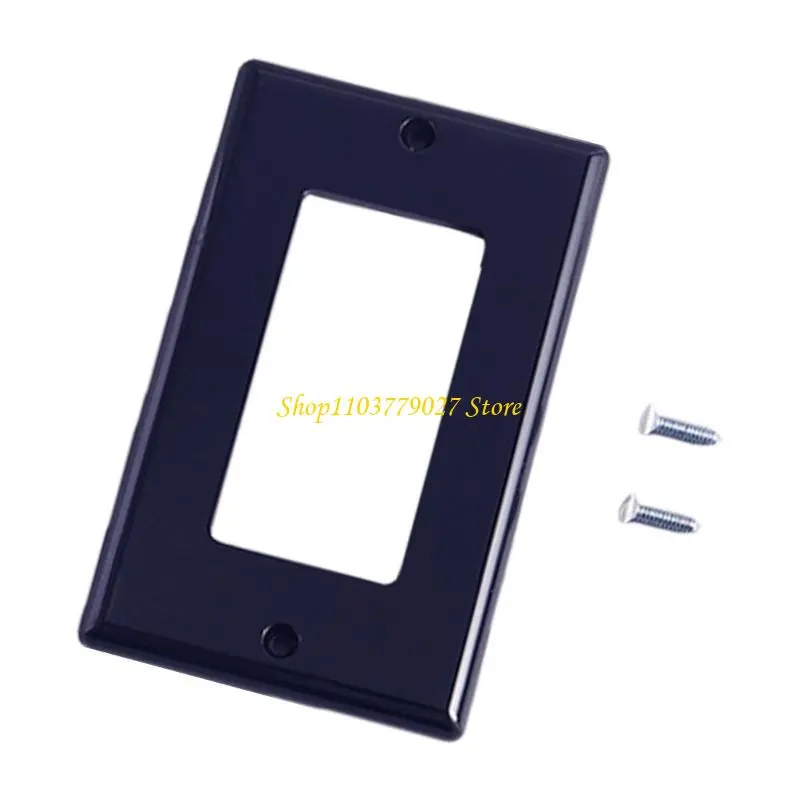
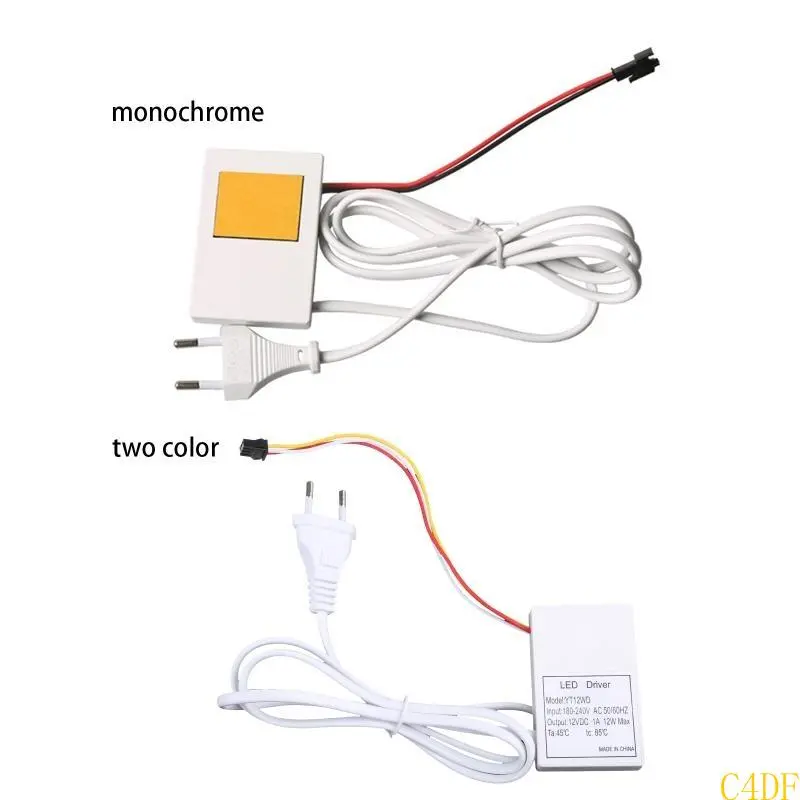
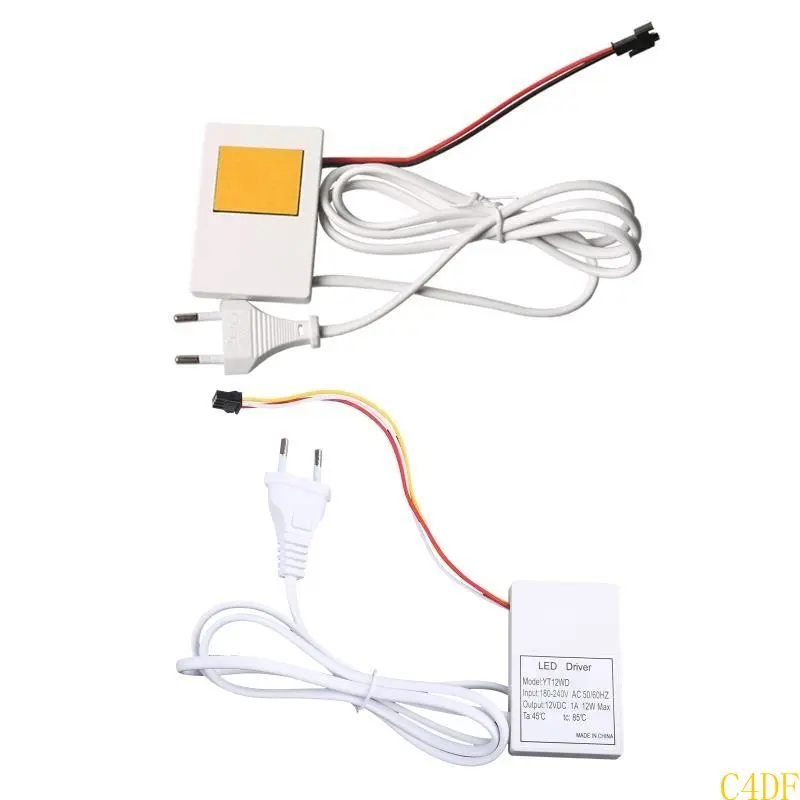
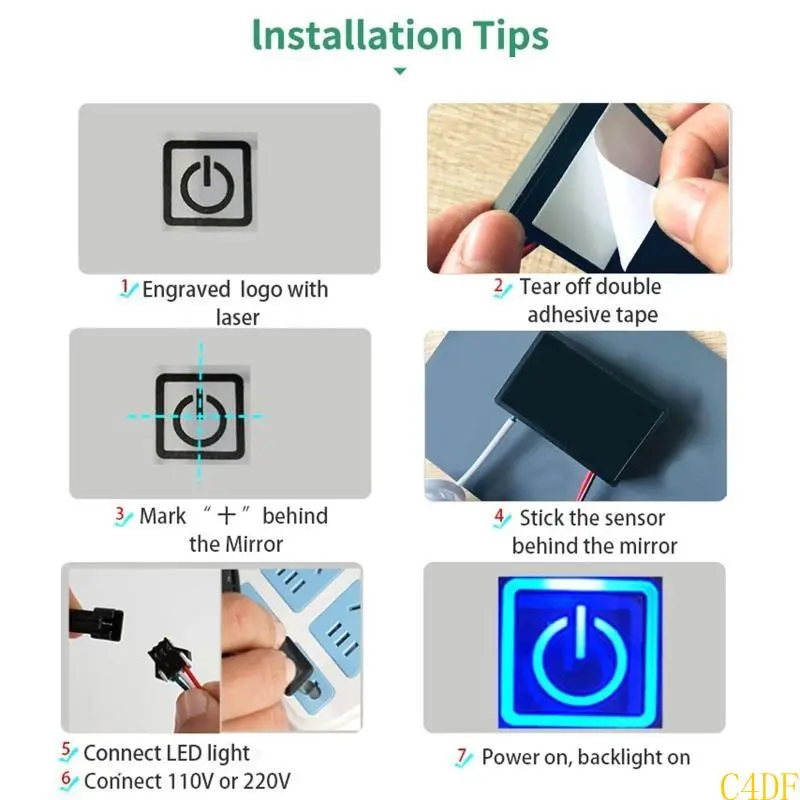
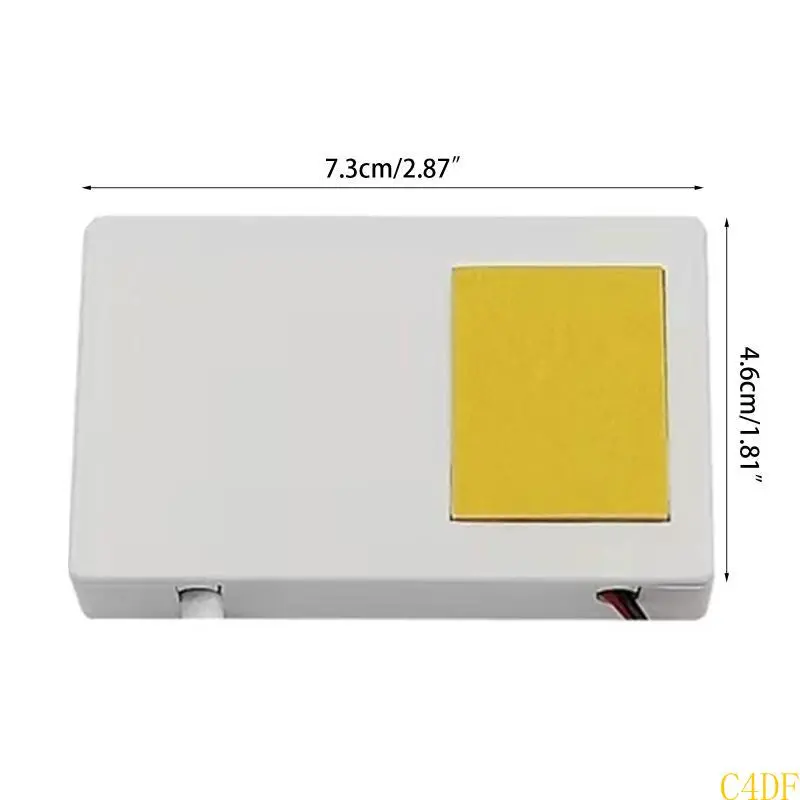
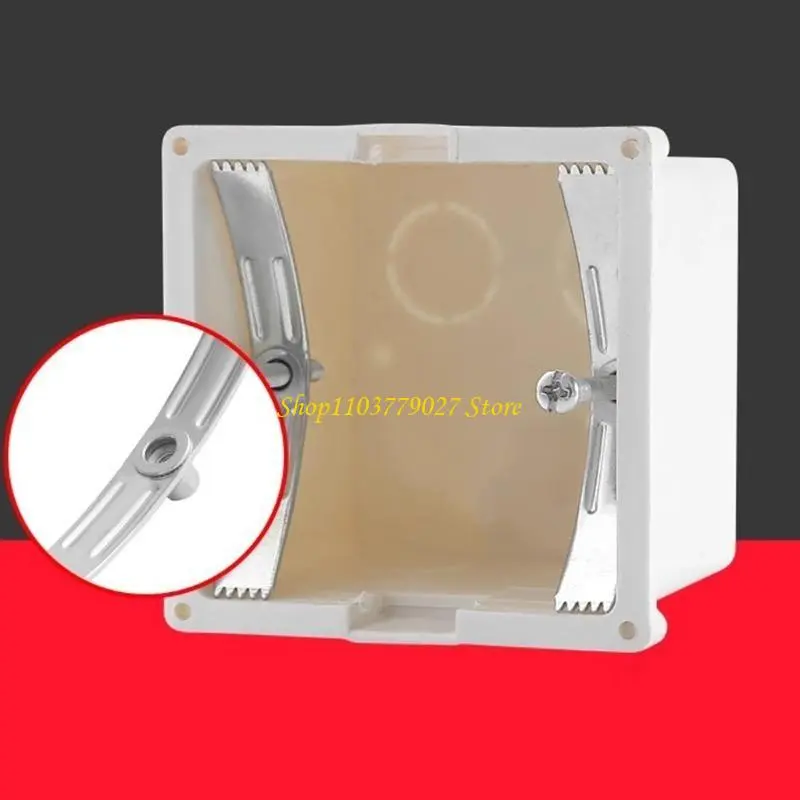
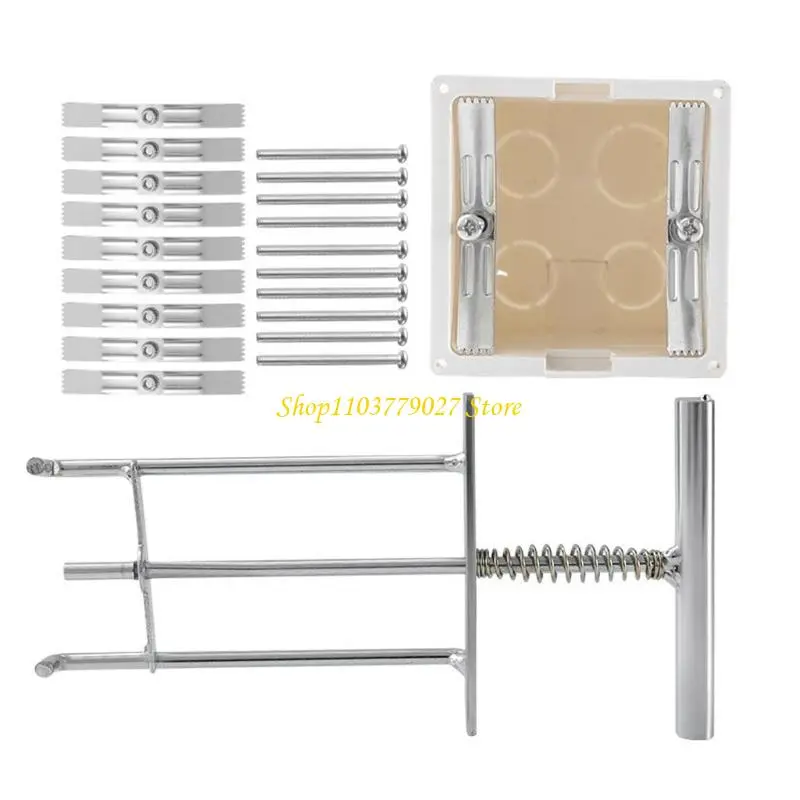
<div style="font-family:"Open Sans", Roboto, Arial, Helvetica, sans-serif, SimSun;font-size:14px;font-weight:400;letter-spacing:normal;text-align:start;white-space:normal;color:rgb(34, 34, 34);margin:0px;margin-bottom:0px;margin-top:0px;margin-left:0px;margin-right:0px;padding:0px;padding-bottom:0px;padding-top:0px;padding-left:0px;padding-right:0px;box-sizing:content-box" align="start"><div><br/></div><div class="detailmodule_html"><div class="detail-desc-decorate-richtext"><div style="font-family:"Open Sans", Roboto, Arial, Helvetica, sans-serif, SimSun;font-size:14px;font-weight:400;letter-spacing:normal;text-align:start;white-space:normal;color:rgb(34, 34, 34);margin:0px;margin-bottom:0px;margin-top:0px;margin-left:0px;margin-right:0px;padding:0px;padding-bottom:0px;padding-top:0px;padding-left:0px;padding-right:0px;box-sizing:content-box" align="start"><div style="margin:0px;margin-bottom:0px;margin-top:0px;margin-left:0px;margin-right:0px;padding:0px;padding-bottom:0px;padding-top:0px;padding-left:0px;padding-right:0px;box-sizing:content-box"><span style="font-size:24px"><strong>Pairing method</strong></span> <span style="font-size:18px"><br/>(1) Pairing code -</span> <span style="font-size:18px"><span> </span></span> <span style="font-size:18px"><strong><span style="color:rgb(231, 76, 60)">Only can set Toggle Mode</span></strong></span> <span style="font-size:18px"><br/>Manual pairing method: press the controller code key for 2 times and the LED flashes to enter the code matching mode.<br/>At this time, press the remote control switch 2 times, and the light is successfully controlled and paired;<br/>(2) Clearing mode<br/>Manual code clearing method: press the controller key for 8 times,and the LED flashes to clear the code successfully.</span></div></div><div><br/></div><div style="font-family:"Open Sans", Roboto, Arial, Helvetica, sans-serif, SimSun;font-size:14px;font-weight:400;letter-spacing:normal;text-align:start;white-space:normal;color:rgb(34, 34, 34);margin:0px;margin-bottom:0px;margin-top:0px;margin-left:0px;margin-right:0px;padding:0px;padding-bottom:0px;padding-top:0px;padding-left:0px;padding-right:0px;box-sizing:content-box" align="start"><p style="font-family:OpenSans;font-size:20px;font-weight:900;line-height:28px;white-space:pre-wrap;color:rgb(0, 0, 0);margin:0px 0px 12px;margin-bottom:12px;margin-top:0px;margin-left:0px;margin-right:0px;padding:0px;padding-bottom:0px;padding-top:0px;padding-left:0px;padding-right:0px;box-sizing:border-box" class="detail-desc-decorate-title">Controller parameter</p><p style="font-family:OpenSans;font-size:14px;font-weight:300;line-height:20px;white-space:pre-wrap;color:rgb(0, 0, 0);margin:0px 0px 12px;margin-bottom:12px;margin-top:0px;margin-left:0px;margin-right:0px;padding:0px;padding-bottom:0px;padding-top:0px;padding-left:0px;padding-right:0px;box-sizing:border-box" class="detail-desc-decorate-content">Working voltage: AC85-240V 60HZ/50HZ<br/>Working frequency: 433.92MHZ<br/>Power consumption in standby mode:<0.3W<br/>Maximum current:10A<br/>Receiving sensitivity: -108dBM<br/>Working way: wireless control<br/>Coding way: learning code<br/>Modulation: ASK<br/>Working temperature: -10℃~+70℃<br/>Out size: 67*41.2*25.7(mm)<br/>Body size: 47.4*41.2*25.7 (mm)<br/>distance:20-100m(in open area)</p><div></div><div><br/><br/></div><div style="margin:0px;margin-bottom:0px;margin-top:0px;margin-left:0px;margin-right:0px;padding:0px;padding-bottom:0px;padding-top:0px;padding-left:0px;padding-right:0px;box-sizing:content-box"><p style="font-family:OpenSans;font-size:20px;font-weight:900;line-height:28px;white-space:pre-wrap;color:rgb(0, 0, 0);margin:0px 0px 12px;margin-bottom:12px;margin-top:0px;margin-left:0px;margin-right:0px;padding:0px;padding-bottom:0px;padding-top:0px;padding-left:0px;padding-right:0px;box-sizing:border-box" class="detail-desc-decorate-title"><br/>Controller Installation</p></div><div style="margin:0px;margin-bottom:0px;margin-top:0px;margin-left:0px;margin-right:0px;padding:0px;padding-bottom:0px;padding-top:0px;padding-left:0px;padding-right:0px;box-sizing:content-box"><span style="font-size:18px">(1) Connect the controller in series with the circuit of the lamp. Connect the fire wire to L and the neutral wire to N.<br/>INPUT is connected to the input (input end), OUTPUT is connected to the output (lamp end); As shown below:</span><br/><br/><span style="font-size:18px">(2) After connecting the controller, it can be fixed in the appropriate position with the supplied double-sided tape or screw package.</span></div><div style="margin:0px;margin-bottom:0px;margin-top:0px;margin-left:0px;margin-right:0px;padding:0px;padding-bottom:0px;padding-top:0px;padding-left:0px;padding-right:0px;box-sizing:content-box"><br/><span style="font-size:18px"><span style="font-size:24px"><strong>Working Mode</strong></span></span><br/><span style="font-size:24px"><strong>Toggle mode:</strong></span><br/><span style="font-size:18px">Press A button,the relay will work, press A button again, this relay will stop.</span><br/><span style="font-size:24px"><strong><br/>Pairing method</strong></span> <span style="font-size:18px"><br/>(1) Pairing code -</span> <span style="font-size:18px"><span> </span></span> <span style="font-size:18px"><strong><span style="color:rgb(231, 76, 60)">Only can set Toggle Mode</span></strong></span> <span style="font-size:18px"><br/>Manual pairing method: press the controller code key for 2 times and the LED flashes to enter the code matching mode.<br/>At this time, press the remote control switch 2 times, and the light is successfully controlled and paired;<br/>(2) Clearing mode<br/>Manual code clearing method: press the controller key for 8 times,and the LED flashes to clear the code successfully.</span><br/><br/><strong><span style="font-size:24px">Cautions</span></strong> <span style="font-size:18px"><br/>1) Please don't operation in electricity and use it after testing.<br/>2) Please change the battery in time (the remote control distance wil become closer when the voltage is insufficient)<br/>3) When using wireless electronic products, please avoid metal masks, large electronic equipments, electromagnelic fields, etc.,<br/>which have strong interference sources, to avoid remote control and short receiving distance or not working properly.<br/>4) Do no use this electronic product abnormally. Abnormal use will reduce product performance and longevity.<br/>Seriously damaged products may bring security risks.</span></div><div style="margin:0px;margin-bottom:0px;margin-top:0px;margin-left:0px;margin-right:0px;padding:0px;padding-bottom:0px;padding-top:0px;padding-left:0px;padding-right:0px;box-sizing:content-box"><br/><br/>The mini controller is convenient and easy to install. No need to climb stairs, just install it in your own wall switch. Your own wall switch can also control the lights.</div></div><div style="font-family:"Open Sans", Roboto, Arial, Helvetica, sans-serif, SimSun;font-size:14px;font-weight:400;letter-spacing:normal;text-align:start;white-space:normal;color:rgb(34, 34, 34);margin:0px;margin-bottom:0px;margin-top:0px;margin-left:0px;margin-right:0px;padding:0px;padding-bottom:0px;padding-top:0px;padding-left:0px;padding-right:0px;box-sizing:content-box" align="start"></div><div style="font-family:"Open Sans", Roboto, Arial, Helvetica, sans-serif, SimSun;font-size:14px;font-weight:400;letter-spacing:normal;text-align:start;white-space:normal;color:rgb(34, 34, 34);margin:0px;margin-bottom:0px;margin-top:0px;margin-left:0px;margin-right:0px;padding:0px;padding-bottom:0px;padding-top:0px;padding-left:0px;padding-right:0px;box-sizing:content-box" align="start"></div><div style="font-family:"Open Sans", Roboto, Arial, Helvetica, sans-serif, SimSun;font-size:14px;font-weight:400;letter-spacing:normal;text-align:start;white-space:normal;color:rgb(34, 34, 34);margin:0px;margin-bottom:0px;margin-top:0px;margin-left:0px;margin-right:0px;padding:0px;padding-bottom:0px;padding-top:0px;padding-left:0px;padding-right:0px;box-sizing:content-box" align="start"></div><div style="font-family:"Open Sans", Roboto, Arial, Helvetica, sans-serif, SimSun;font-size:14px;font-weight:400;letter-spacing:normal;text-align:start;white-space:normal;color:rgb(34, 34, 34);margin:0px;margin-bottom:0px;margin-top:0px;margin-left:0px;margin-right:0px;padding:0px;padding-bottom:0px;padding-top:0px;padding-left:0px;padding-right:0px;box-sizing:content-box" align="start"><p style="font-family:OpenSans;font-size:20px;font-weight:900;line-height:28px;white-space:pre-wrap;color:rgb(0, 0, 0);margin:0px 0px 12px;margin-bottom:12px;margin-top:0px;margin-left:0px;margin-right:0px;padding:0px;padding-bottom:0px;padding-top:0px;padding-left:0px;padding-right:0px;box-sizing:border-box" class="detail-desc-decorate-title">20~100M LONG RANGE (in Open area)</p><p style="font-family:OpenSans;font-size:14px;font-weight:300;line-height:20px;white-space:pre-wrap;color:rgb(0, 0, 0);margin:0px 0px 12px;margin-bottom:12px;margin-top:0px;margin-left:0px;margin-right:0px;padding:0px;padding-bottom:0px;padding-top:0px;padding-left:0px;padding-right:0px;box-sizing:border-box" class="detail-desc-decorate-content">Tip: The obstacle will shorten the distance, the wireless signal is affected by the environment, the more obstacles, the shorter the distance.</p><div style="margin:0px;margin-bottom:0px;margin-top:0px;margin-left:0px;margin-right:0px;padding:0px;padding-bottom:0px;padding-top:0px;padding-left:0px;padding-right:0px;box-sizing:content-box"></div></div><div style="font-family:"Open Sans", Roboto, Arial, Helvetica, sans-serif, SimSun;font-size:14px;font-weight:400;letter-spacing:normal;text-align:start;white-space:normal;color:rgb(34, 34, 34);margin:0px;margin-bottom:0px;margin-top:0px;margin-left:0px;margin-right:0px;padding:0px;padding-bottom:0px;padding-top:0px;padding-left:0px;padding-right:0px;box-sizing:content-box" align="start"></div><div style="font-family:"Open Sans", Roboto, Arial, Helvetica, sans-serif, SimSun;font-size:14px;font-weight:400;letter-spacing:normal;text-align:start;white-space:normal;color:rgb(34, 34, 34);margin:0px;margin-bottom:0px;margin-top:0px;margin-left:0px;margin-right:0px;padding:0px;padding-bottom:0px;padding-top:0px;padding-left:0px;padding-right:0px;box-sizing:content-box" align="start"><p style="font-family:OpenSans;font-size:20px;font-weight:900;line-height:28px;white-space:pre-wrap;color:rgb(0, 0, 0);margin:0px 0px 12px;margin-bottom:12px;margin-top:0px;margin-left:0px;margin-right:0px;padding:0px;padding-bottom:0px;padding-top:0px;padding-left:0px;padding-right:0px;box-sizing:border-box" class="detail-desc-decorate-title">note:</p><p style="font-family:OpenSans;font-size:14px;font-weight:300;line-height:20px;white-space:pre-wrap;color:rgb(0, 0, 0);margin:0px 0px 12px;margin-bottom:12px;margin-top:0px;margin-left:0px;margin-right:0px;padding:0px;padding-bottom:0px;padding-top:0px;padding-left:0px;padding-right:0px;box-sizing:border-box" class="detail-desc-decorate-content">1.This controller will not be available if a wall switch with RF function is installed at home. Otherwise the function will be affected. Just need to buy a separate wireless switch<br/><br/>2. Do not operate with power. Turn off the power supply and operate it. If the test is confirmed to be correct, use it under the guidance of a professional electrician.<br/><br/>3. When the voltage of the remote control is insufficient, please change the battery in time (the remote control distance becomes closer when the remote control battery voltage is insufficient).<br/><br/>4. When using wireless electronic products, care should be taken to avoid metal masks, large electronic devices, electromagnetic fields, etc., which have strong interference sources, to avoid remote control and short receiving distance or to work normally.<br/><br/>5. Do not use this electronic product abnormally. Abnormal use will reduce product performance and longevity. In severe cases, damage to the product will also pose a safety hazard.</p></div><div> </div></div></div></div><p><br/></p>
$9.755
$5.87
- Category : Home Improvement
- Brand : shine_tale_flagship_store SHINE-TALE Flagship Store
Colors
Sizes
-
+
<div style="font-family:"Open Sans", Roboto, Arial, Helvetica, sans-serif, SimSun;font-size:14px;font-weight:400;letter-spacing:normal;text-align:start;white-space:normal;color:rgb(34, 34, 34);margin:0px;margin-bottom:0px;margin-top:0px;margin-left:0px;margin-right:0px;padding:0px;padding-bottom:0px;padding-top:0px;padding-left:0px;padding-right:0px;box-sizing:content-box" align="start"><div><br/></div><div class="detailmodule_html"><div class="detail-desc-decorate-richtext"><div style="font-family:"Open Sans", Roboto, Arial, Helvetica, sans-serif, SimSun;font-size:14px;font-weight:400;letter-spacing:normal;text-align:start;white-space:normal;color:rgb(34, 34, 34);margin:0px;margin-bottom:0px;margin-top:0px;margin-left:0px;margin-right:0px;padding:0px;padding-bottom:0px;padding-top:0px;padding-left:0px;padding-right:0px;box-sizing:content-box" align="start"><div style="margin:0px;margin-bottom:0px;margin-top:0px;margin-left:0px;margin-right:0px;padding:0px;padding-bottom:0px;padding-top:0px;padding-left:0px;padding-right:0px;box-sizing:content-box"><span style="font-size:24px"><strong>Pairing method</strong></span> <span style="font-size:18px"><br/>(1) Pairing code -</span> <span style="font-size:18px"><span> </span></span> <span style="font-size:18px"><strong><span style="color:rgb(231, 76, 60)">Only can set Toggle Mode</span></strong></span> <span style="font-size:18px"><br/>Manual pairing method: press the controller code key for 2 times and the LED flashes to enter the code matching mode.<br/>At this time, press the remote control switch 2 times, and the light is successfully controlled and paired;<br/>(2) Clearing mode<br/>Manual code clearing method: press the controller key for 8 times,and the LED flashes to clear the code successfully.</span></div></div><div><br/></div><div style="font-family:"Open Sans", Roboto, Arial, Helvetica, sans-serif, SimSun;font-size:14px;font-weight:400;letter-spacing:normal;text-align:start;white-space:normal;color:rgb(34, 34, 34);margin:0px;margin-bottom:0px;margin-top:0px;margin-left:0px;margin-right:0px;padding:0px;padding-bottom:0px;padding-top:0px;padding-left:0px;padding-right:0px;box-sizing:content-box" align="start"><p style="font-family:OpenSans;font-size:20px;font-weight:900;line-height:28px;white-space:pre-wrap;color:rgb(0, 0, 0);margin:0px 0px 12px;margin-bottom:12px;margin-top:0px;margin-left:0px;margin-right:0px;padding:0px;padding-bottom:0px;padding-top:0px;padding-left:0px;padding-right:0px;box-sizing:border-box" class="detail-desc-decorate-title">Controller parameter</p><p style="font-family:OpenSans;font-size:14px;font-weight:300;line-height:20px;white-space:pre-wrap;color:rgb(0, 0, 0);margin:0px 0px 12px;margin-bottom:12px;margin-top:0px;margin-left:0px;margin-right:0px;padding:0px;padding-bottom:0px;padding-top:0px;padding-left:0px;padding-right:0px;box-sizing:border-box" class="detail-desc-decorate-content">Working voltage: AC85-240V 60HZ/50HZ<br/>Working frequency: 433.92MHZ<br/>Power consumption in standby mode:<0.3W<br/>Maximum current:10A<br/>Receiving sensitivity: -108dBM<br/>Working way: wireless control<br/>Coding way: learning code<br/>Modulation: ASK<br/>Working temperature: -10℃~+70℃<br/>Out size: 67*41.2*25.7(mm)<br/>Body size: 47.4*41.2*25.7 (mm)<br/>distance:20-100m(in open area)</p><div></div><div><br/><br/></div><div style="margin:0px;margin-bottom:0px;margin-top:0px;margin-left:0px;margin-right:0px;padding:0px;padding-bottom:0px;padding-top:0px;padding-left:0px;padding-right:0px;box-sizing:content-box"><p style="font-family:OpenSans;font-size:20px;font-weight:900;line-height:28px;white-space:pre-wrap;color:rgb(0, 0, 0);margin:0px 0px 12px;margin-bottom:12px;margin-top:0px;margin-left:0px;margin-right:0px;padding:0px;padding-bottom:0px;padding-top:0px;padding-left:0px;padding-right:0px;box-sizing:border-box" class="detail-desc-decorate-title"><br/>Controller Installation</p></div><div style="margin:0px;margin-bottom:0px;margin-top:0px;margin-left:0px;margin-right:0px;padding:0px;padding-bottom:0px;padding-top:0px;padding-left:0px;padding-right:0px;box-sizing:content-box"><span style="font-size:18px">(1) Connect the controller in series with the circuit of the lamp. Connect the fire wire to L and the neutral wire to N.<br/>INPUT is connected to the input (input end), OUTPUT is connected to the output (lamp end); As shown below:</span><br/><br/><span style="font-size:18px">(2) After connecting the controller, it can be fixed in the appropriate position with the supplied double-sided tape or screw package.</span></div><div style="margin:0px;margin-bottom:0px;margin-top:0px;margin-left:0px;margin-right:0px;padding:0px;padding-bottom:0px;padding-top:0px;padding-left:0px;padding-right:0px;box-sizing:content-box"><br/><span style="font-size:18px"><span style="font-size:24px"><strong>Working Mode</strong></span></span><br/><span style="font-size:24px"><strong>Toggle mode:</strong></span><br/><span style="font-size:18px">Press A button,the relay will work, press A button again, this relay will stop.</span><br/><span style="font-size:24px"><strong><br/>Pairing method</strong></span> <span style="font-size:18px"><br/>(1) Pairing code -</span> <span style="font-size:18px"><span> </span></span> <span style="font-size:18px"><strong><span style="color:rgb(231, 76, 60)">Only can set Toggle Mode</span></strong></span> <span style="font-size:18px"><br/>Manual pairing method: press the controller code key for 2 times and the LED flashes to enter the code matching mode.<br/>At this time, press the remote control switch 2 times, and the light is successfully controlled and paired;<br/>(2) Clearing mode<br/>Manual code clearing method: press the controller key for 8 times,and the LED flashes to clear the code successfully.</span><br/><br/><strong><span style="font-size:24px">Cautions</span></strong> <span style="font-size:18px"><br/>1) Please don't operation in electricity and use it after testing.<br/>2) Please change the battery in time (the remote control distance wil become closer when the voltage is insufficient)<br/>3) When using wireless electronic products, please avoid metal masks, large electronic equipments, electromagnelic fields, etc.,<br/>which have strong interference sources, to avoid remote control and short receiving distance or not working properly.<br/>4) Do no use this electronic product abnormally. Abnormal use will reduce product performance and longevity.<br/>Seriously damaged products may bring security risks.</span></div><div style="margin:0px;margin-bottom:0px;margin-top:0px;margin-left:0px;margin-right:0px;padding:0px;padding-bottom:0px;padding-top:0px;padding-left:0px;padding-right:0px;box-sizing:content-box"><br/><br/>The mini controller is convenient and easy to install. No need to climb stairs, just install it in your own wall switch. Your own wall switch can also control the lights.</div></div><div style="font-family:"Open Sans", Roboto, Arial, Helvetica, sans-serif, SimSun;font-size:14px;font-weight:400;letter-spacing:normal;text-align:start;white-space:normal;color:rgb(34, 34, 34);margin:0px;margin-bottom:0px;margin-top:0px;margin-left:0px;margin-right:0px;padding:0px;padding-bottom:0px;padding-top:0px;padding-left:0px;padding-right:0px;box-sizing:content-box" align="start"></div><div style="font-family:"Open Sans", Roboto, Arial, Helvetica, sans-serif, SimSun;font-size:14px;font-weight:400;letter-spacing:normal;text-align:start;white-space:normal;color:rgb(34, 34, 34);margin:0px;margin-bottom:0px;margin-top:0px;margin-left:0px;margin-right:0px;padding:0px;padding-bottom:0px;padding-top:0px;padding-left:0px;padding-right:0px;box-sizing:content-box" align="start"></div><div style="font-family:"Open Sans", Roboto, Arial, Helvetica, sans-serif, SimSun;font-size:14px;font-weight:400;letter-spacing:normal;text-align:start;white-space:normal;color:rgb(34, 34, 34);margin:0px;margin-bottom:0px;margin-top:0px;margin-left:0px;margin-right:0px;padding:0px;padding-bottom:0px;padding-top:0px;padding-left:0px;padding-right:0px;box-sizing:content-box" align="start"></div><div style="font-family:"Open Sans", Roboto, Arial, Helvetica, sans-serif, SimSun;font-size:14px;font-weight:400;letter-spacing:normal;text-align:start;white-space:normal;color:rgb(34, 34, 34);margin:0px;margin-bottom:0px;margin-top:0px;margin-left:0px;margin-right:0px;padding:0px;padding-bottom:0px;padding-top:0px;padding-left:0px;padding-right:0px;box-sizing:content-box" align="start"><p style="font-family:OpenSans;font-size:20px;font-weight:900;line-height:28px;white-space:pre-wrap;color:rgb(0, 0, 0);margin:0px 0px 12px;margin-bottom:12px;margin-top:0px;margin-left:0px;margin-right:0px;padding:0px;padding-bottom:0px;padding-top:0px;padding-left:0px;padding-right:0px;box-sizing:border-box" class="detail-desc-decorate-title">20~100M LONG RANGE (in Open area)</p><p style="font-family:OpenSans;font-size:14px;font-weight:300;line-height:20px;white-space:pre-wrap;color:rgb(0, 0, 0);margin:0px 0px 12px;margin-bottom:12px;margin-top:0px;margin-left:0px;margin-right:0px;padding:0px;padding-bottom:0px;padding-top:0px;padding-left:0px;padding-right:0px;box-sizing:border-box" class="detail-desc-decorate-content">Tip: The obstacle will shorten the distance, the wireless signal is affected by the environment, the more obstacles, the shorter the distance.</p><div style="margin:0px;margin-bottom:0px;margin-top:0px;margin-left:0px;margin-right:0px;padding:0px;padding-bottom:0px;padding-top:0px;padding-left:0px;padding-right:0px;box-sizing:content-box"></div></div><div style="font-family:"Open Sans", Roboto, Arial, Helvetica, sans-serif, SimSun;font-size:14px;font-weight:400;letter-spacing:normal;text-align:start;white-space:normal;color:rgb(34, 34, 34);margin:0px;margin-bottom:0px;margin-top:0px;margin-left:0px;margin-right:0px;padding:0px;padding-bottom:0px;padding-top:0px;padding-left:0px;padding-right:0px;box-sizing:content-box" align="start"></div><div style="font-family:"Open Sans", Roboto, Arial, Helvetica, sans-serif, SimSun;font-size:14px;font-weight:400;letter-spacing:normal;text-align:start;white-space:normal;color:rgb(34, 34, 34);margin:0px;margin-bottom:0px;margin-top:0px;margin-left:0px;margin-right:0px;padding:0px;padding-bottom:0px;padding-top:0px;padding-left:0px;padding-right:0px;box-sizing:content-box" align="start"><p style="font-family:OpenSans;font-size:20px;font-weight:900;line-height:28px;white-space:pre-wrap;color:rgb(0, 0, 0);margin:0px 0px 12px;margin-bottom:12px;margin-top:0px;margin-left:0px;margin-right:0px;padding:0px;padding-bottom:0px;padding-top:0px;padding-left:0px;padding-right:0px;box-sizing:border-box" class="detail-desc-decorate-title">note:</p><p style="font-family:OpenSans;font-size:14px;font-weight:300;line-height:20px;white-space:pre-wrap;color:rgb(0, 0, 0);margin:0px 0px 12px;margin-bottom:12px;margin-top:0px;margin-left:0px;margin-right:0px;padding:0px;padding-bottom:0px;padding-top:0px;padding-left:0px;padding-right:0px;box-sizing:border-box" class="detail-desc-decorate-content">1.This controller will not be available if a wall switch with RF function is installed at home. Otherwise the function will be affected. Just need to buy a separate wireless switch<br/><br/>2. Do not operate with power. Turn off the power supply and operate it. If the test is confirmed to be correct, use it under the guidance of a professional electrician.<br/><br/>3. When the voltage of the remote control is insufficient, please change the battery in time (the remote control distance becomes closer when the remote control battery voltage is insufficient).<br/><br/>4. When using wireless electronic products, care should be taken to avoid metal masks, large electronic devices, electromagnetic fields, etc., which have strong interference sources, to avoid remote control and short receiving distance or to work normally.<br/><br/>5. Do not use this electronic product abnormally. Abnormal use will reduce product performance and longevity. In severe cases, damage to the product will also pose a safety hazard.</p></div><div> </div></div></div></div><p><br/></p>
Related Product
Browse The Collection of Top Products.