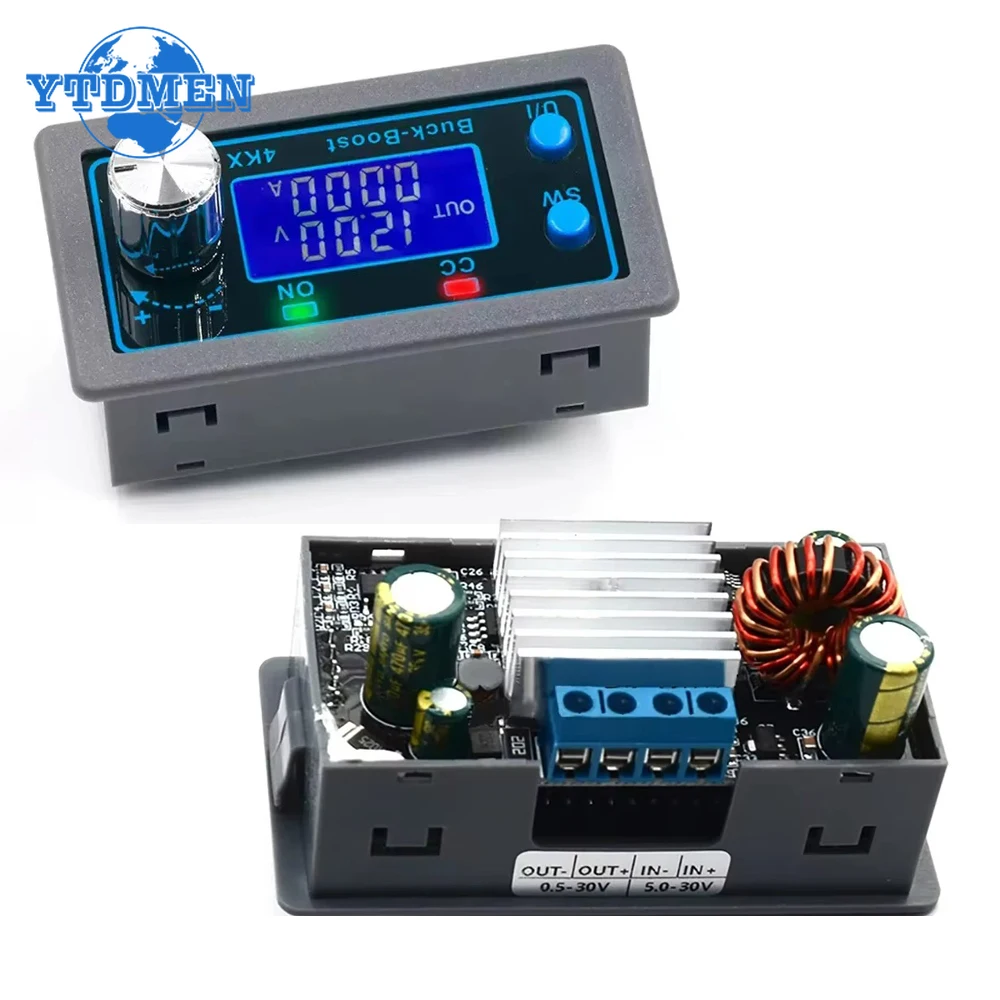
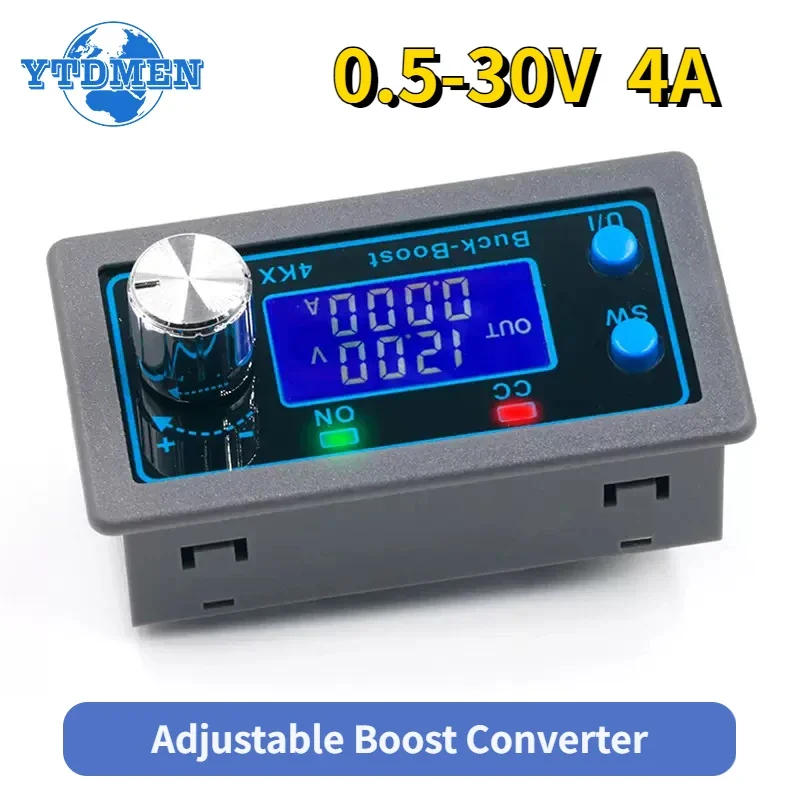
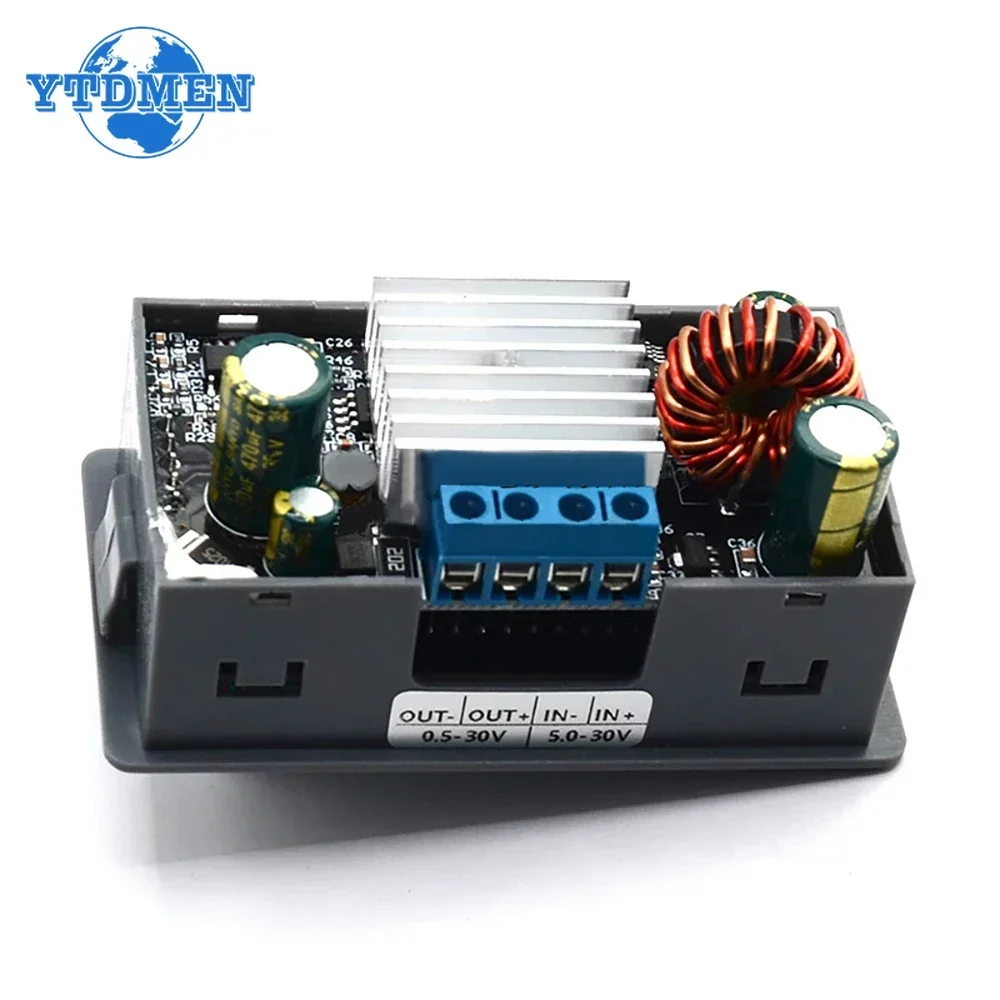
ZK-4KX DC-DC Buck Boost Converter CC CV 0.5-30V 4A Power Module Adjustable Regulated
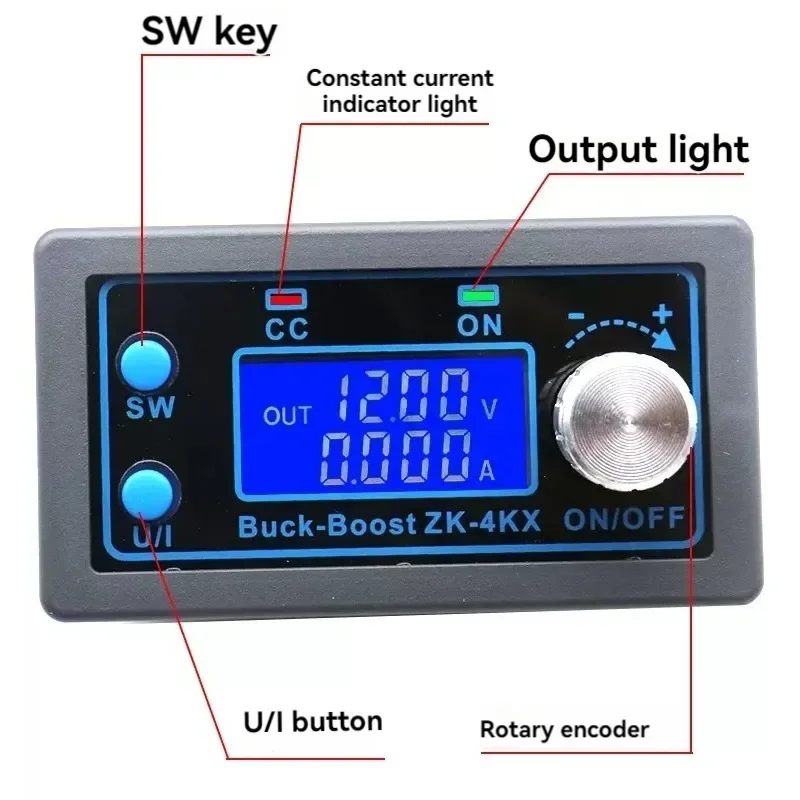
<div class="detailmodule_html"><div class="detail-desc-decorate-richtext"><div><span style="font-size:22px"><span style="font-family:Arial, Helvetica, sans-serif"><strong><br/>Product details:</strong></span></span><span style="font-size:18px"><span style="font-family:Arial, Helvetica, sans-serif"><br/>1. LCD can display input/output voltage/temperature, output current/output power/output capacity/output time;<br/>2. Numerical control adjustment, precise and fast, can increase or decrease voltage, output voltage can be adjusted freely from 0.5-30V (ZK-4KX) , limiting current adjustment from 0-4A (ZK-4KX) .<br/>3. Input terminal anti reverse protection, reverse connection will not burn out;<br/>4. The output terminal is anti backflow, so there is no need to add an anti backflow diode when charging the battery;<br/>5. The module can be set to default on/off;<br/>6. It has multiple software protection mechanisms and adjustable protection thresholds. After the working parameters of the module exceed the protection threshold, the output will be automatically turned off.<br/>7. Small output ripple, with π - type filtering;<br/>8. Thicken the heat sink;</span></span><br/><br/><span style="font-size:22px"><span style="font-family:Arial, Helvetica, sans-serif"><strong><br/>[Product Parameters]</strong></span></span><span style="font-size:18px"><span style="font-family:Arial, Helvetica, sans-serif"><br/>Input voltage: 5.0-30V (ZK-4KX)<br/>Output voltage: 0.5-30V (ZK-4KX)<br/>Output current: enhanced heat dissipation 4A (ZK-4KX)<br/>Output power: enhanced heat dissipation 50W (ZK-4KX)<br/>Voltage display resolution: 0.01V<br/>Current display resolution: 0.001A<br/>Conversion efficiency: around 88%<br/>Soft start: Yes (there is a possibility of failure when starting modules with high power and load)<br/><br/>Protection mechanism: Input anti reverse connection; Output anti backflow;<br/>Input undervoltage protection:<br/>ZK-4KX (4.8-30V adjustable, default 4.8V)<br/>Output overvoltage protection:<br/>ZK-4KX (0.5-31V adjustable, default 31V)<br/>Output overcurrent protection:<br/>ZK-4KX (0-4.1A adjustable, default 4.1A)</span></span><br/><br/><span style="font-size:22px"><span style="font-family:Arial, Helvetica, sans-serif"><strong>Output over power protection:</strong></span></span><span style="font-size:18px"><span style="font-family:Arial, Helvetica, sans-serif"><br/> ZK-4KX (adjustable from 0-50W, default 50W)<br/>Over temperature protection (adjustable from 80-110 ℃, default 110C)<br/>Timeout protection (adjustable from 0-100 hours, default off)<br/>Overcapacity protection (0-60Ah adjustable, default off)<br/>Working frequency: 180KHZ (ZK-4KX)<br/>Dimensions: Length * Width 79mm * 43mm</span></span><br/><span style="font-size:22px"><span style="font-family:Arial, Helvetica, sans-serif"><strong><br/>[Instructions for Use]</strong></span></span><span style="font-size:18px"><span style="font-family:Arial, Helvetica, sans-serif"><br/>5.1. Switching Display Parameters - In the normal interface, short press SW to switch the display of the downward direction on the screen, and switch the display content between current A, power W, capacity Ah, and time h. Long press the SW button to switch the up display on the screen, and switch the display content between input voltage IN and output voltage OUT.<br/><br/>5.2. Set output voltage value - Short press the U/button on the normal interface to enter the set voltage constant current interface. You can see that a certain digit of the output voltage value is flashing. Rotate the rotary encoder left and right to adjust the amplitude.<br/>Short press the rotary encoder to select which output voltage to set.<br/>After setting up, press the U/button twice to return to the normal interface.<br/>Or stop operating for 10 seconds and automatically return to the normal interface.<br/><br/>5.3. Set constant current value (i.e. the maximum current value allowed by the module to output) - Short press the U/button on the normal interface to enter the voltage constant current setting interface. Short press the U/button again to switch to setting the constant current value. You can see that one of the settings for the constant current value is flashing. Rotate the rotary encoder left and right to adjust the size. Short press the rotary encoder to select which constant current value to set. After setting, press the U/button briefly to exit the voltage constant current setting interface and return to the normal interface. Or stop operating for 10 seconds and automatically return to the normal interface.<br/><br/>5.4. Set the default power on/off status of the module - Long press the U/button on the normal interface to enter the parameters<br/>Settings interface. You can see that it displays OPENOFF or OPENON OPENOFF stands for default off when powered on<br/>Closed output, OPEN ON means that the output is turned on by default when powered on. Long press the rotary encoder to switch between two states<br/>After setting up, long press the U/I button to return to the normal interface.<br/><br/>5.5. Set protection parameter on status and value - Long press the U/button on the normal interface to enter parameter settings<br/>Interface. Short press the SW button until the desired protection parameter appears.<br/>LUP - undervoltage protection threshold; OUP - overvoltage protection threshold: OCP - overcurrent protection threshold; OPP - Overpower protection threshold; OAP - Excess Capacity Protection Threshold;<br/>OHP timeout protection threshold; OTP - Over temperature protection reading value;<br/>Short press the rotary encoder to select which protection parameter you want to set. Long press the rotary encoder to set whether the protection parameters are turned on or off (only timeout protection and overload protection can be set on/off, other protection parameters are turned on by default). Rotating the encoder left and right can make the parameters larger and smaller. After setting up, long press the U/button to return to the normal interface.<br/><br/>5.6. Calibrate voltage and current - Long press the U/1 button on the normal interface to enter the parameter setting interface. Short press the SW key until a parameter interface with CAL appears. The interface with CAL+IN+V symbol is the calibration input voltage interface; The interface with CAL+OUT+V symbol is the calibration output voltage interface; The interface with CAL+OUT+A symbol is the calibration output current interface. The left and right rotary encoders can adjust the parameter size. Adjustment completed, long press the rotary encoder to confirm the adjustment is complete. At this time, the parameter value is not flashing. Long press the U/button to return to the normal interface.</span></span><br/><br/><span style="font-size:22px"><span style="font-family:Arial, Helvetica, sans-serif"><strong>【 Precautions 】</strong></span></span><span style="font-size:18px"><span style="font-family:Arial, Helvetica, sans-serif"><br/>▲ The input IN of the module is prohibited from short circuiting with the output OUT, otherwise the constant current function will fail.<br/>Please ensure that the power of the power supply is always greater than the required power of the output load!<br/>If the module wants to output at full load, the input voltage should be above 8V. The maximum current value of the ZK-4KX module is 4A, provided that it is limited by the maximum output power, such as outputting 17V, and the current should not exceed 2A.<br/>The module has input undervoltage protection function, ZK-4KX default at around 4.8V (both can be set). When the value is lower than this, the output will automatically disconnect (note that the voltage at the module port is lower than the undervoltage protection threshold. When the input current is relatively high, do not ignore the voltage division on the input wire).<br/><br/></span></span><span style="font-size:18px"><span style="font-family:Arial, Helvetica, sans-serif"> </span></span><br/></div><p style="margin:0px;margin-bottom:0px;margin-top:0px;margin-left:0px;margin-right:0px;display:block;width:100%"></p></div></div><br/>
$48.335
$25.175
- Category : Electronic Components & Supplies
- Brand : shop1104159084_store Shop1104159084 Store
Colors
Sizes
-
+
<div class="detailmodule_html"><div class="detail-desc-decorate-richtext"><div><span style="font-size:22px"><span style="font-family:Arial, Helvetica, sans-serif"><strong><br/>Product details:</strong></span></span><span style="font-size:18px"><span style="font-family:Arial, Helvetica, sans-serif"><br/>1. LCD can display input/output voltage/temperature, output current/output power/output capacity/output time;<br/>2. Numerical control adjustment, precise and fast, can increase or decrease voltage, output voltage can be adjusted freely from 0.5-30V (ZK-4KX) , limiting current adjustment from 0-4A (ZK-4KX) .<br/>3. Input terminal anti reverse protection, reverse connection will not burn out;<br/>4. The output terminal is anti backflow, so there is no need to add an anti backflow diode when charging the battery;<br/>5. The module can be set to default on/off;<br/>6. It has multiple software protection mechanisms and adjustable protection thresholds. After the working parameters of the module exceed the protection threshold, the output will be automatically turned off.<br/>7. Small output ripple, with π - type filtering;<br/>8. Thicken the heat sink;</span></span><br/><br/><span style="font-size:22px"><span style="font-family:Arial, Helvetica, sans-serif"><strong><br/>[Product Parameters]</strong></span></span><span style="font-size:18px"><span style="font-family:Arial, Helvetica, sans-serif"><br/>Input voltage: 5.0-30V (ZK-4KX)<br/>Output voltage: 0.5-30V (ZK-4KX)<br/>Output current: enhanced heat dissipation 4A (ZK-4KX)<br/>Output power: enhanced heat dissipation 50W (ZK-4KX)<br/>Voltage display resolution: 0.01V<br/>Current display resolution: 0.001A<br/>Conversion efficiency: around 88%<br/>Soft start: Yes (there is a possibility of failure when starting modules with high power and load)<br/><br/>Protection mechanism: Input anti reverse connection; Output anti backflow;<br/>Input undervoltage protection:<br/>ZK-4KX (4.8-30V adjustable, default 4.8V)<br/>Output overvoltage protection:<br/>ZK-4KX (0.5-31V adjustable, default 31V)<br/>Output overcurrent protection:<br/>ZK-4KX (0-4.1A adjustable, default 4.1A)</span></span><br/><br/><span style="font-size:22px"><span style="font-family:Arial, Helvetica, sans-serif"><strong>Output over power protection:</strong></span></span><span style="font-size:18px"><span style="font-family:Arial, Helvetica, sans-serif"><br/> ZK-4KX (adjustable from 0-50W, default 50W)<br/>Over temperature protection (adjustable from 80-110 ℃, default 110C)<br/>Timeout protection (adjustable from 0-100 hours, default off)<br/>Overcapacity protection (0-60Ah adjustable, default off)<br/>Working frequency: 180KHZ (ZK-4KX)<br/>Dimensions: Length * Width 79mm * 43mm</span></span><br/><span style="font-size:22px"><span style="font-family:Arial, Helvetica, sans-serif"><strong><br/>[Instructions for Use]</strong></span></span><span style="font-size:18px"><span style="font-family:Arial, Helvetica, sans-serif"><br/>5.1. Switching Display Parameters - In the normal interface, short press SW to switch the display of the downward direction on the screen, and switch the display content between current A, power W, capacity Ah, and time h. Long press the SW button to switch the up display on the screen, and switch the display content between input voltage IN and output voltage OUT.<br/><br/>5.2. Set output voltage value - Short press the U/button on the normal interface to enter the set voltage constant current interface. You can see that a certain digit of the output voltage value is flashing. Rotate the rotary encoder left and right to adjust the amplitude.<br/>Short press the rotary encoder to select which output voltage to set.<br/>After setting up, press the U/button twice to return to the normal interface.<br/>Or stop operating for 10 seconds and automatically return to the normal interface.<br/><br/>5.3. Set constant current value (i.e. the maximum current value allowed by the module to output) - Short press the U/button on the normal interface to enter the voltage constant current setting interface. Short press the U/button again to switch to setting the constant current value. You can see that one of the settings for the constant current value is flashing. Rotate the rotary encoder left and right to adjust the size. Short press the rotary encoder to select which constant current value to set. After setting, press the U/button briefly to exit the voltage constant current setting interface and return to the normal interface. Or stop operating for 10 seconds and automatically return to the normal interface.<br/><br/>5.4. Set the default power on/off status of the module - Long press the U/button on the normal interface to enter the parameters<br/>Settings interface. You can see that it displays OPENOFF or OPENON OPENOFF stands for default off when powered on<br/>Closed output, OPEN ON means that the output is turned on by default when powered on. Long press the rotary encoder to switch between two states<br/>After setting up, long press the U/I button to return to the normal interface.<br/><br/>5.5. Set protection parameter on status and value - Long press the U/button on the normal interface to enter parameter settings<br/>Interface. Short press the SW button until the desired protection parameter appears.<br/>LUP - undervoltage protection threshold; OUP - overvoltage protection threshold: OCP - overcurrent protection threshold; OPP - Overpower protection threshold; OAP - Excess Capacity Protection Threshold;<br/>OHP timeout protection threshold; OTP - Over temperature protection reading value;<br/>Short press the rotary encoder to select which protection parameter you want to set. Long press the rotary encoder to set whether the protection parameters are turned on or off (only timeout protection and overload protection can be set on/off, other protection parameters are turned on by default). Rotating the encoder left and right can make the parameters larger and smaller. After setting up, long press the U/button to return to the normal interface.<br/><br/>5.6. Calibrate voltage and current - Long press the U/1 button on the normal interface to enter the parameter setting interface. Short press the SW key until a parameter interface with CAL appears. The interface with CAL+IN+V symbol is the calibration input voltage interface; The interface with CAL+OUT+V symbol is the calibration output voltage interface; The interface with CAL+OUT+A symbol is the calibration output current interface. The left and right rotary encoders can adjust the parameter size. Adjustment completed, long press the rotary encoder to confirm the adjustment is complete. At this time, the parameter value is not flashing. Long press the U/button to return to the normal interface.</span></span><br/><br/><span style="font-size:22px"><span style="font-family:Arial, Helvetica, sans-serif"><strong>【 Precautions 】</strong></span></span><span style="font-size:18px"><span style="font-family:Arial, Helvetica, sans-serif"><br/>▲ The input IN of the module is prohibited from short circuiting with the output OUT, otherwise the constant current function will fail.<br/>Please ensure that the power of the power supply is always greater than the required power of the output load!<br/>If the module wants to output at full load, the input voltage should be above 8V. The maximum current value of the ZK-4KX module is 4A, provided that it is limited by the maximum output power, such as outputting 17V, and the current should not exceed 2A.<br/>The module has input undervoltage protection function, ZK-4KX default at around 4.8V (both can be set). When the value is lower than this, the output will automatically disconnect (note that the voltage at the module port is lower than the undervoltage protection threshold. When the input current is relatively high, do not ignore the voltage division on the input wire).<br/><br/></span></span><span style="font-size:18px"><span style="font-family:Arial, Helvetica, sans-serif"> </span></span><br/></div><p style="margin:0px;margin-bottom:0px;margin-top:0px;margin-left:0px;margin-right:0px;display:block;width:100%"></p></div></div><br/>
Related Product
Browse The Collection of Top Products.